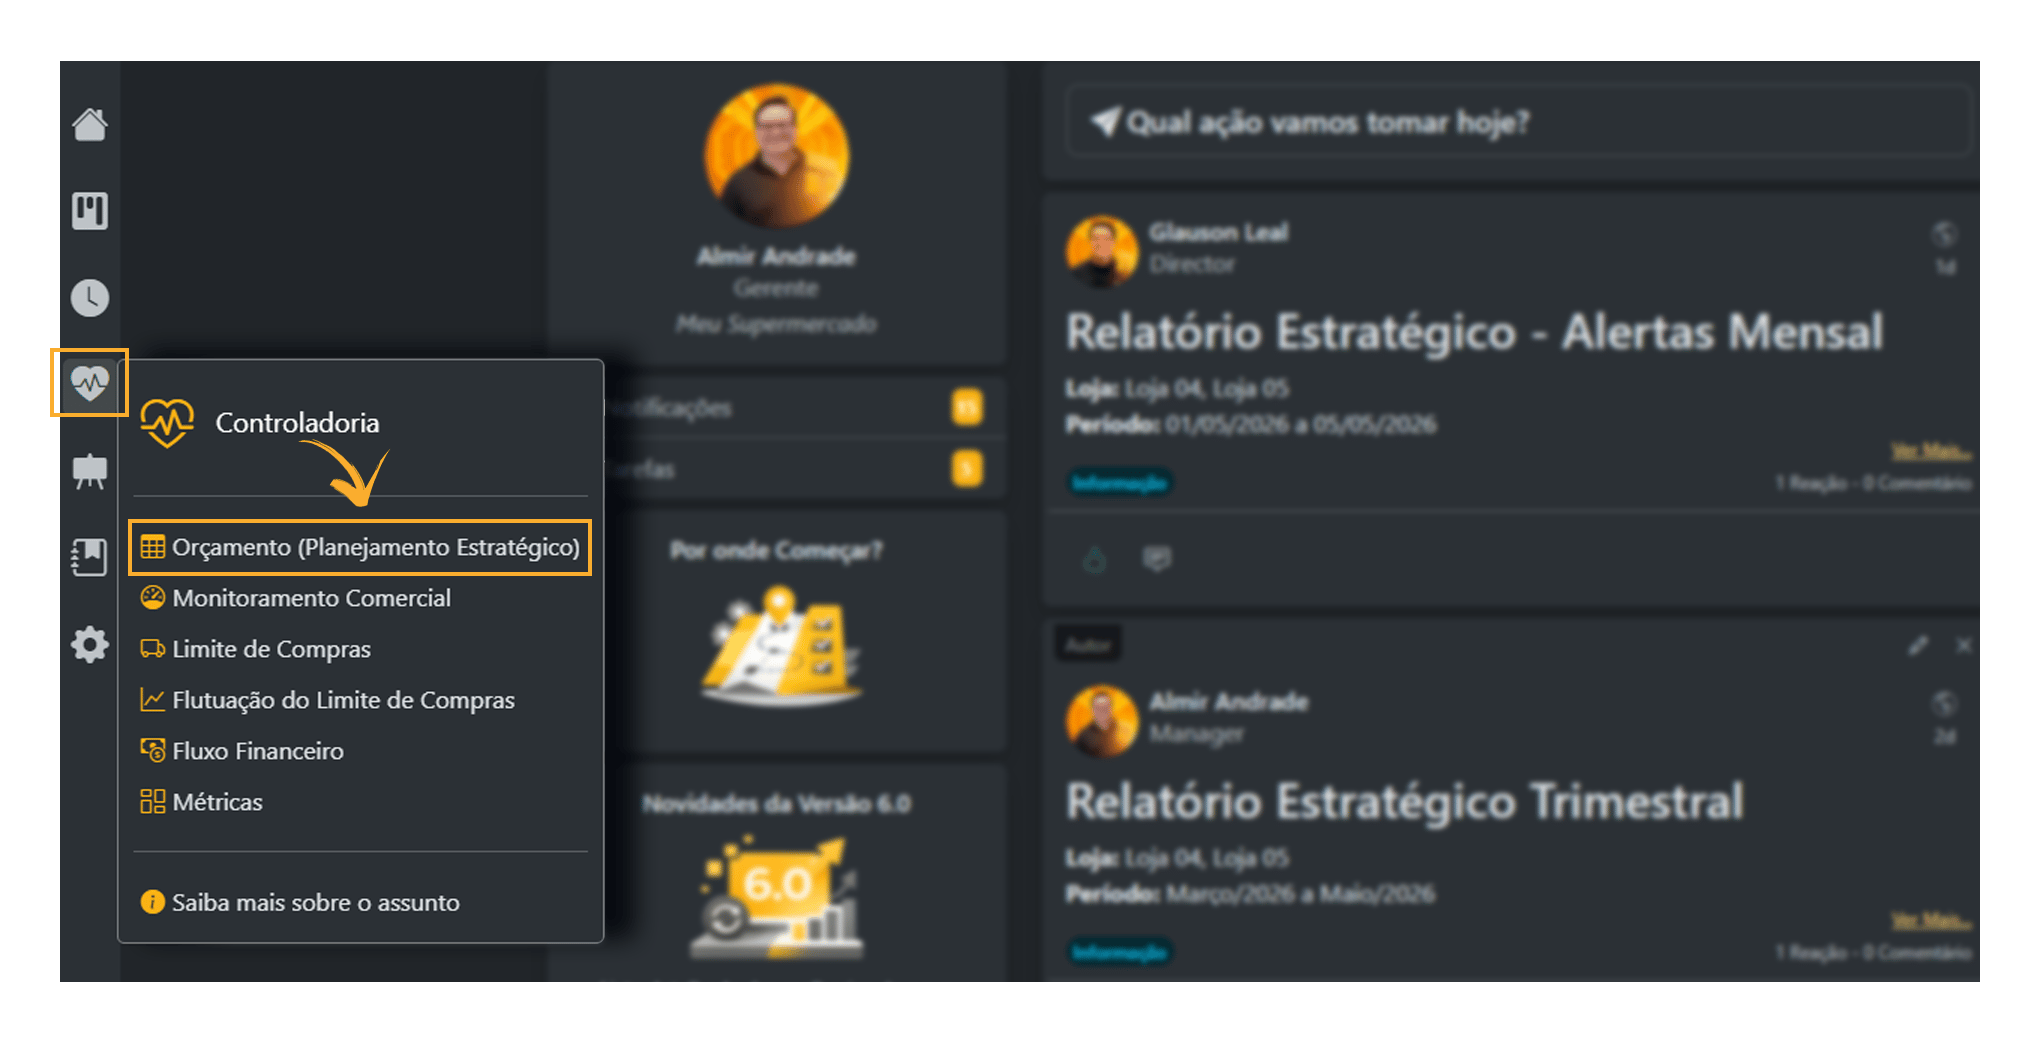
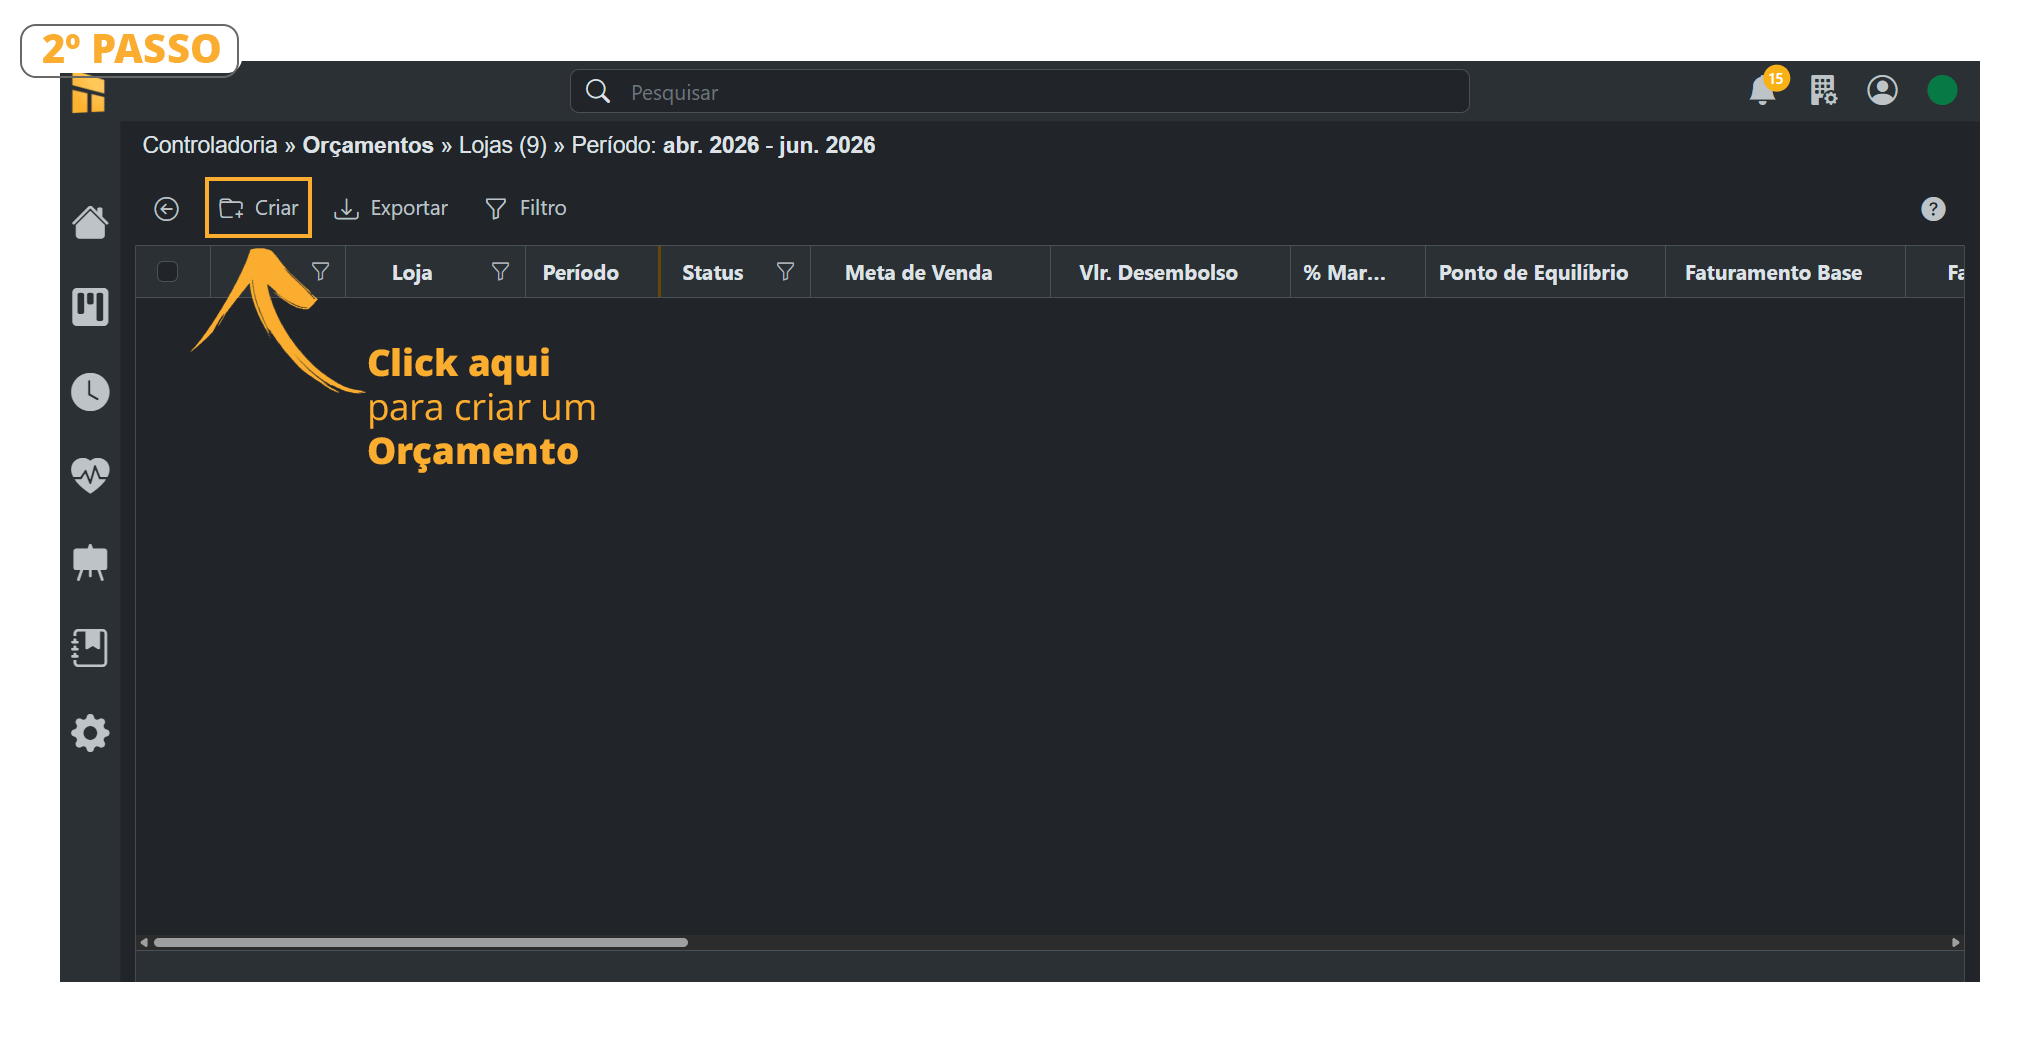
 2. Click the “**Create Budget**” button
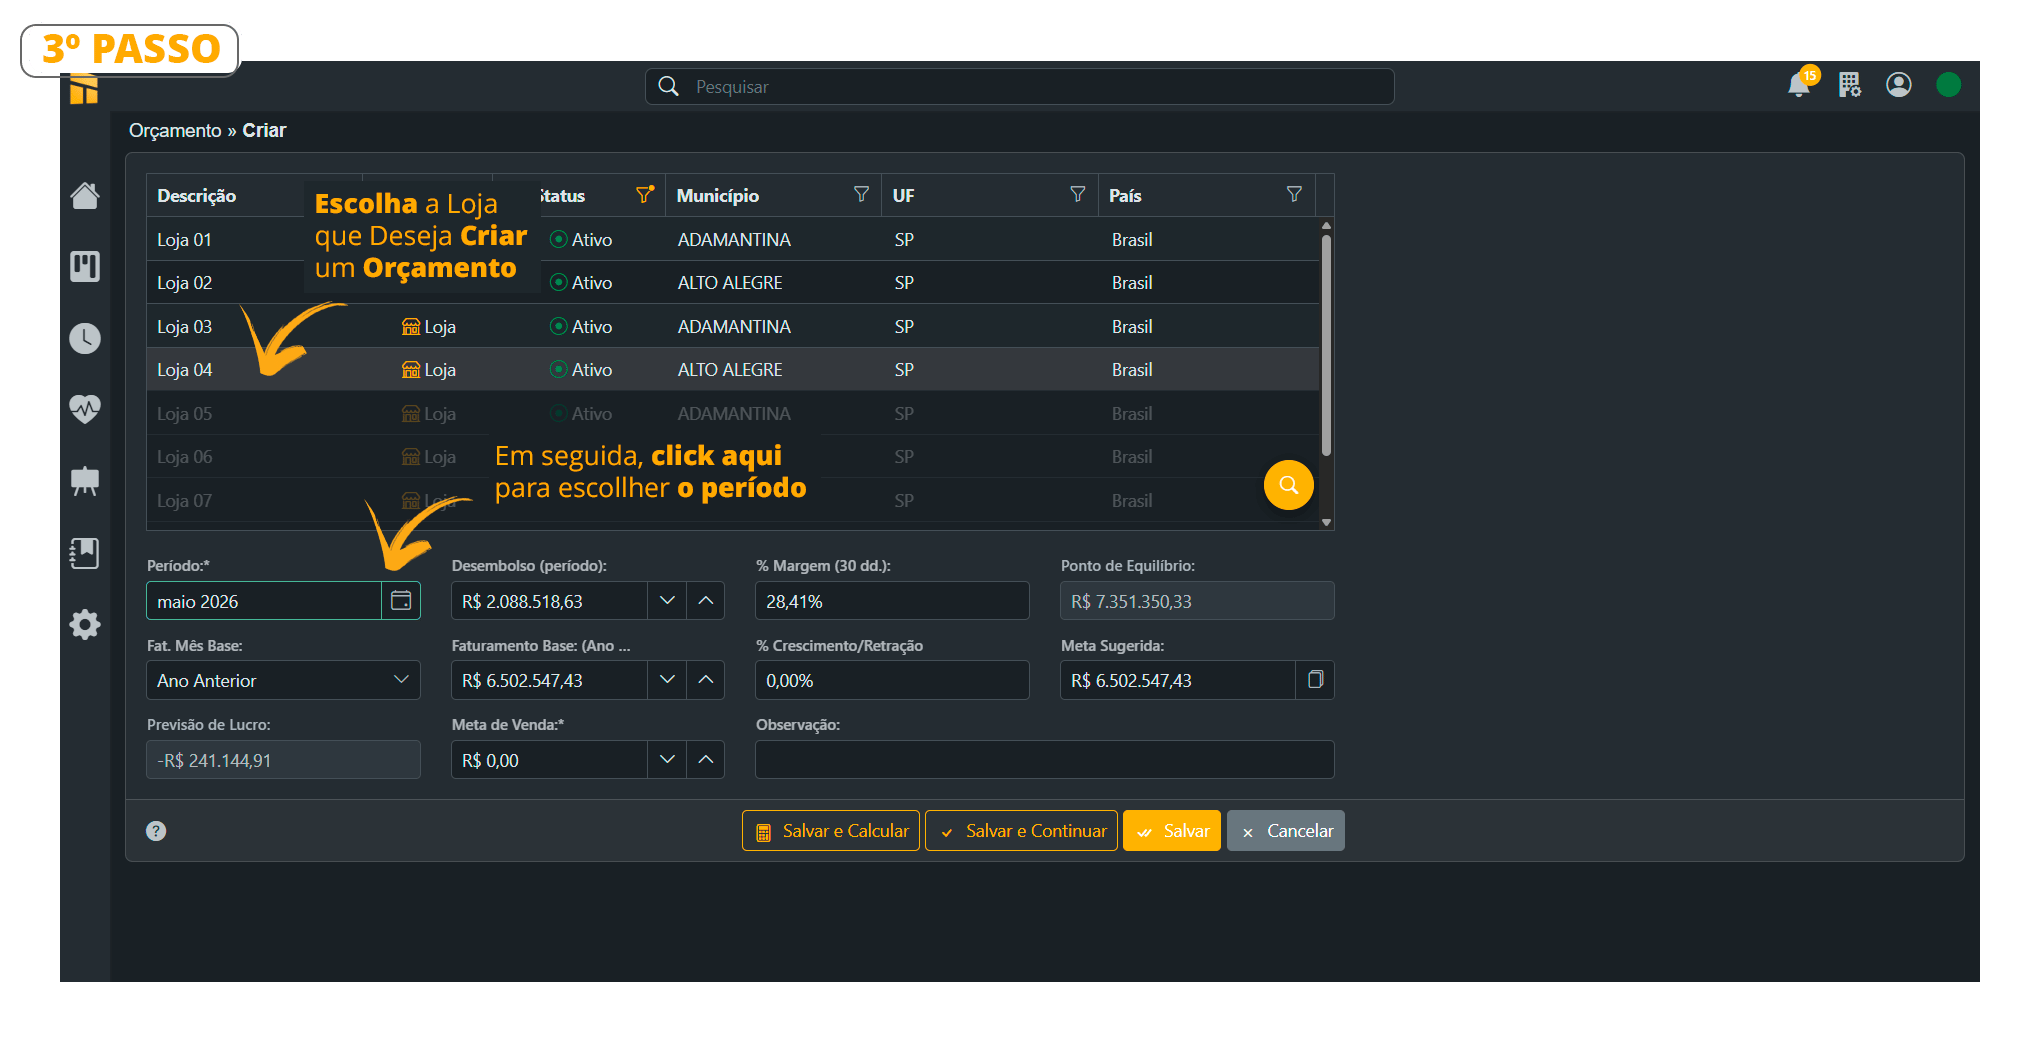
 3. Select the Store for which you want to create the “Budget,” as shown in the image below, and then set the period.
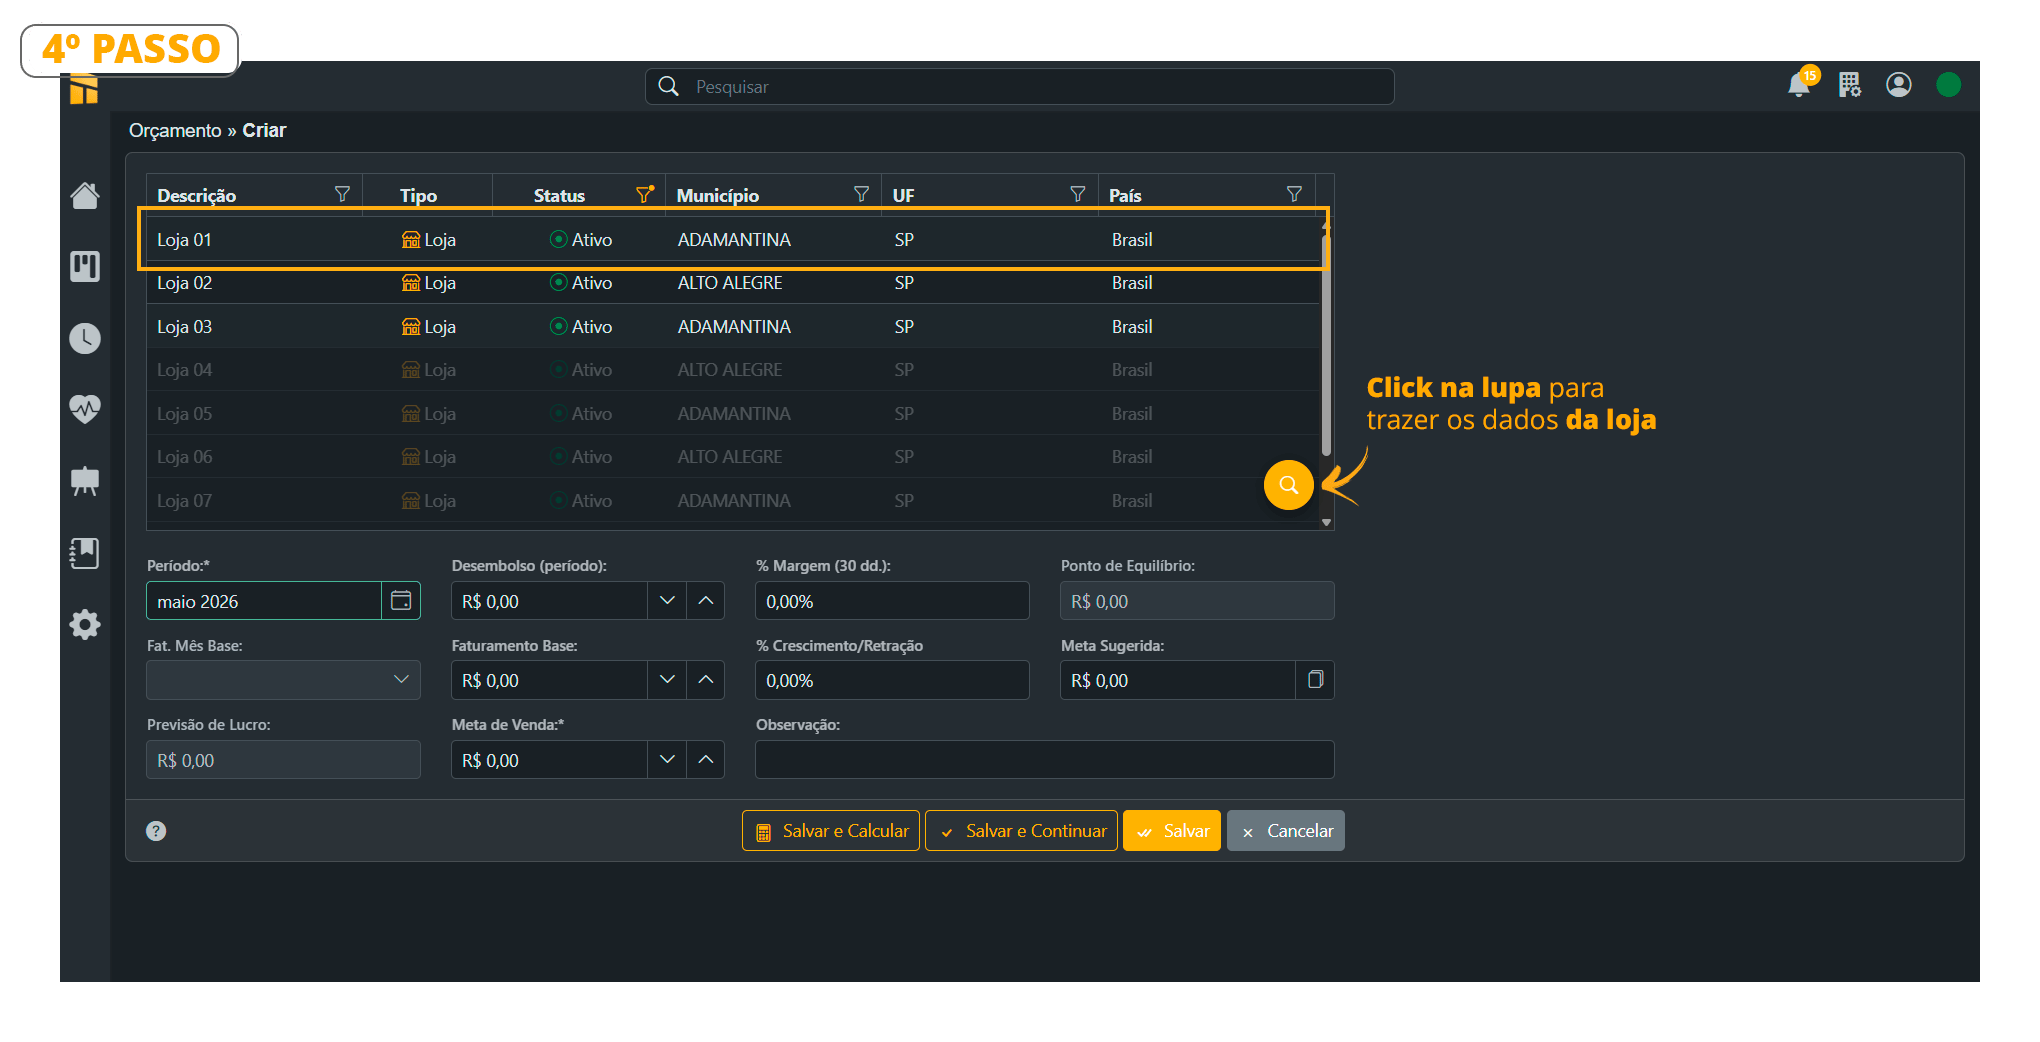
 4. Next, click the “Magnifying Glass,” as shown in the image below. When you click it, the calculated data will appear automatically.
 5. Carefully review each field described in the image below;
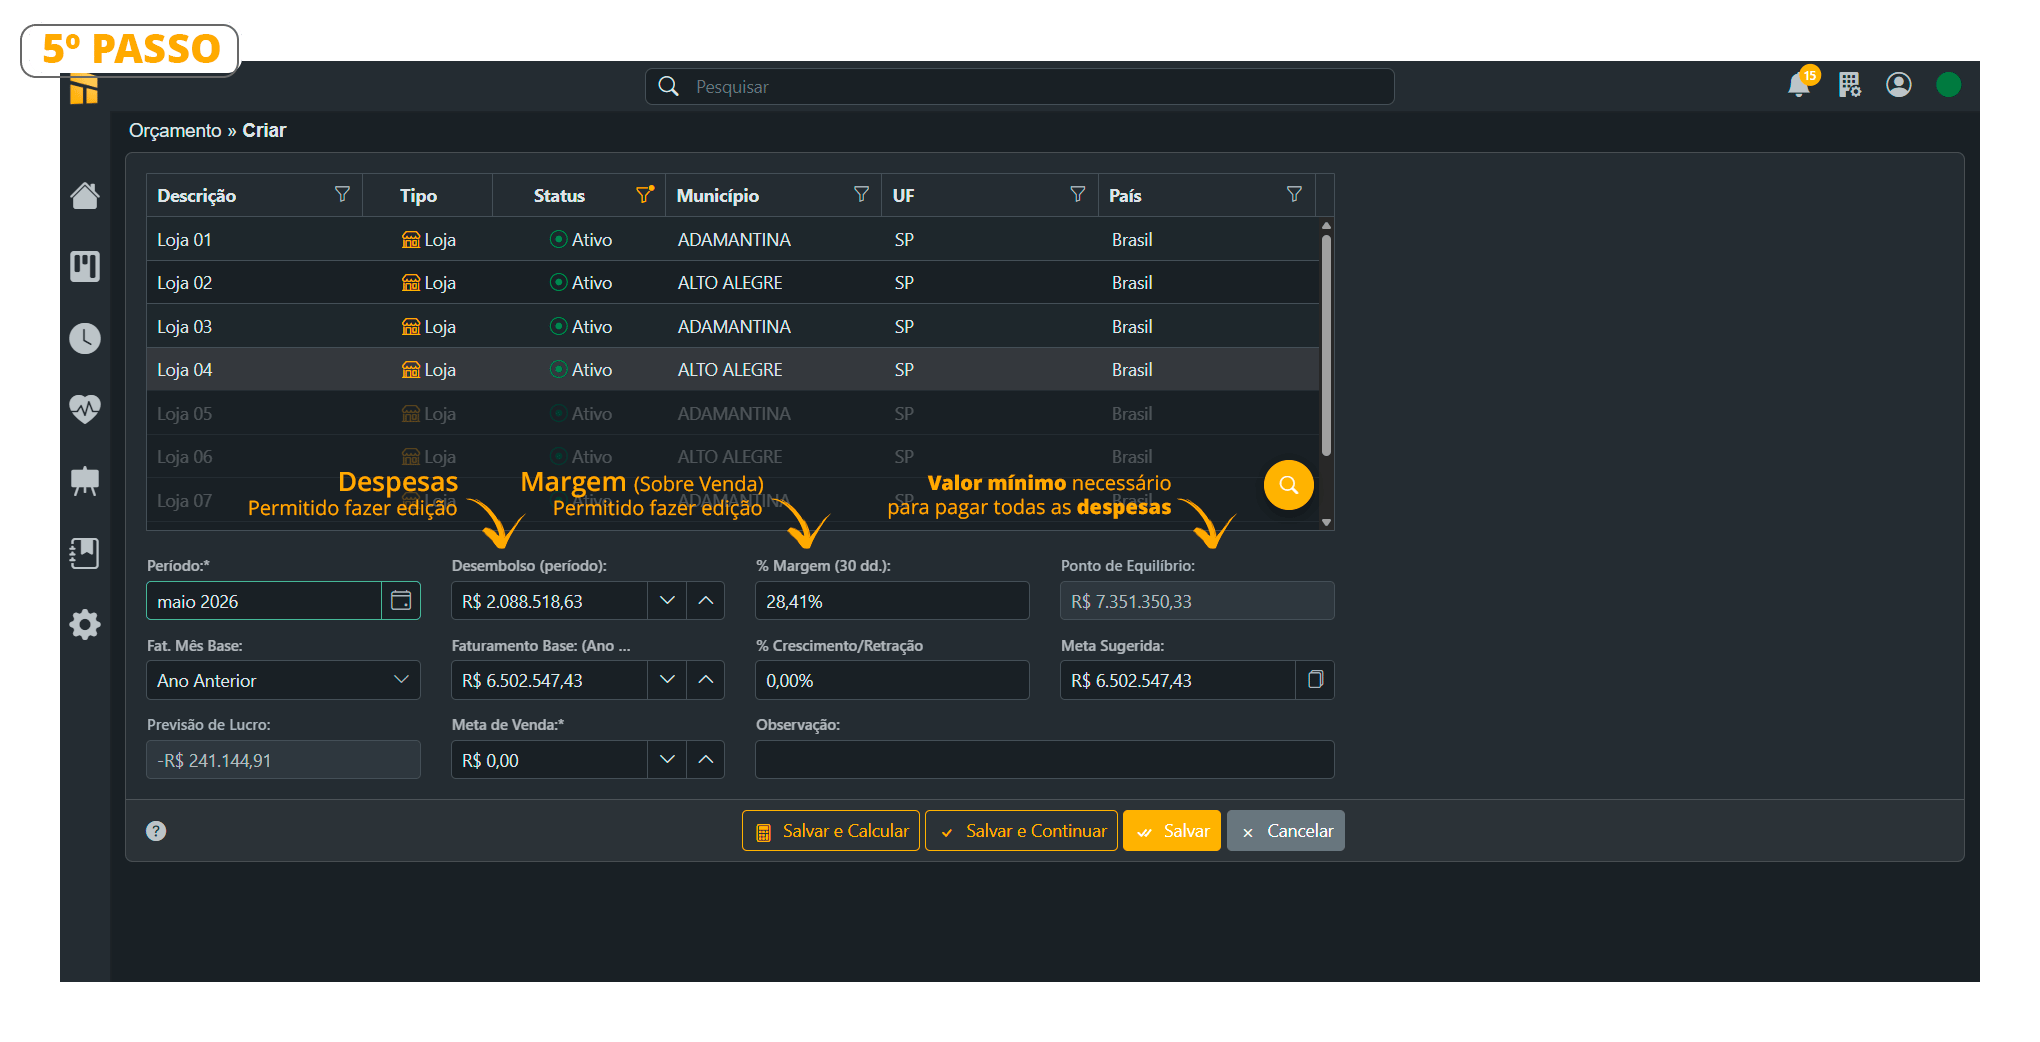 6. As shown in the image below, enter a value for the **growth rate** in this field. Notice that when you enter the rate, a value will **automatically be calculated** in the **“Suggested Target”** field. In our example, we used a **10% rate**. See the result
**The Previous Period used in the budget calculation contains the same number of days as the period selected for the calculation.**
Period 07/2026
The month has 31 days PeriodStart = 22/06/2026 PeriodEnd = 22/07/2026
### Result: for the date **23/07/2026**
6. As shown in the image below, enter a value for the **growth rate** in this field. Notice that when you enter the rate, a value will **automatically be calculated** in the **“Suggested Target”** field. In our example, we used a **10% rate**. See the result
**The Previous Period used in the budget calculation contains the same number of days as the period selected for the calculation.**
Period 07/2026
The month has 31 days PeriodStart = 22/06/2026 PeriodEnd = 22/07/2026
### Result: for the date **23/07/2026**
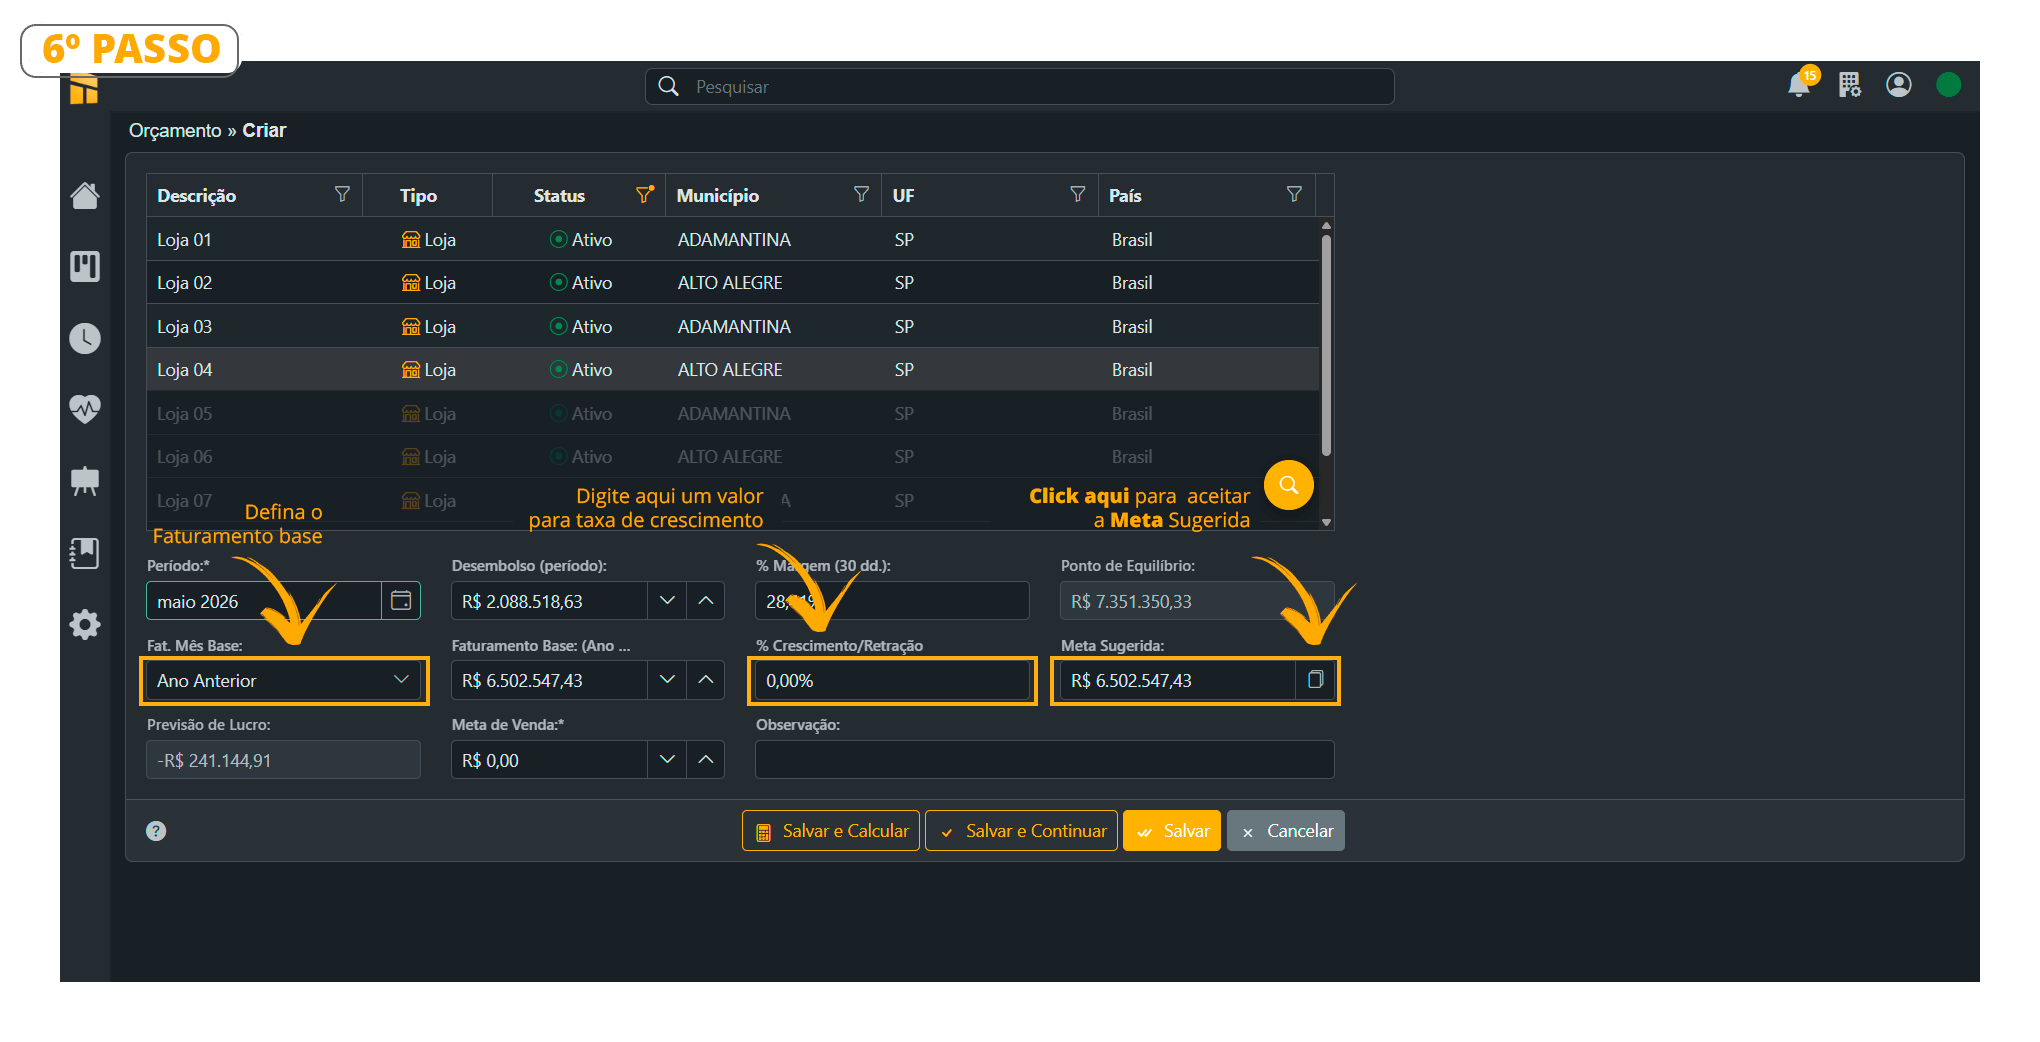 7. When you click the button shown in the image above, it copies the values from the “Suggested Target” and automatically pastes them into the “Sales Target” field. You can also adjust the values manually if necessary;
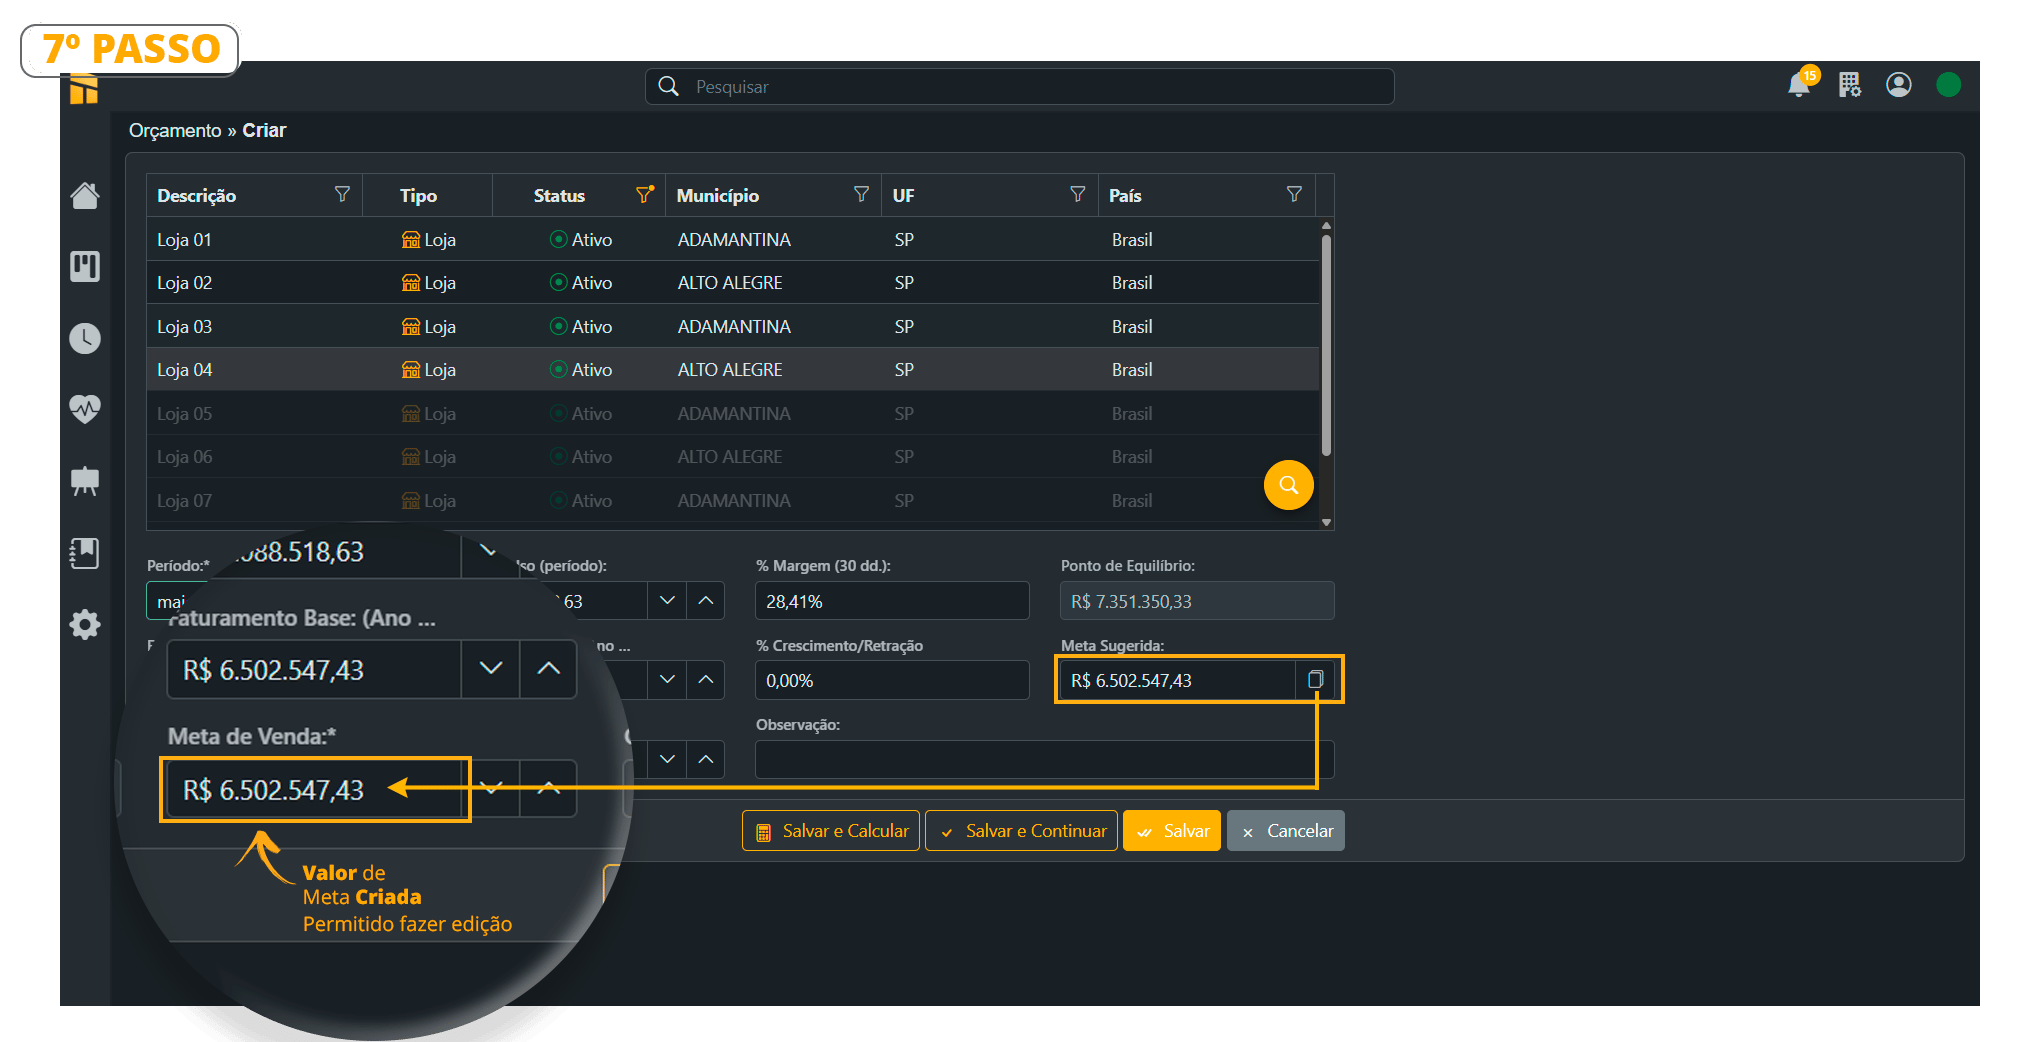 – See the created “**Sales Target**” value in the image below.
The **\[Save and Calculate]** button takes you directly to step 11, while **\[Save and Continue]** saves the budget and keeps you in the same window to create a new budget.
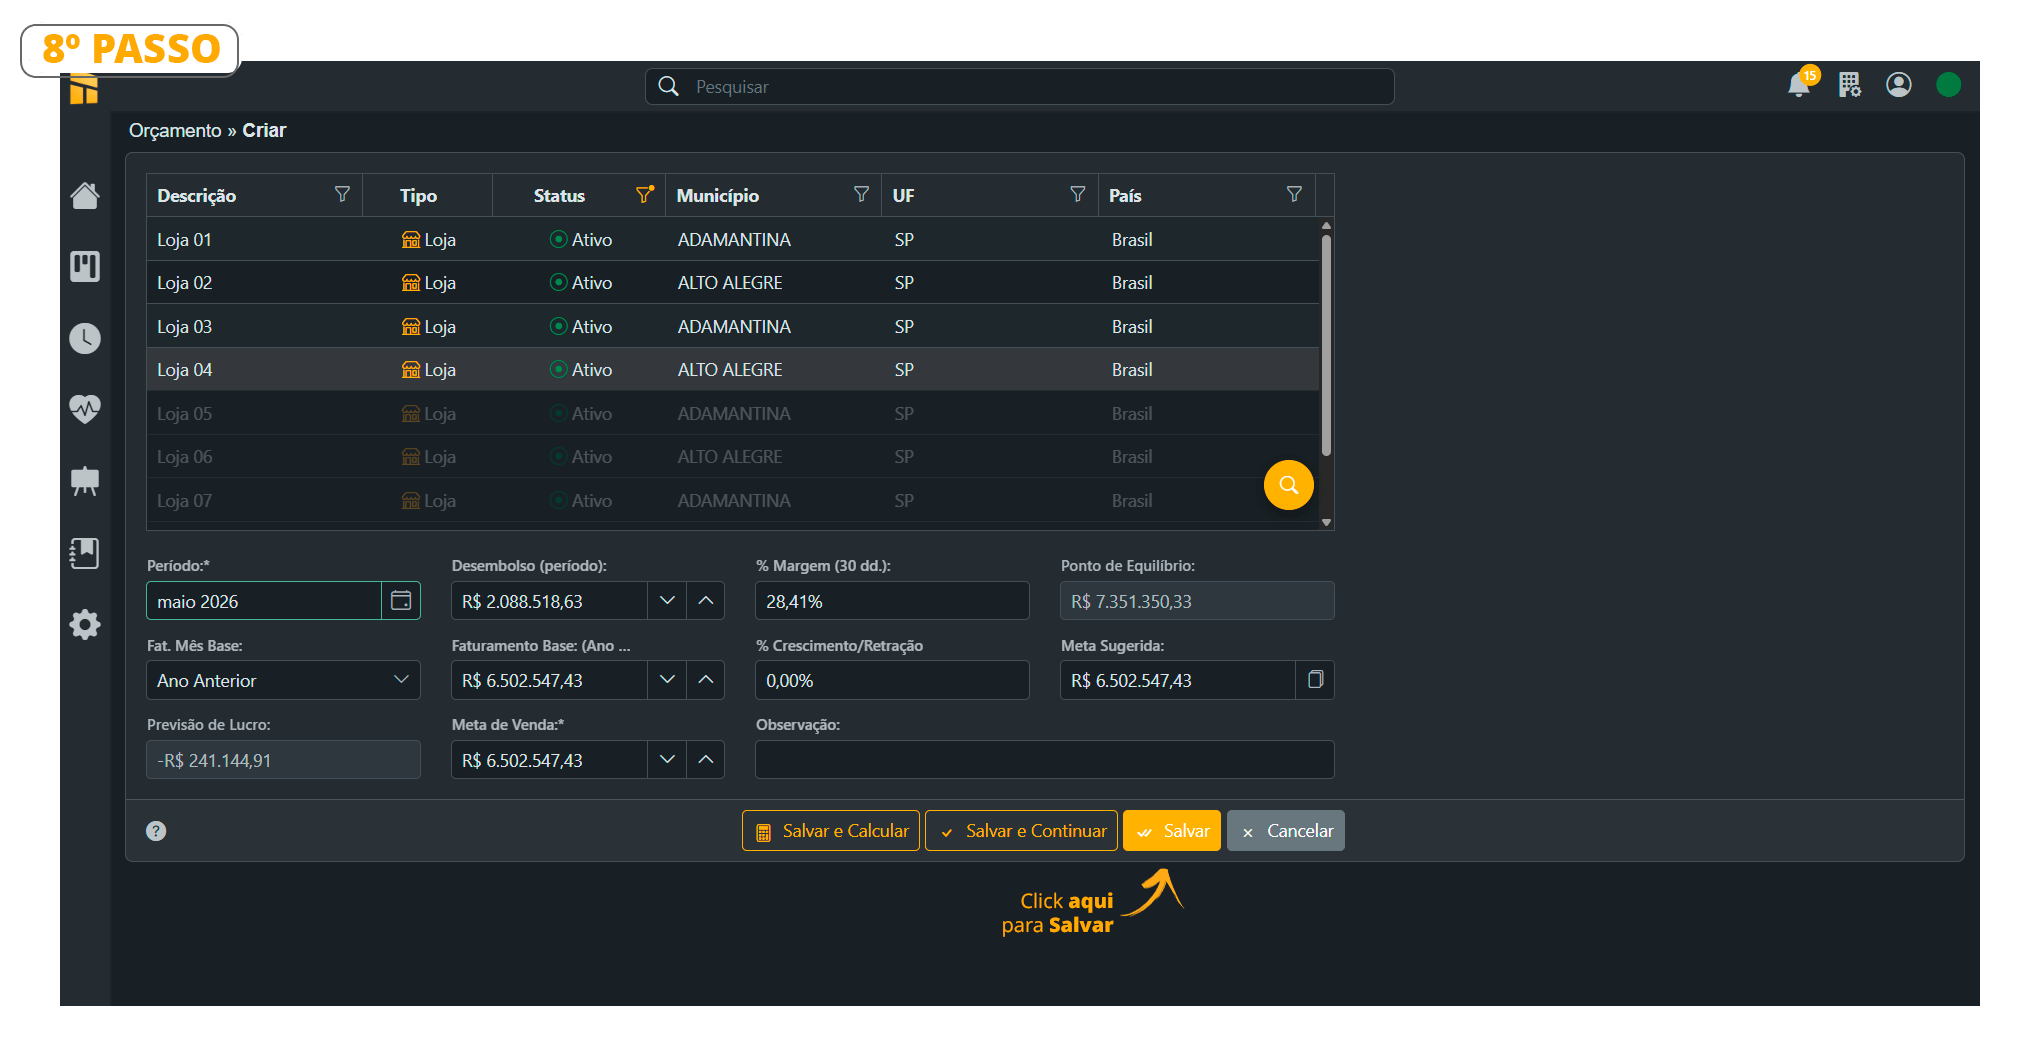 9. Notice that the budget was successfully \[Created]. Follow the next step to calculate the plan.
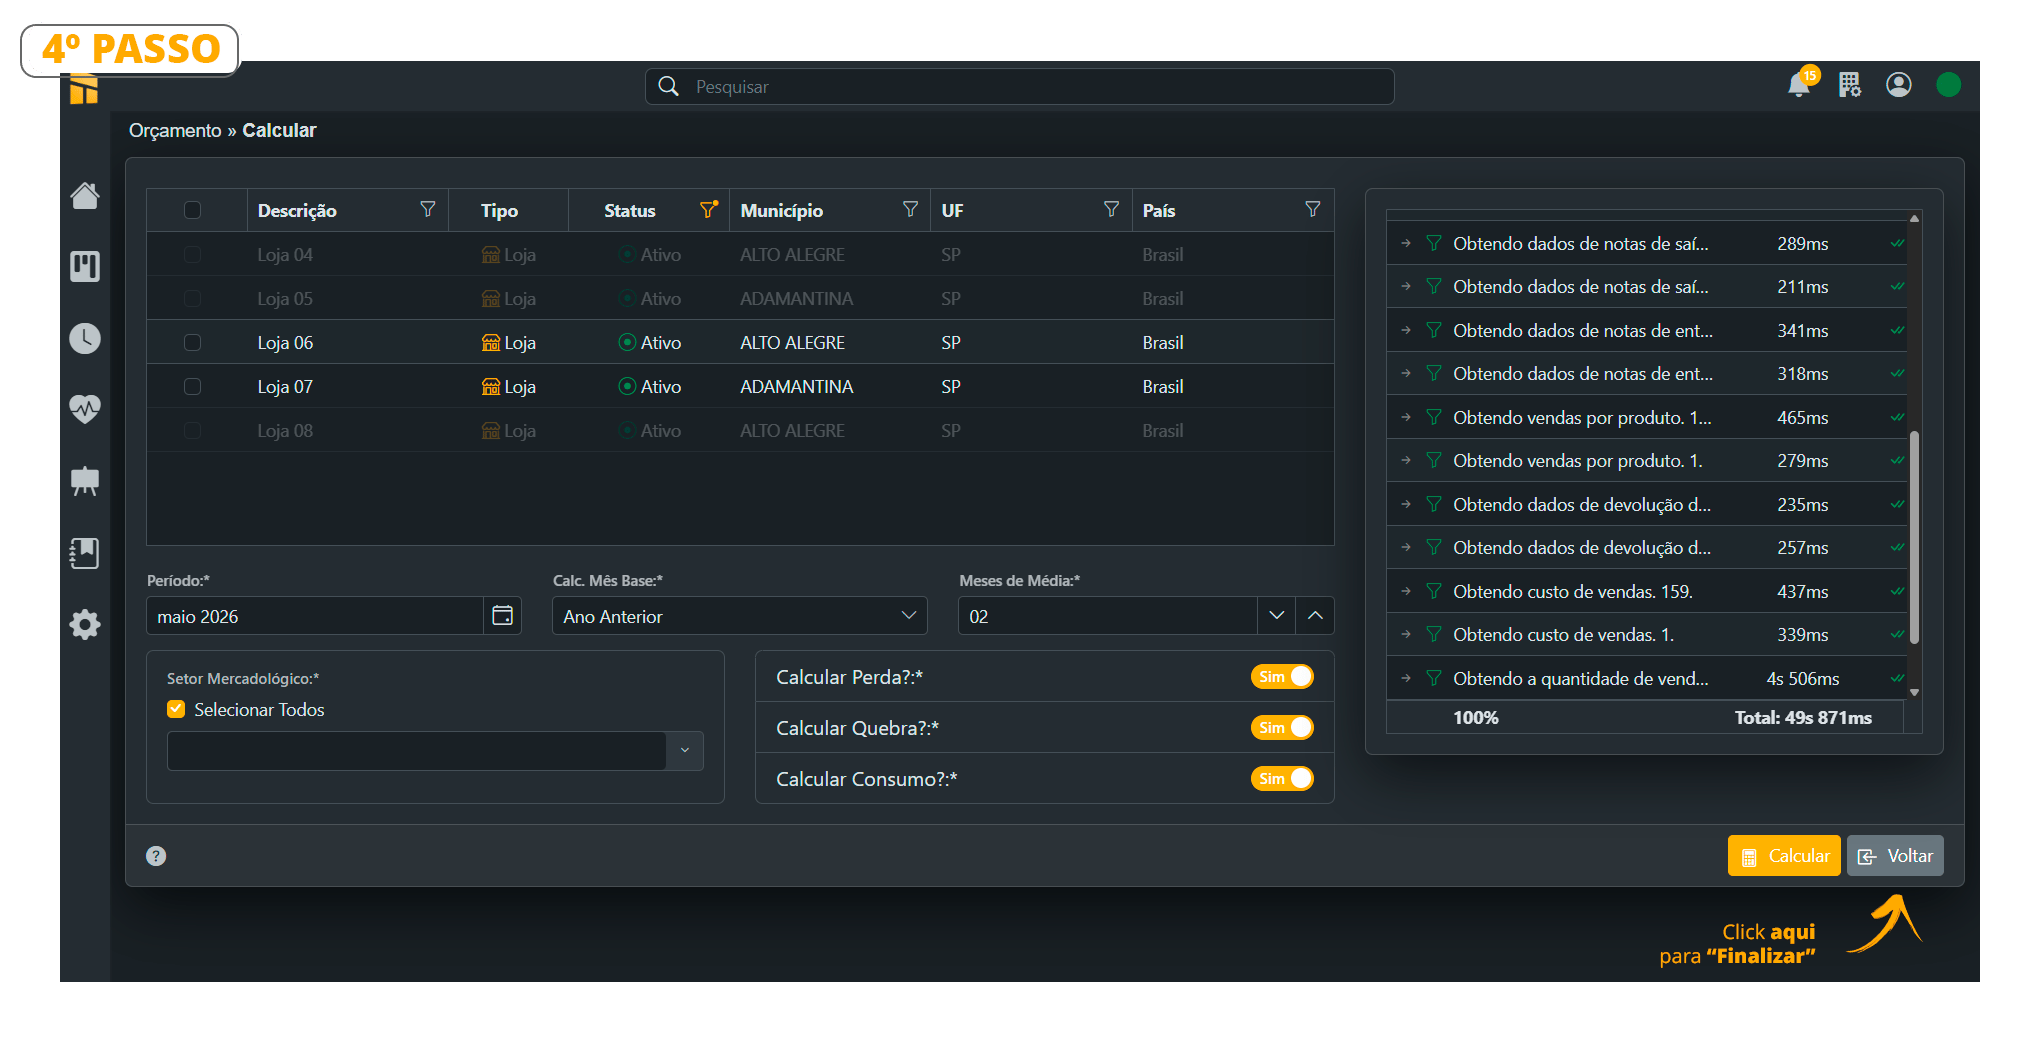
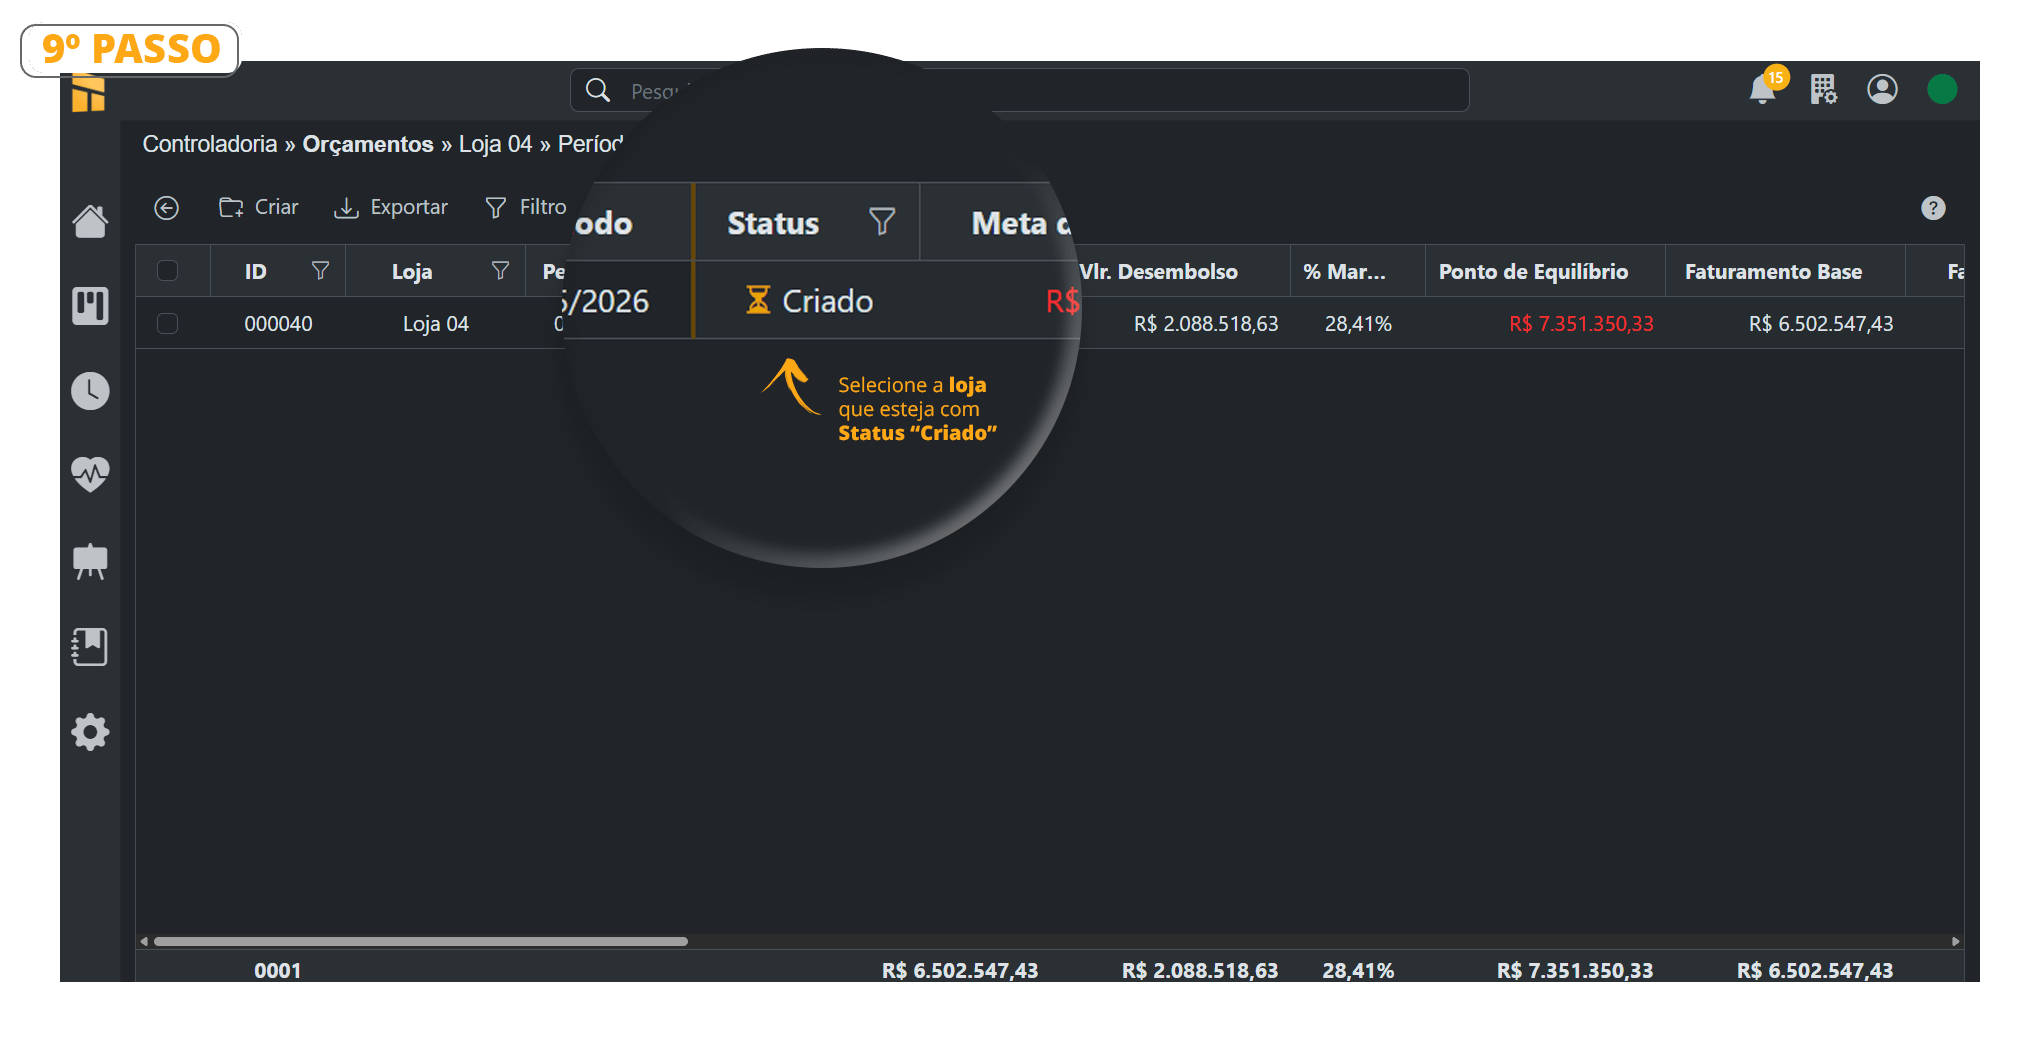 10. To generate the reports, you must run \[Calculate]. Click the \[Calculate] button;
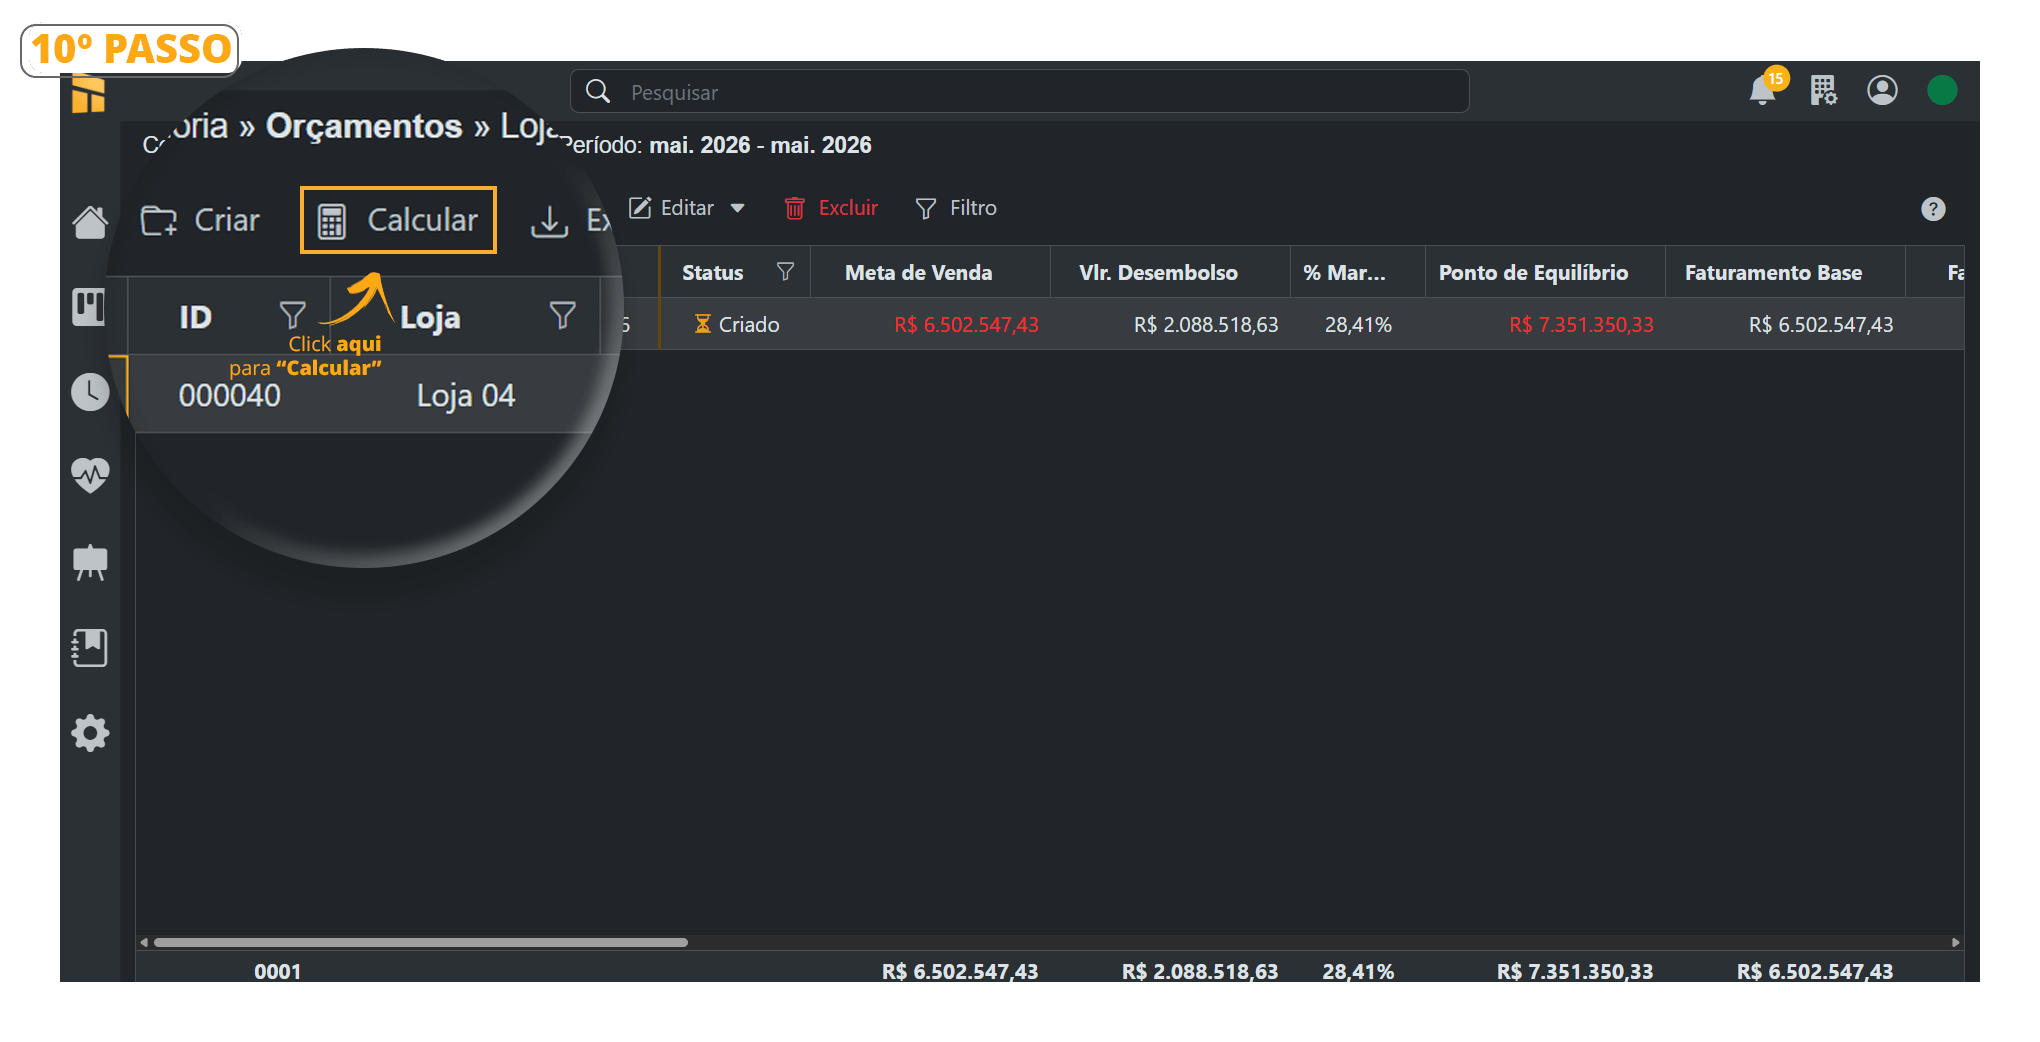 11. You can select more than one store at the same time.
Click the \[Calculate] button;
The Loss, Breakage, and Consumption shown in Controllership are based on Purchases because they are directly related to merchandise purchases. Their averages are also added to COGS, making the Purchase Limit more accurate and complete.
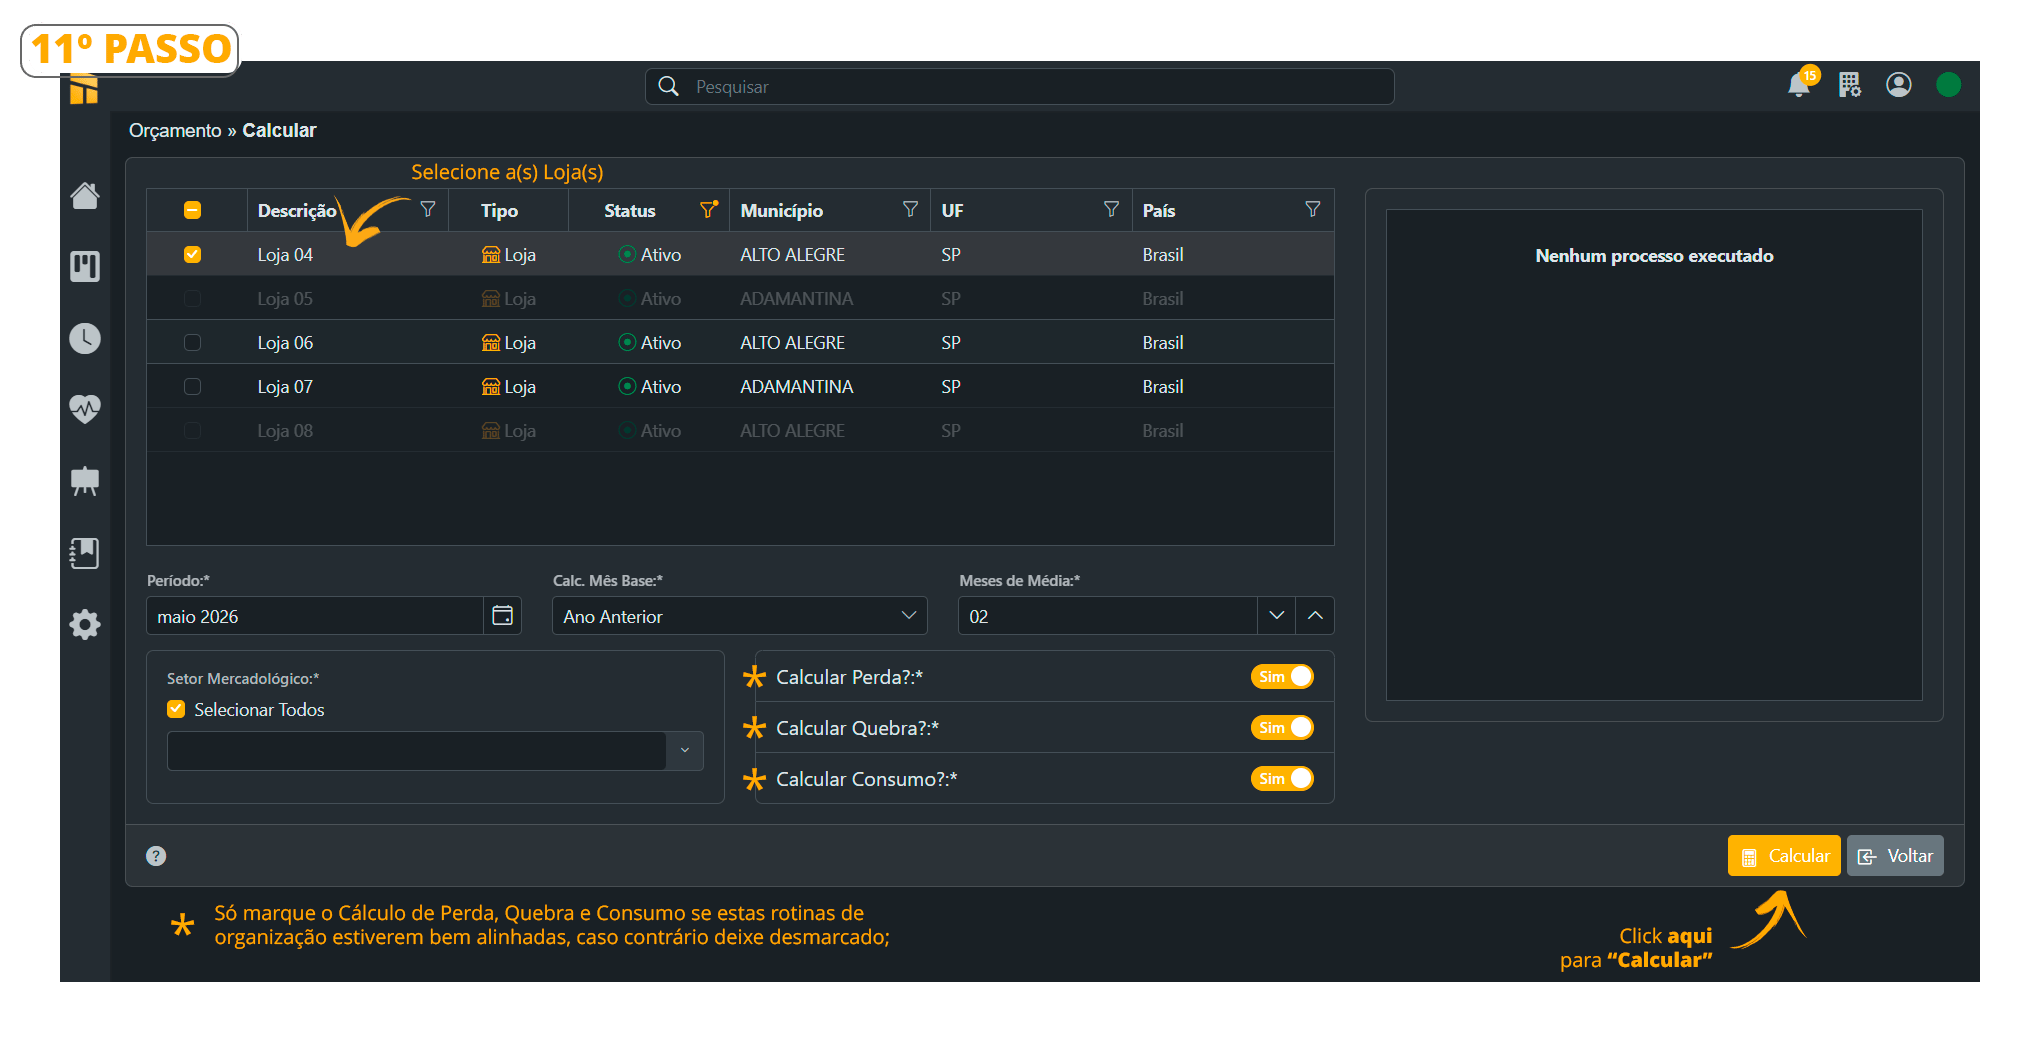 12. Notice that the plan has already been calculated. Simply click the back button.
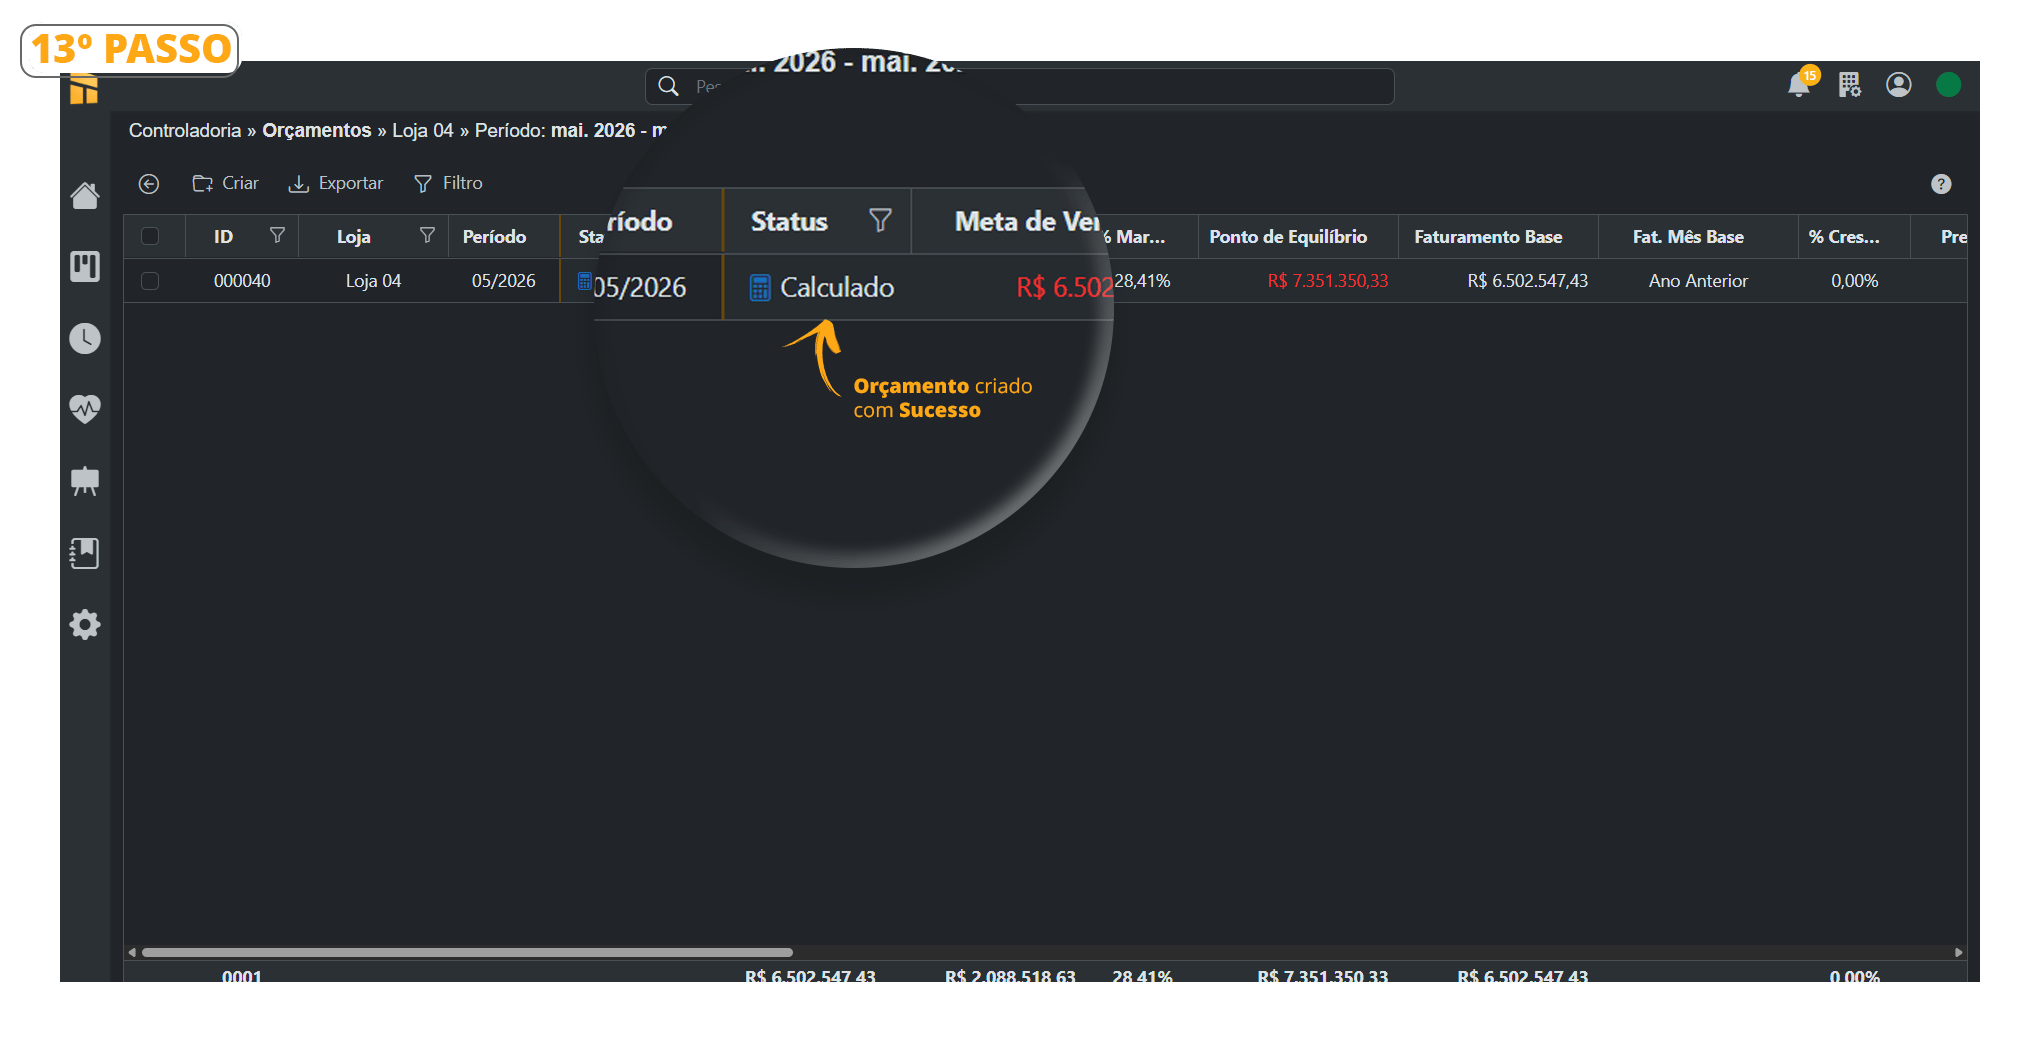
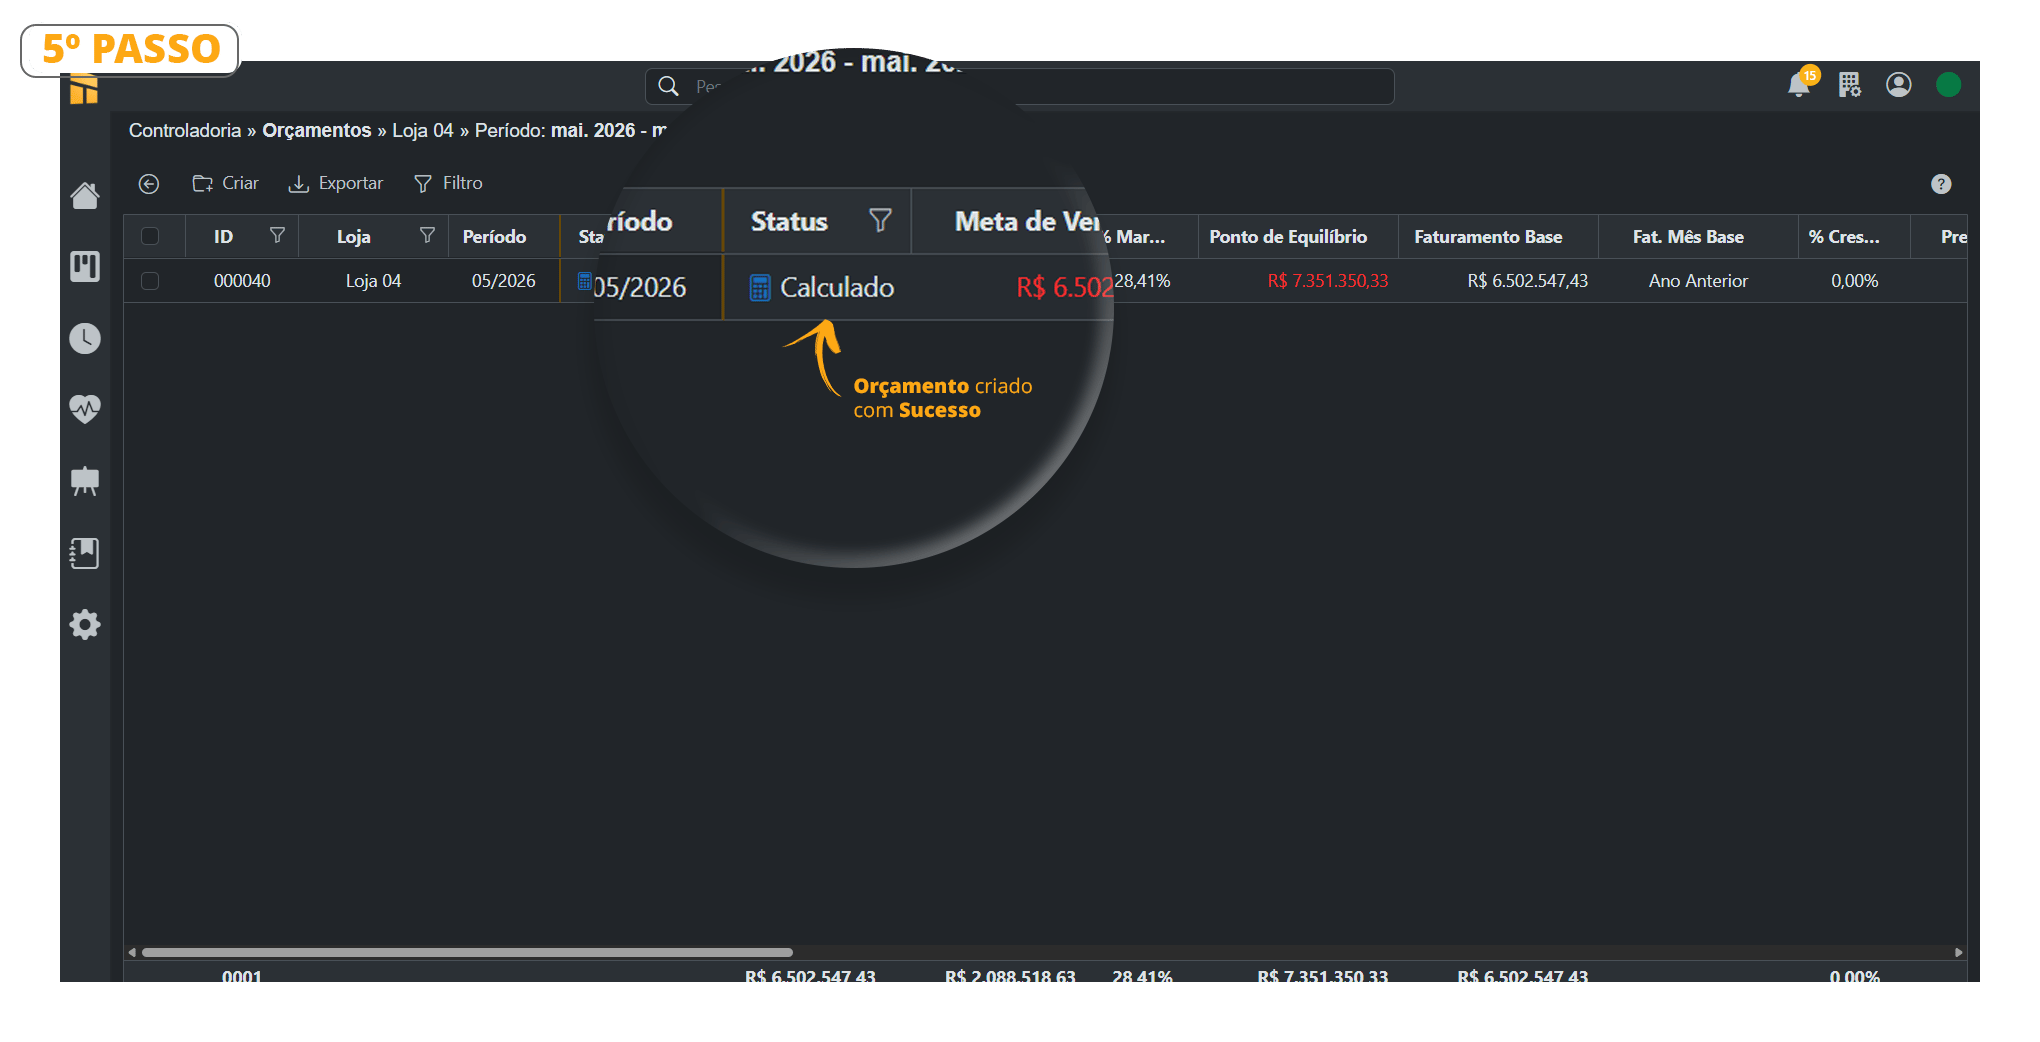
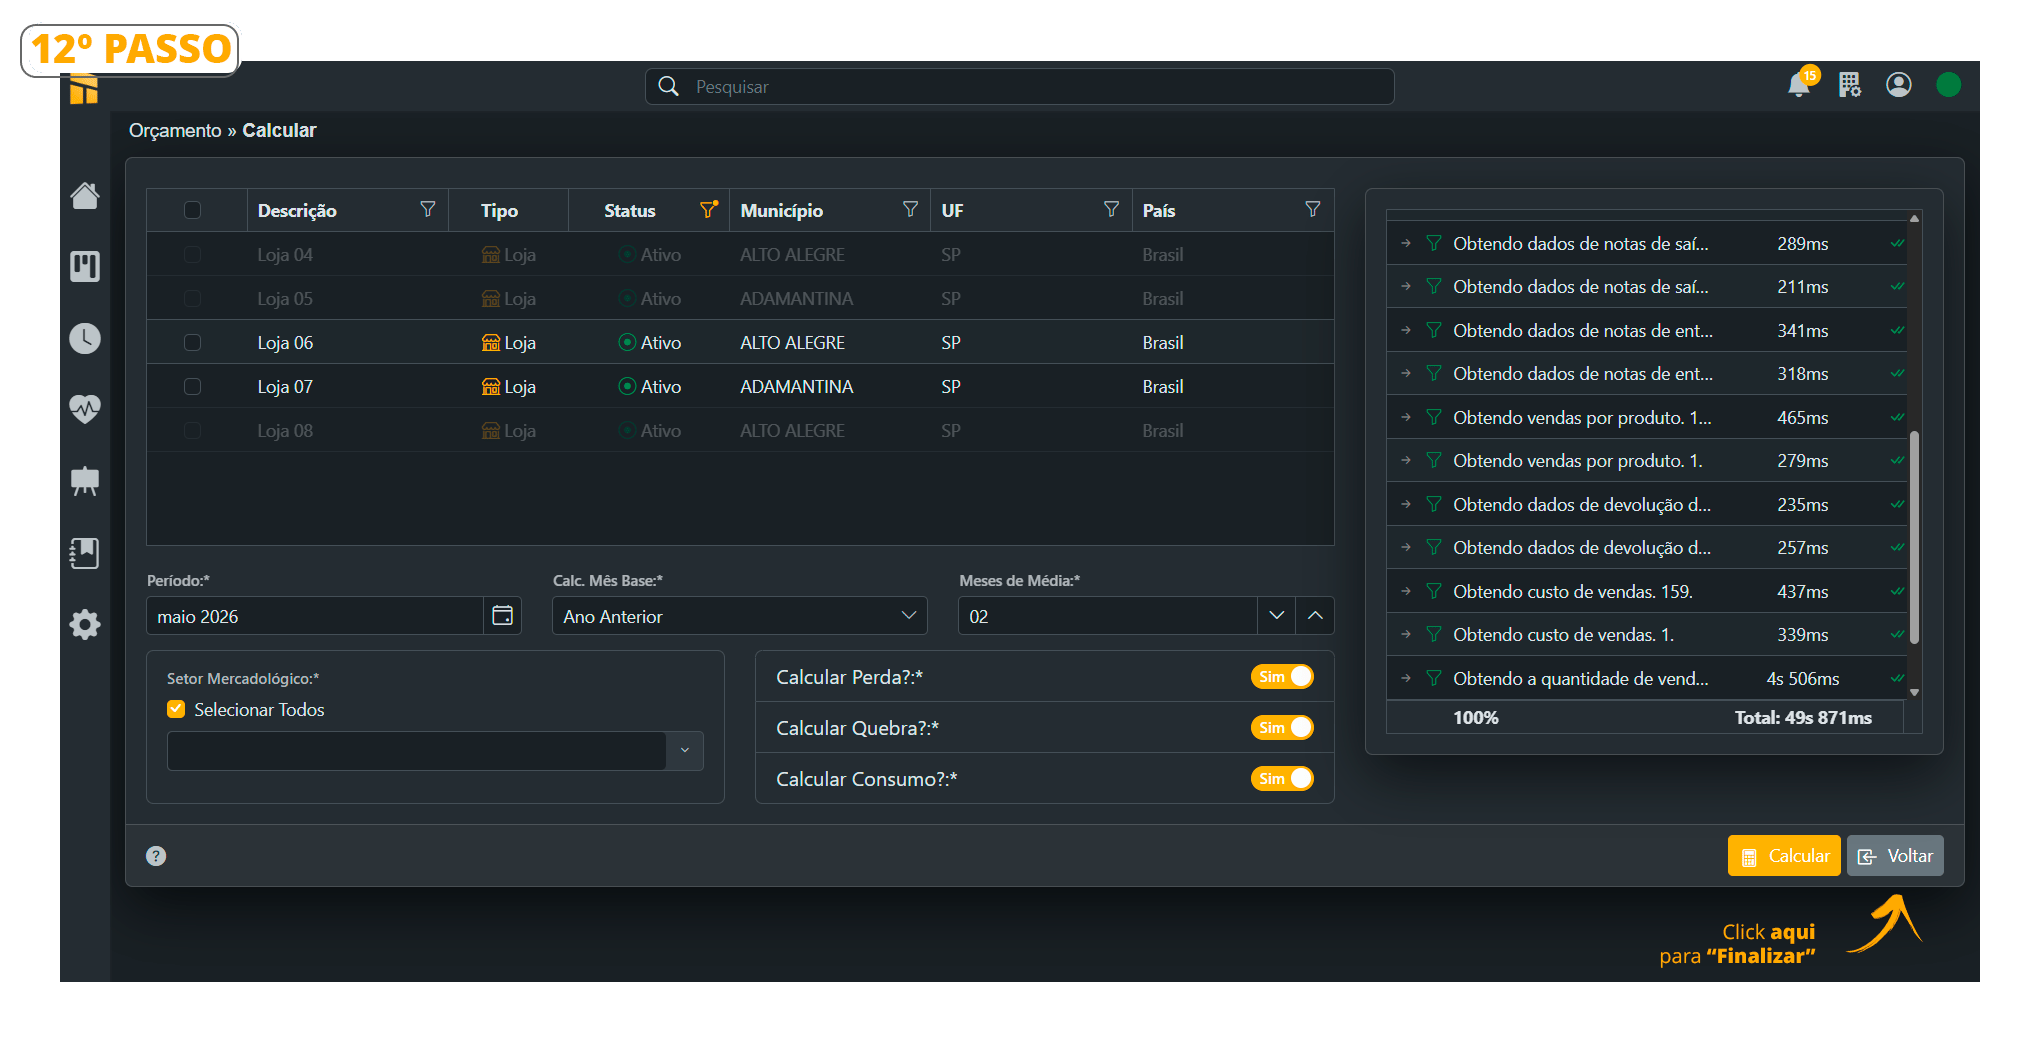 13. Budget successfully created. Notice that the Status is now shown as “Calculated.”
 ## **How to Calculate a Budget**
Follow the steps below to Calculate a Budget;
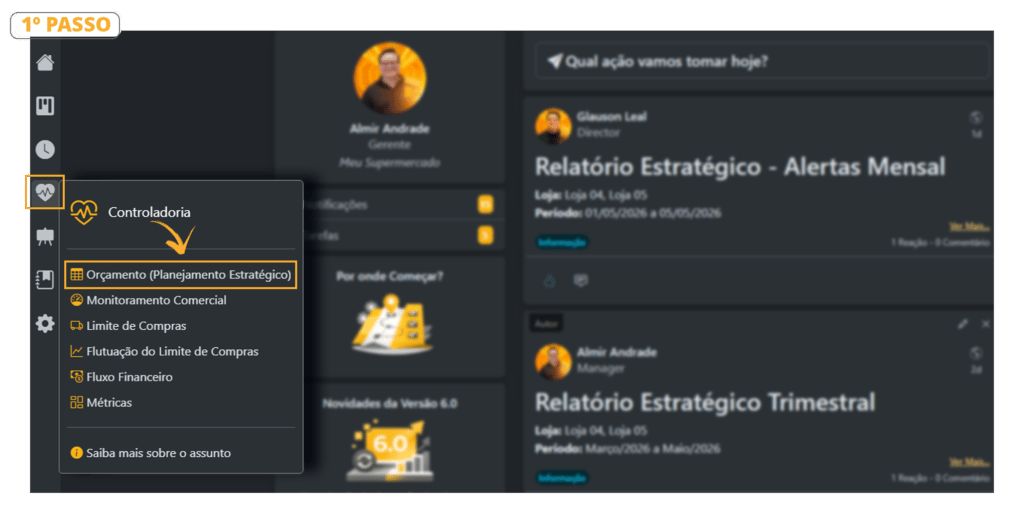
1. Controllership> Budget
## **How to Calculate a Budget**
Follow the steps below to Calculate a Budget;
1. Controllership> Budget
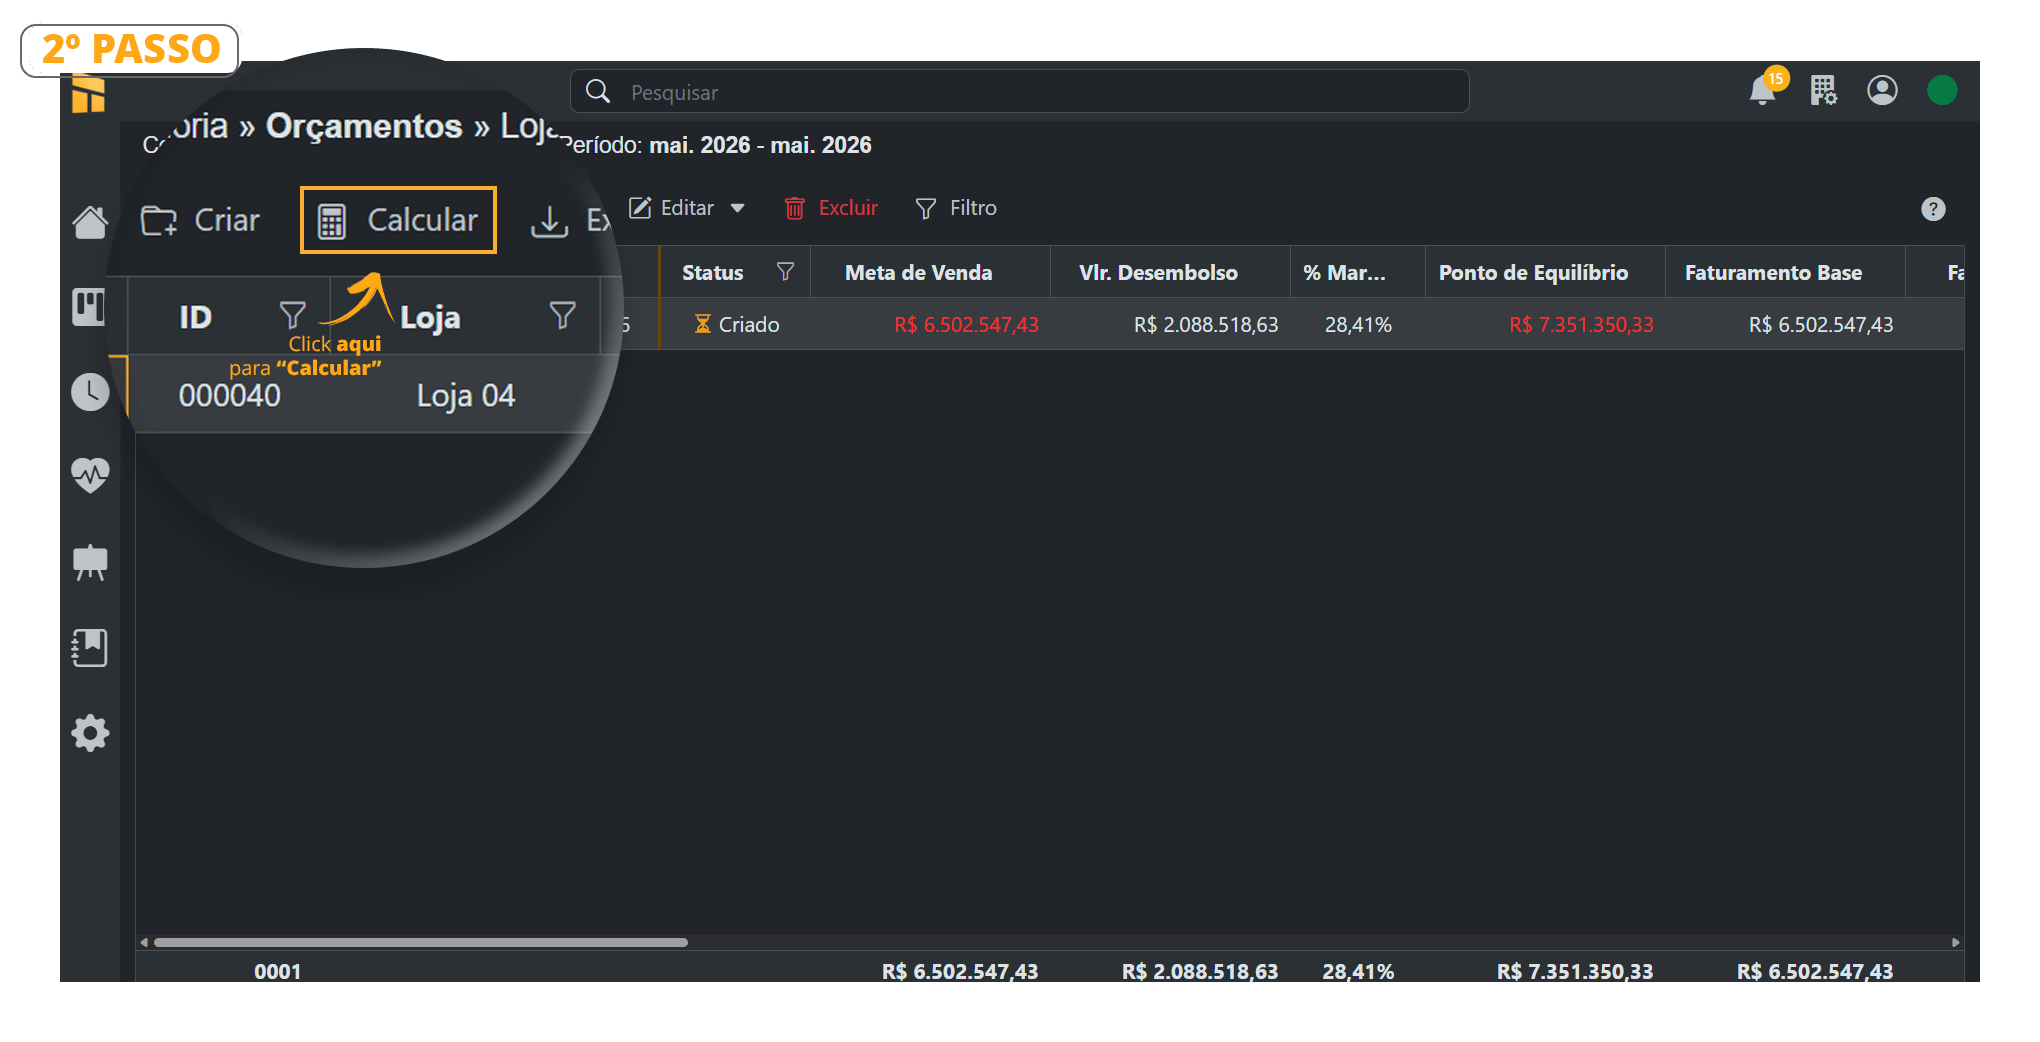
 2. Select the Store whose Budget you want to “Calculate.” – Notice that the “Calculate” button will only appear after you select the store.
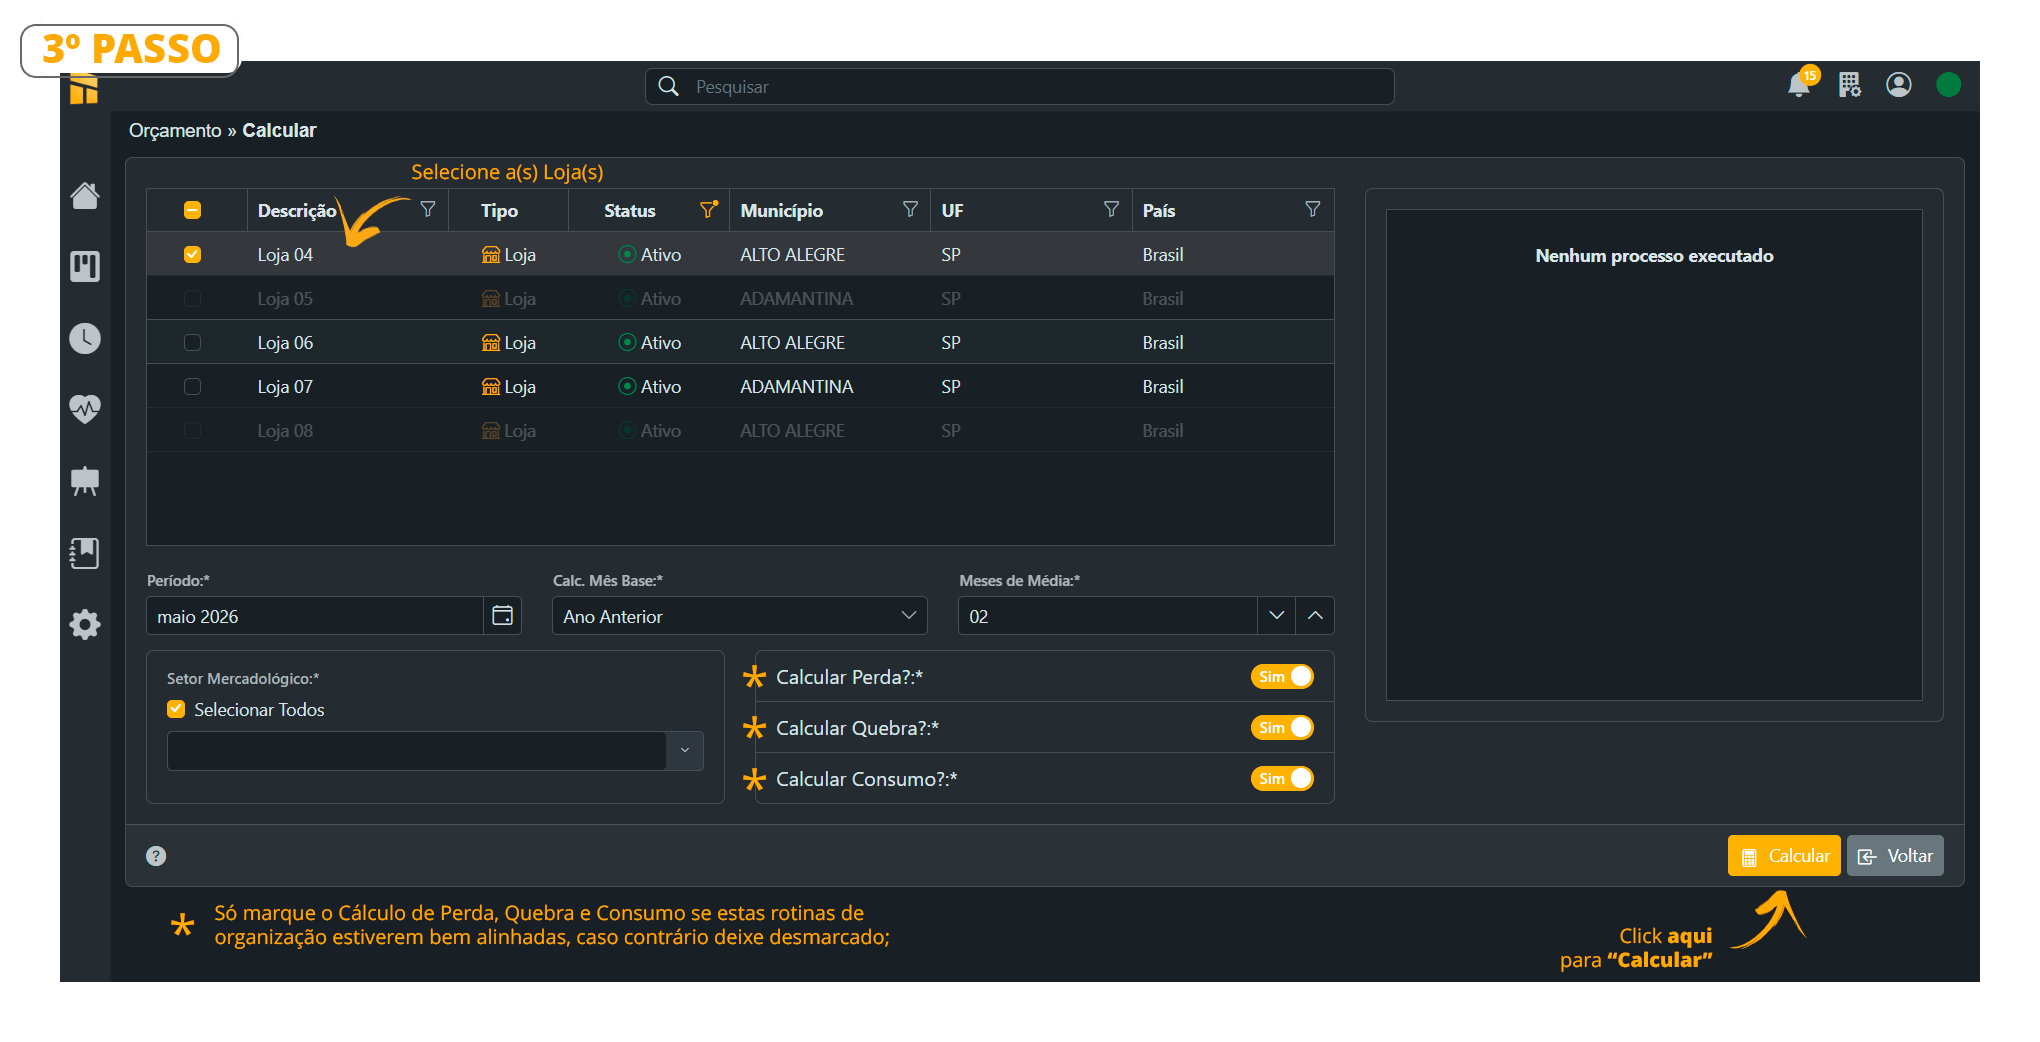
 3. You can select more than one store at the same time.
Click the \[Calculate] button;
The Loss, Breakage, and Consumption shown in Controllership are based on Purchases because they are directly related to merchandise purchases. Their averages are also added to COGS, making the Purchase Limit more accurate and complete.
 4. Notice that the plan has already been calculated. Simply click the back button.
 5. Budget successfully calculated. Notice that the Status is now shown as “Calculated”;
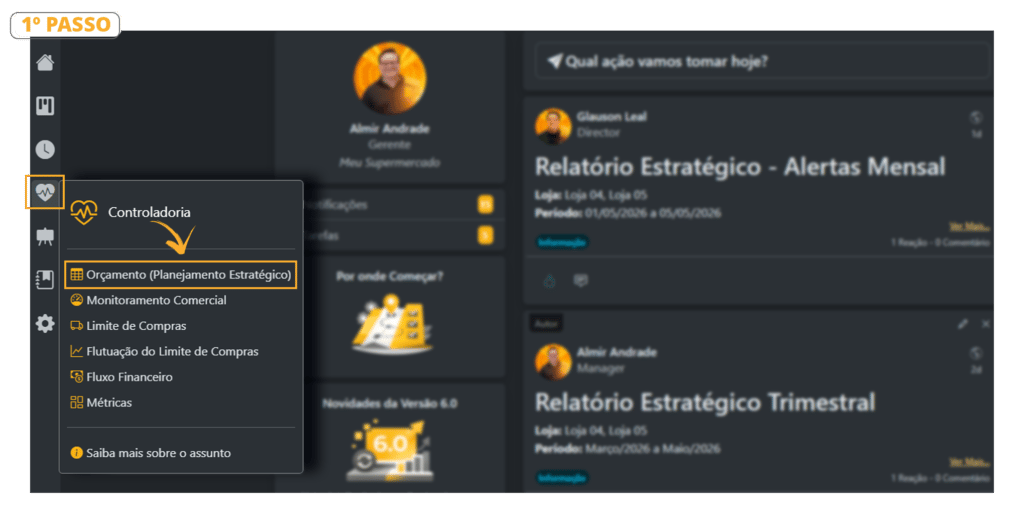
 ## **How to Modify or Recalculate a Budget**
Follow the steps below to Recalculate a Budget
1. Controllership> Budget
## **How to Modify or Recalculate a Budget**
Follow the steps below to Recalculate a Budget
1. Controllership> Budget
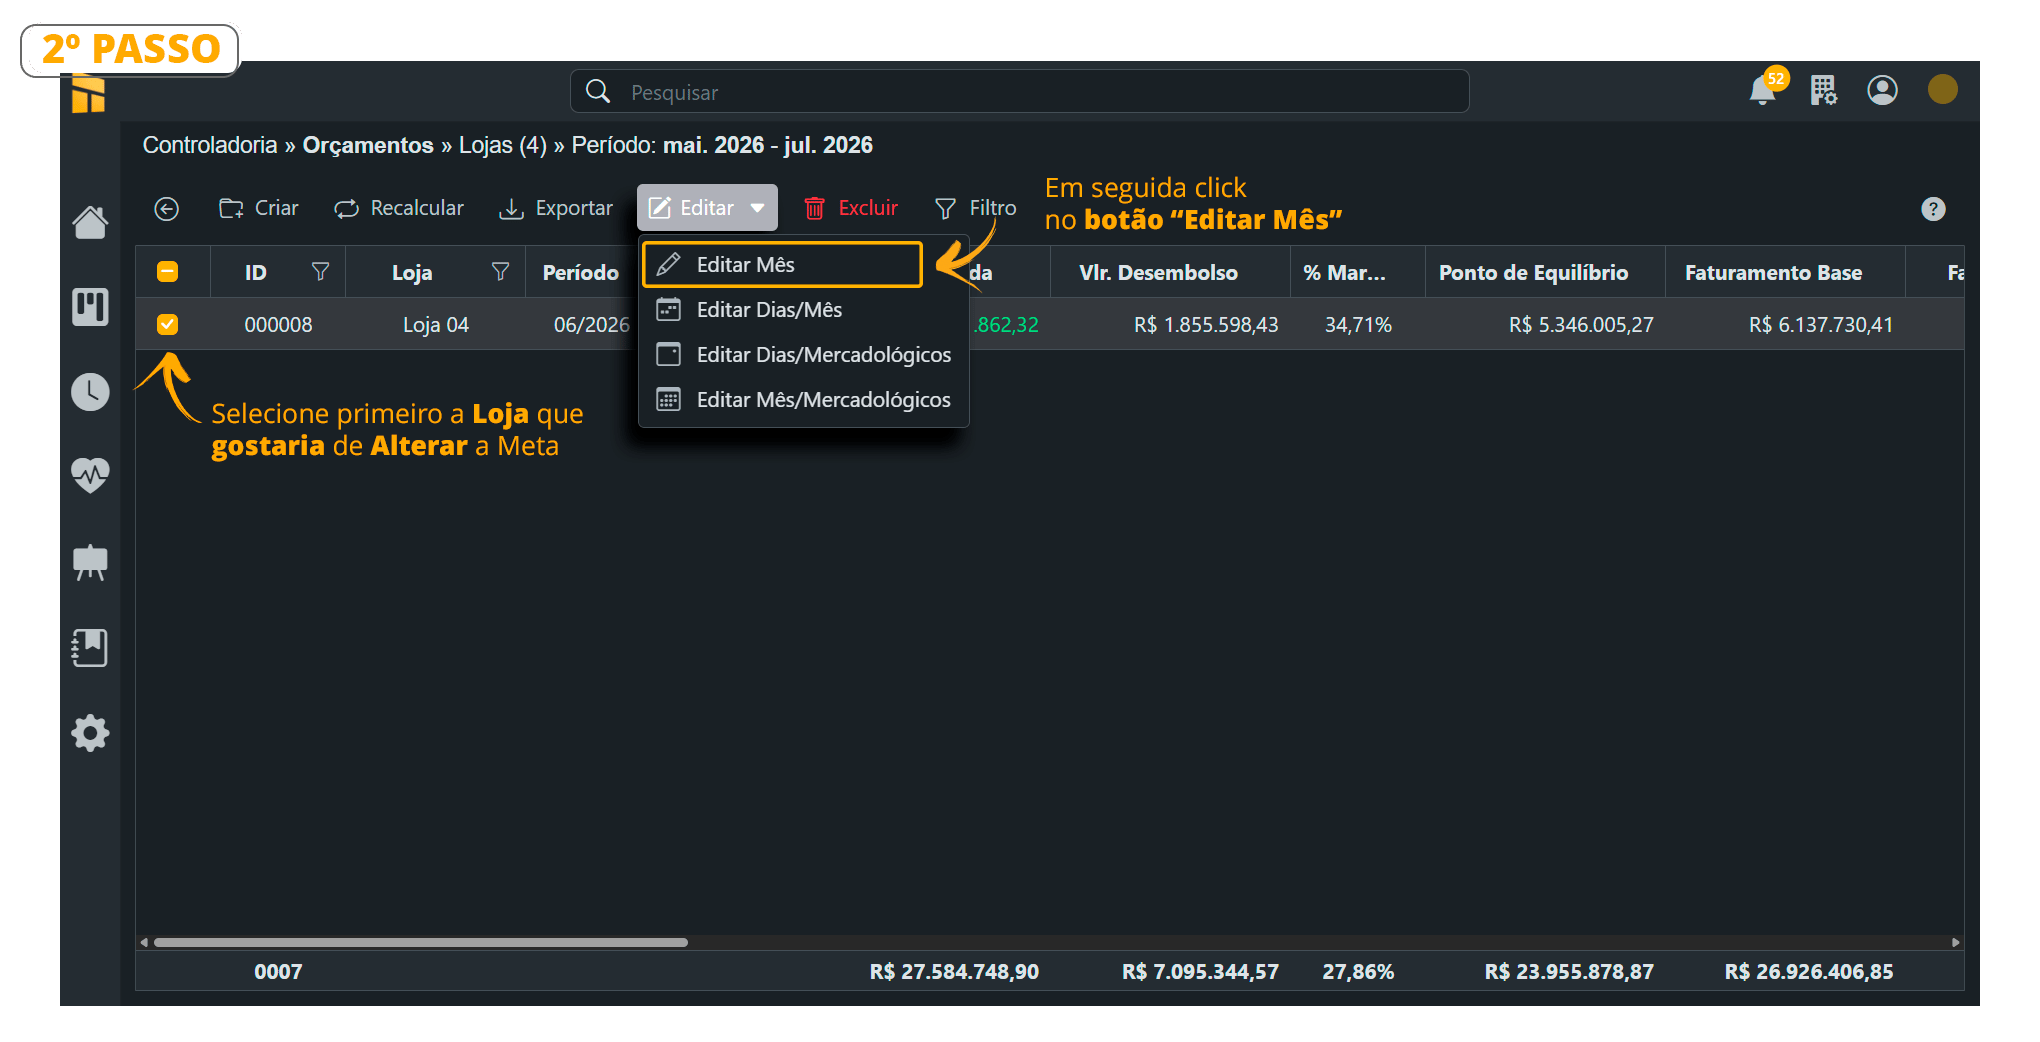
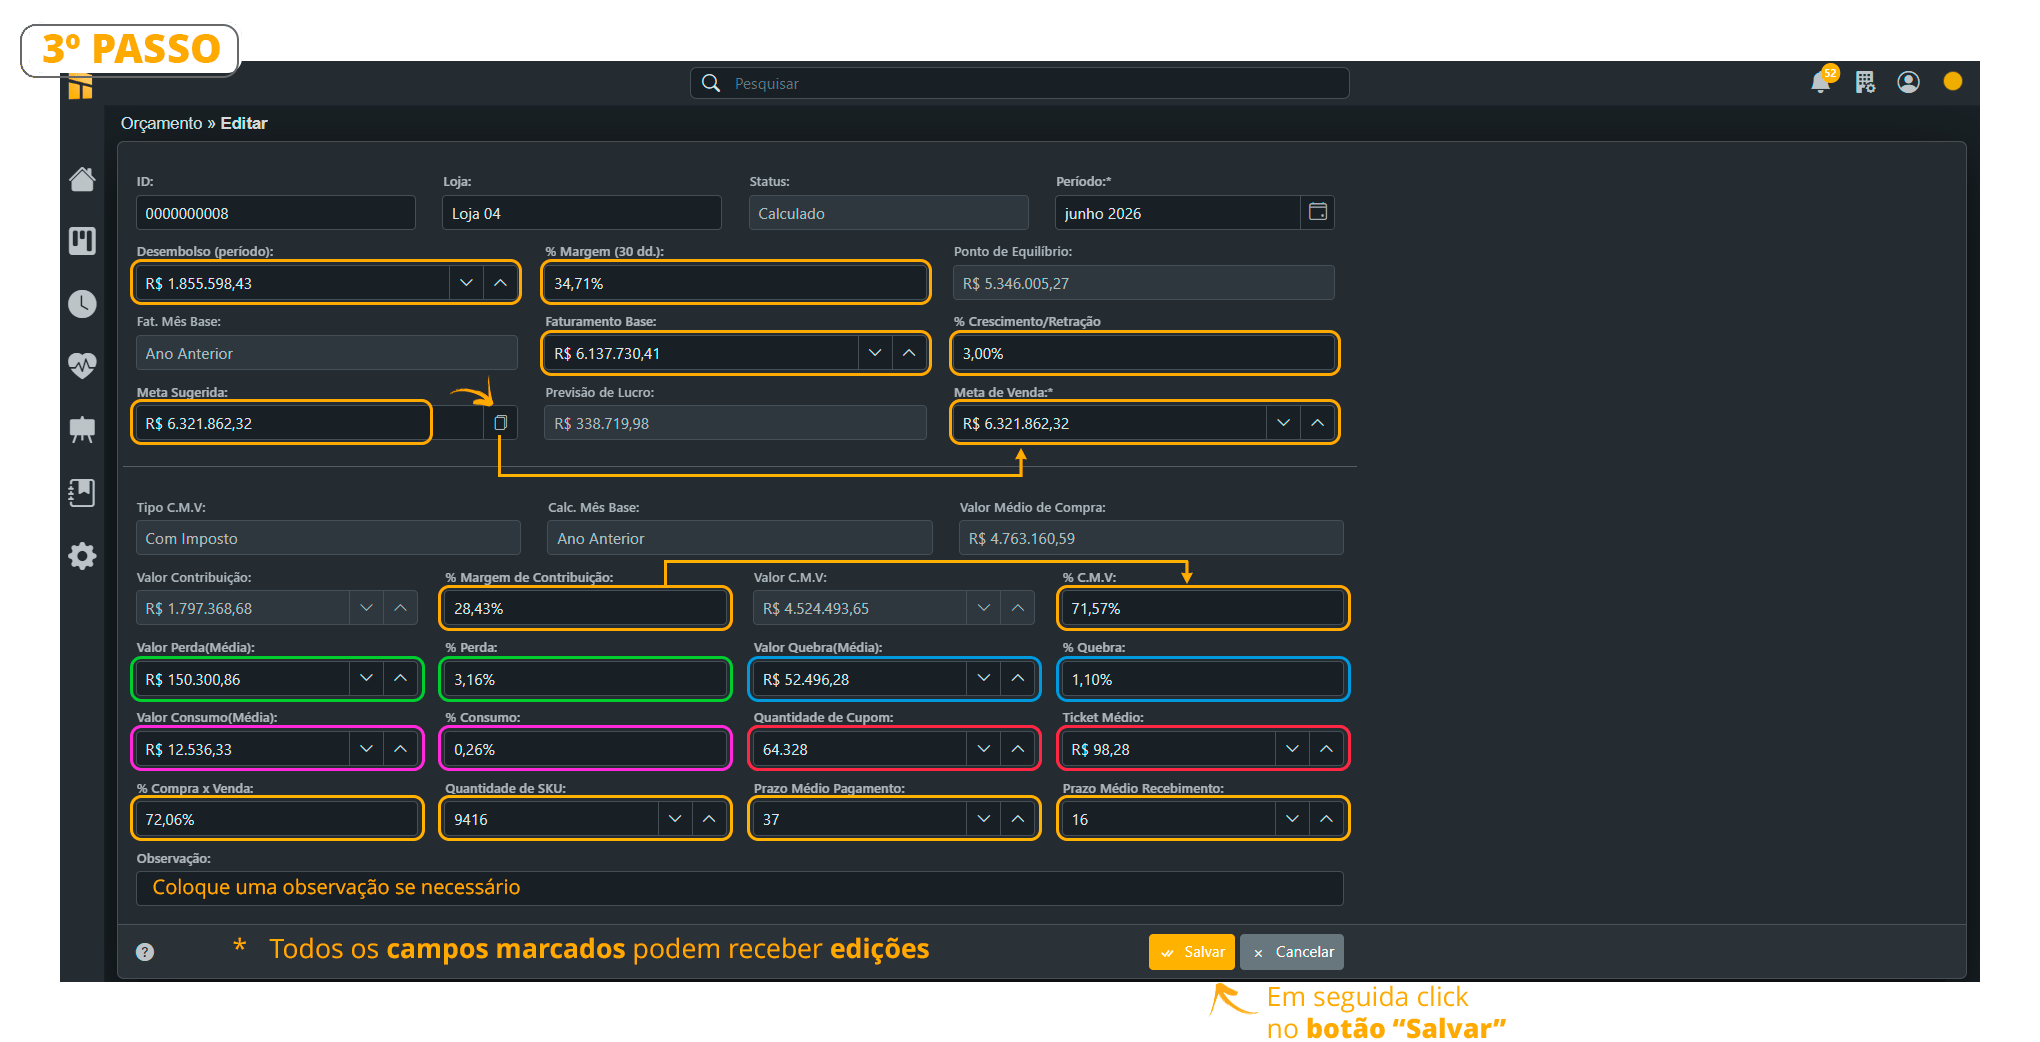
 2. Select the Store whose Budget you want to “Modify.” – Notice that the “Modify” button will only appear after you select the store.
 3. Carefully review the fields below. Fields marked with “Colors” can be edited.
To complete all “Changes,” click SAVE.
Contribution Margin Calculation:
Margin = 100 – (totalCustoComImposto / (totalVenda / 100)
 ## **How to Export a Budget**
Follow the steps below to Export a Budget;
1. Controllership> Budget
2. Select the Store whose Budget you want to “Export.” – Notice that the “Export” button will only appear after you select the store.
## **How to Export a Budget**
Follow the steps below to Export a Budget;
1. Controllership> Budget
2. Select the Store whose Budget you want to “Export.” – Notice that the “Export” button will only appear after you select the store.
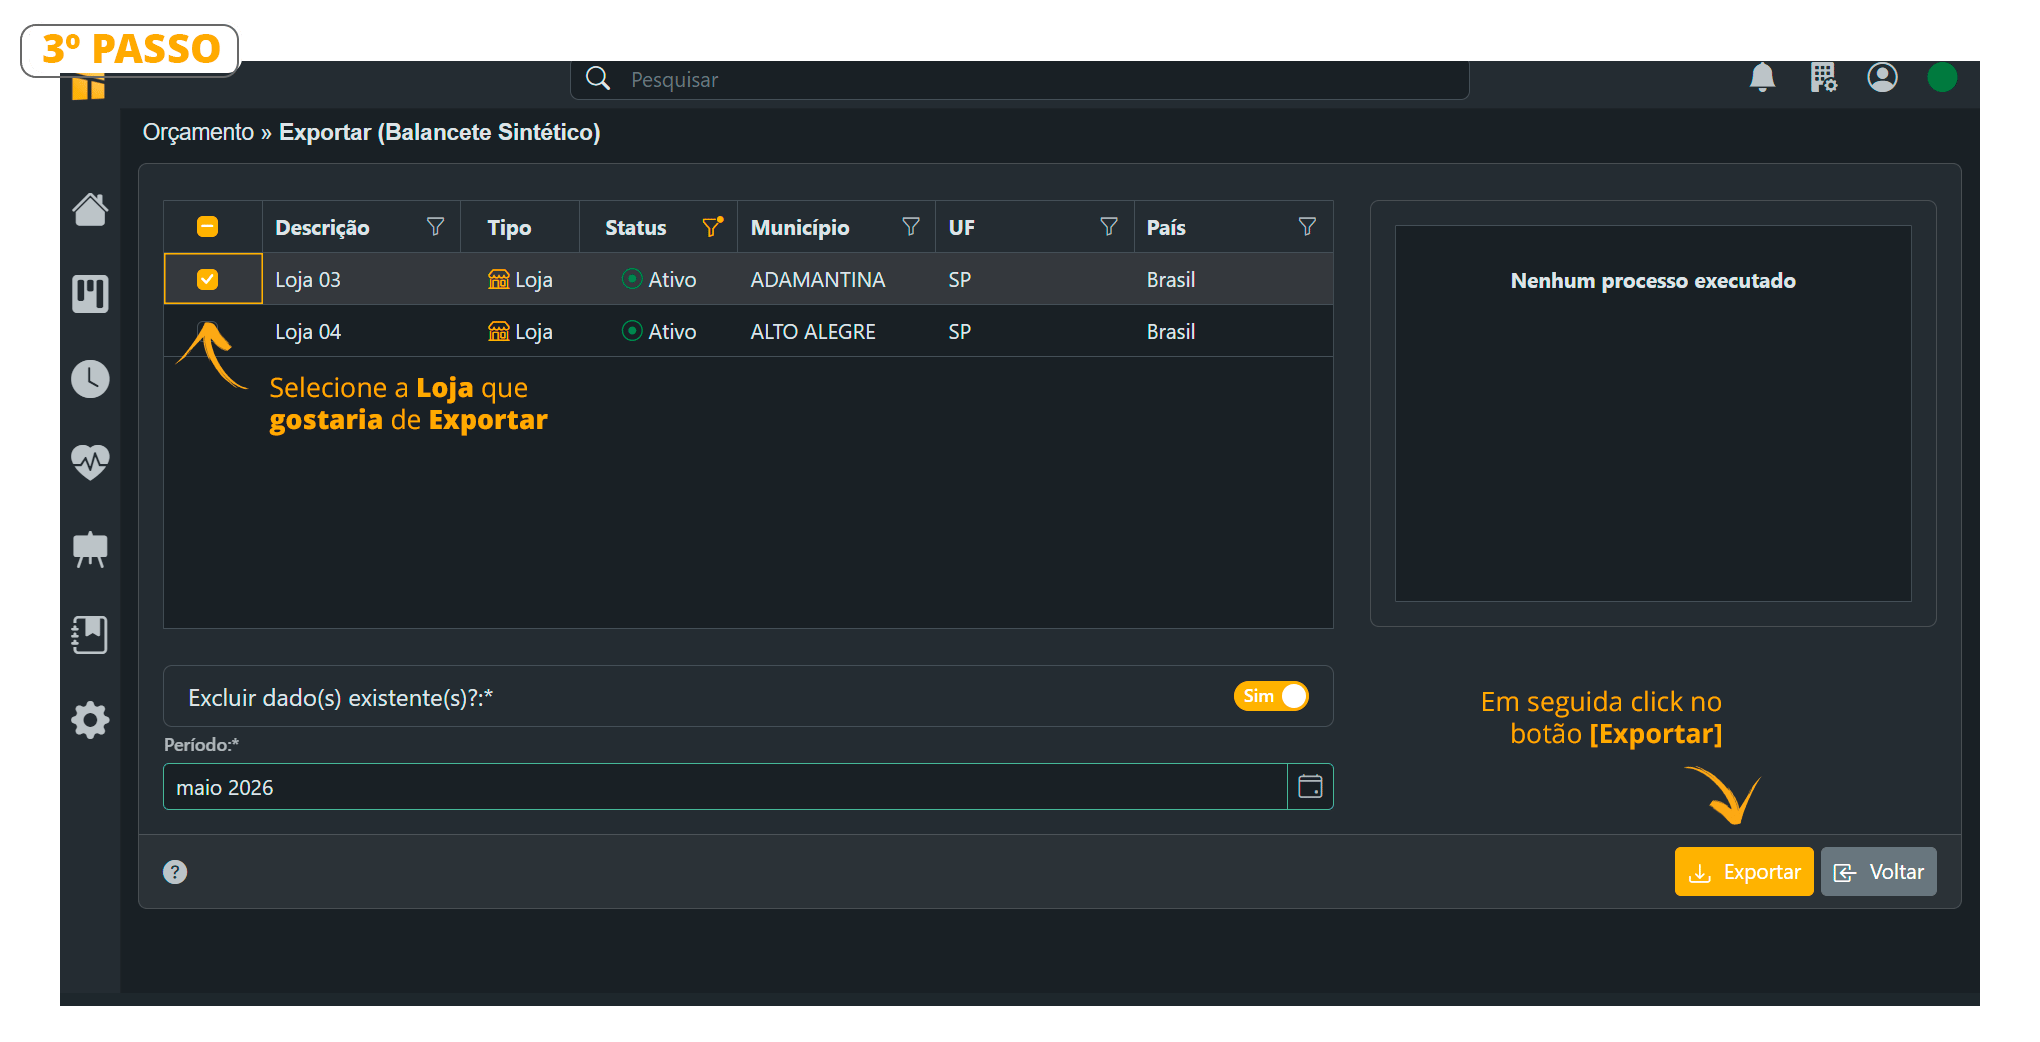
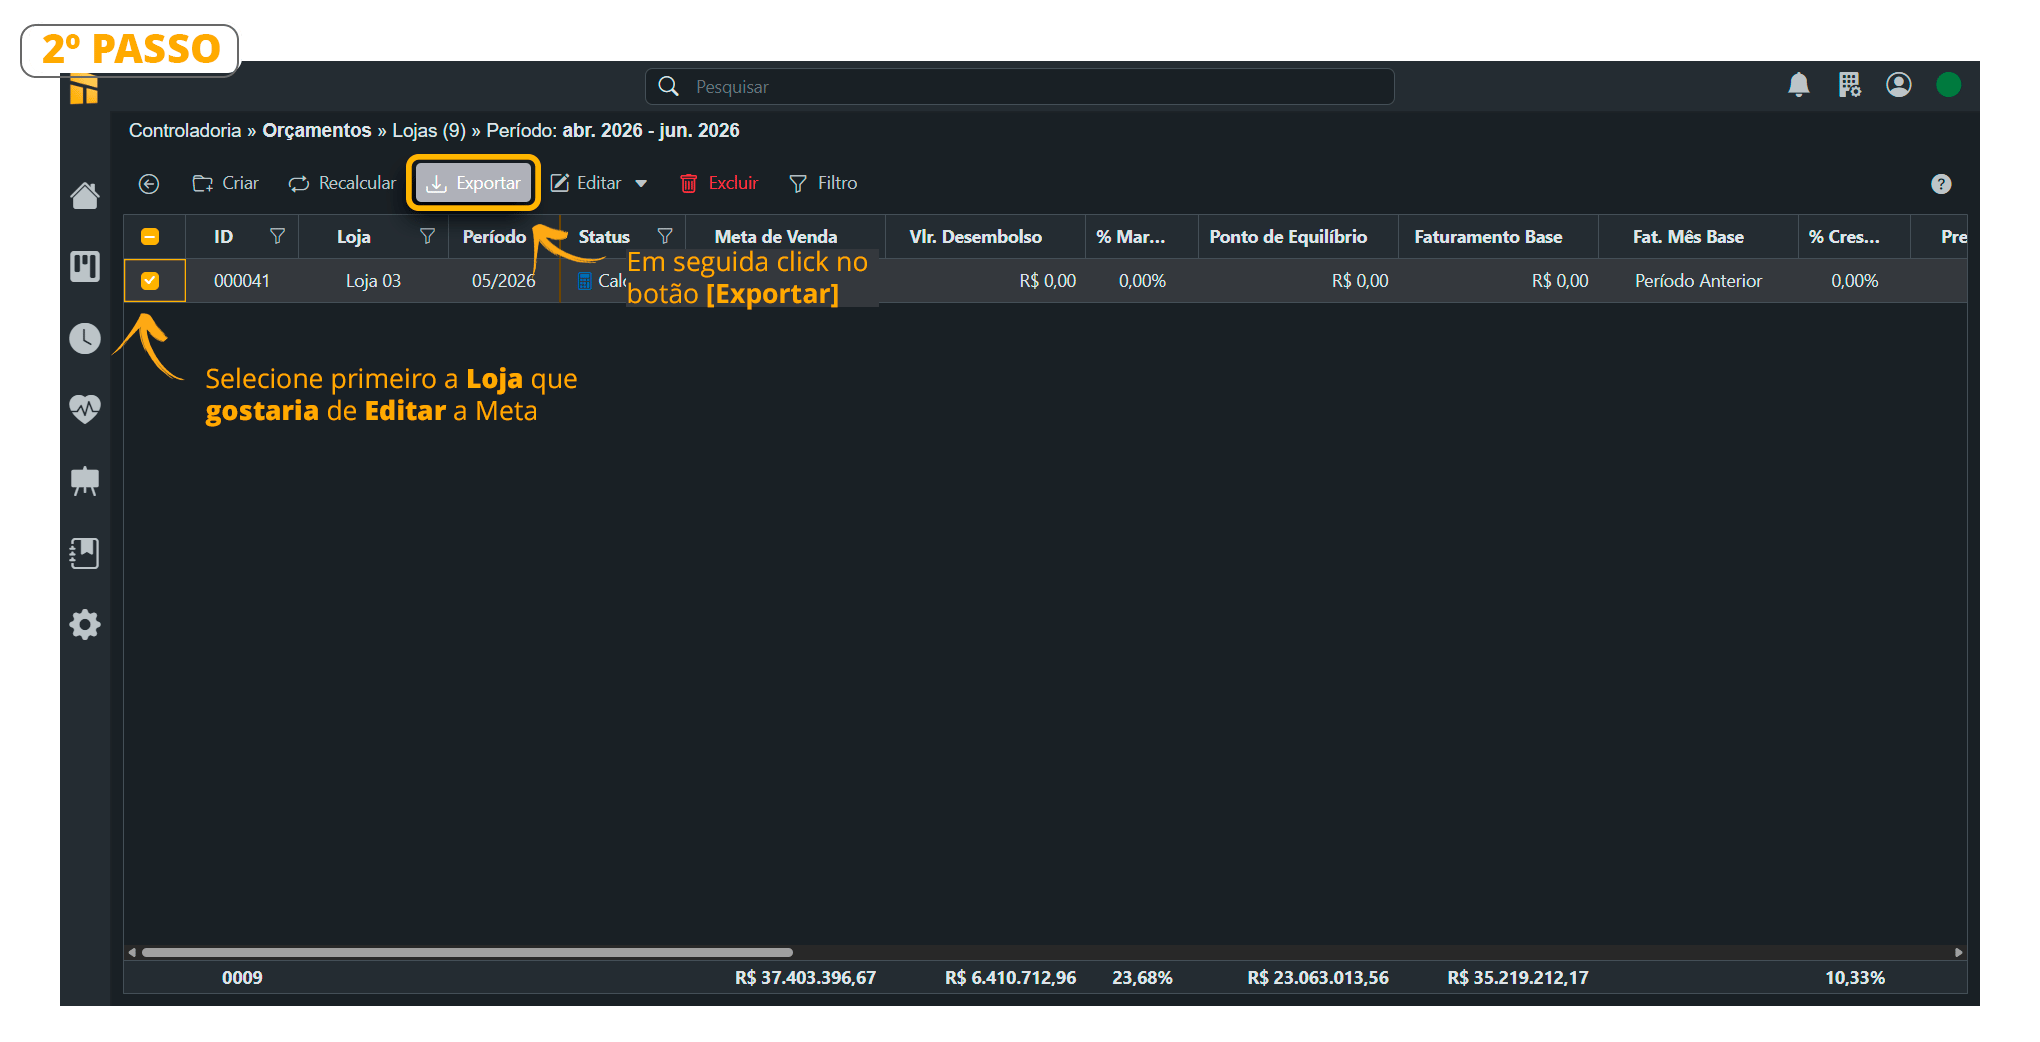 3. You can select more than one store at the same time. Click the \[Export] button;
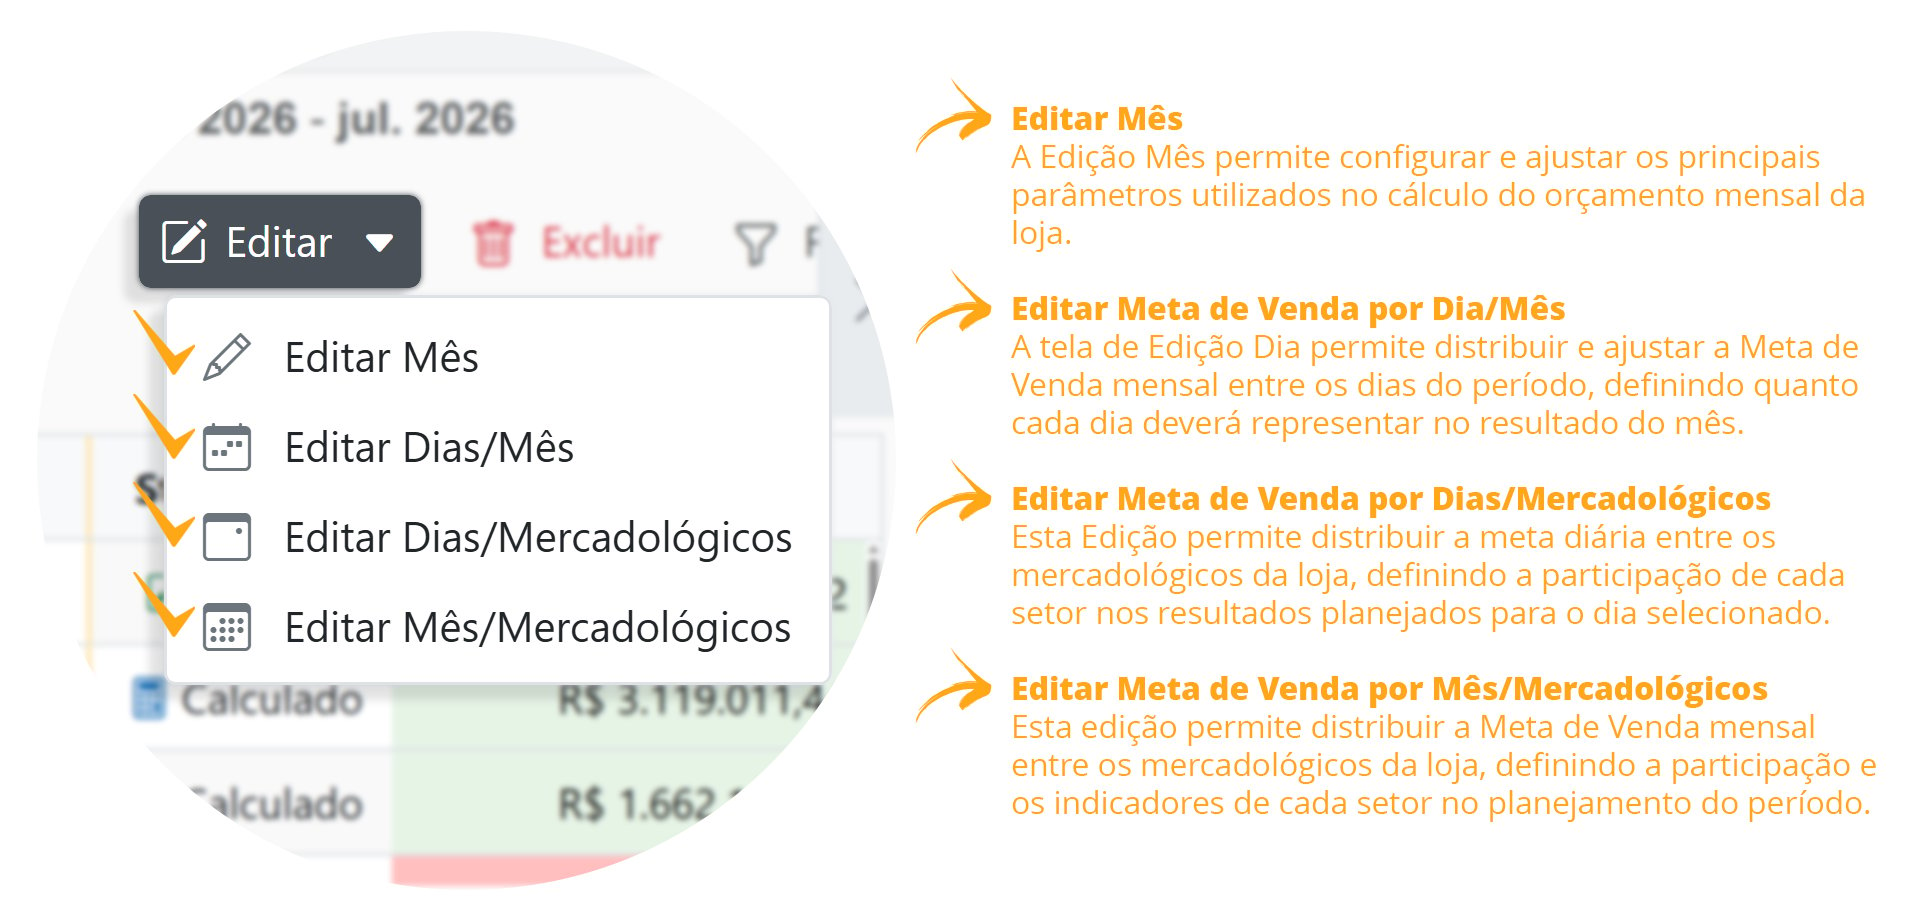
 ## **4 Ways to Edit Sales Targets** **and Commercial Categories**
```text theme={null}
There are 4 ways to Edit Sales Targets
See the details of each one below
```
## **4 Ways to Edit Sales Targets** **and Commercial Categories**
```text theme={null}
There are 4 ways to Edit Sales Targets
See the details of each one below
```
 ## **H**ow to Edit Sales Targets BY DAY/MONTH
[**Click here**](https://youtu.be/QyfTEL6E5lk) to watch the **Complete Editing Video**;
Edit Sales Targets by Day/Month Follow the steps shown in the images below.
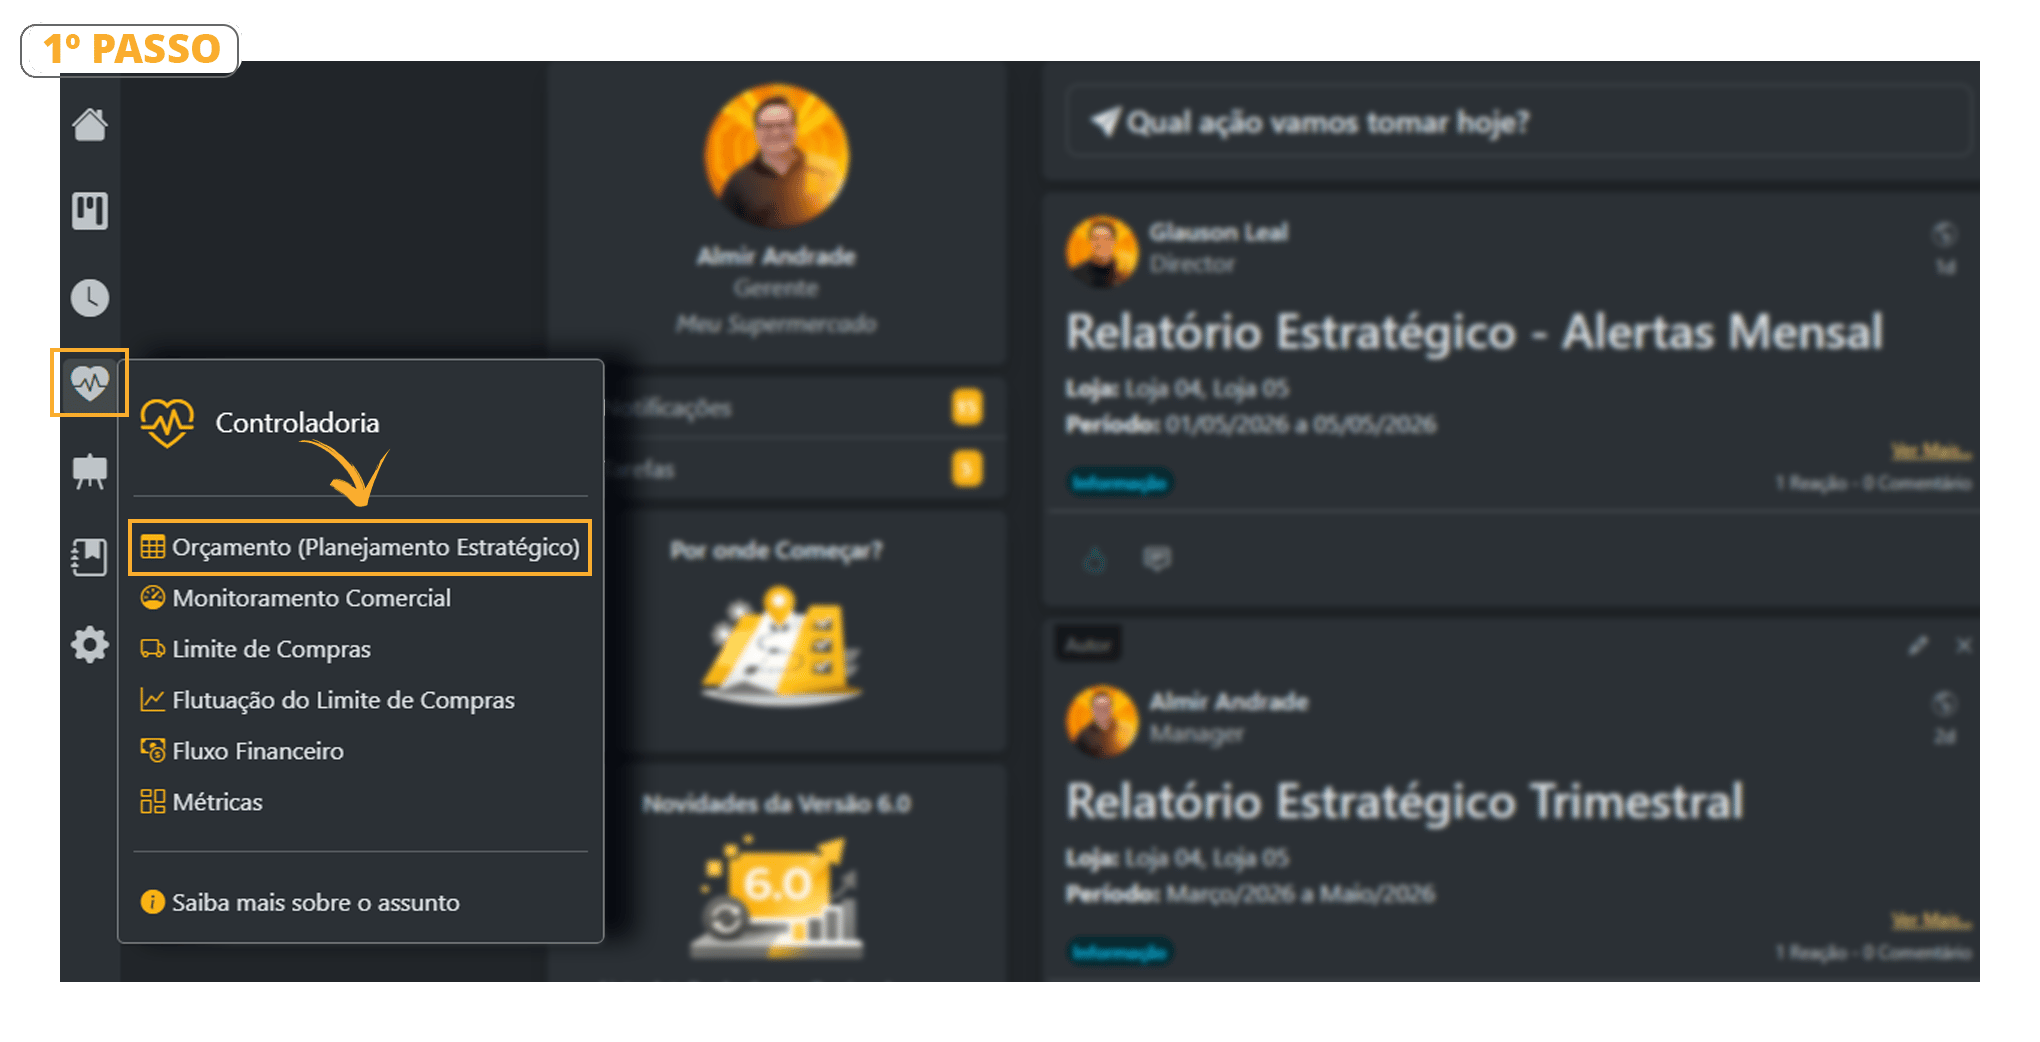
1. Controllership> Budget
## **H**ow to Edit Sales Targets BY DAY/MONTH
[**Click here**](https://youtu.be/QyfTEL6E5lk) to watch the **Complete Editing Video**;
Edit Sales Targets by Day/Month Follow the steps shown in the images below.
1. Controllership> Budget
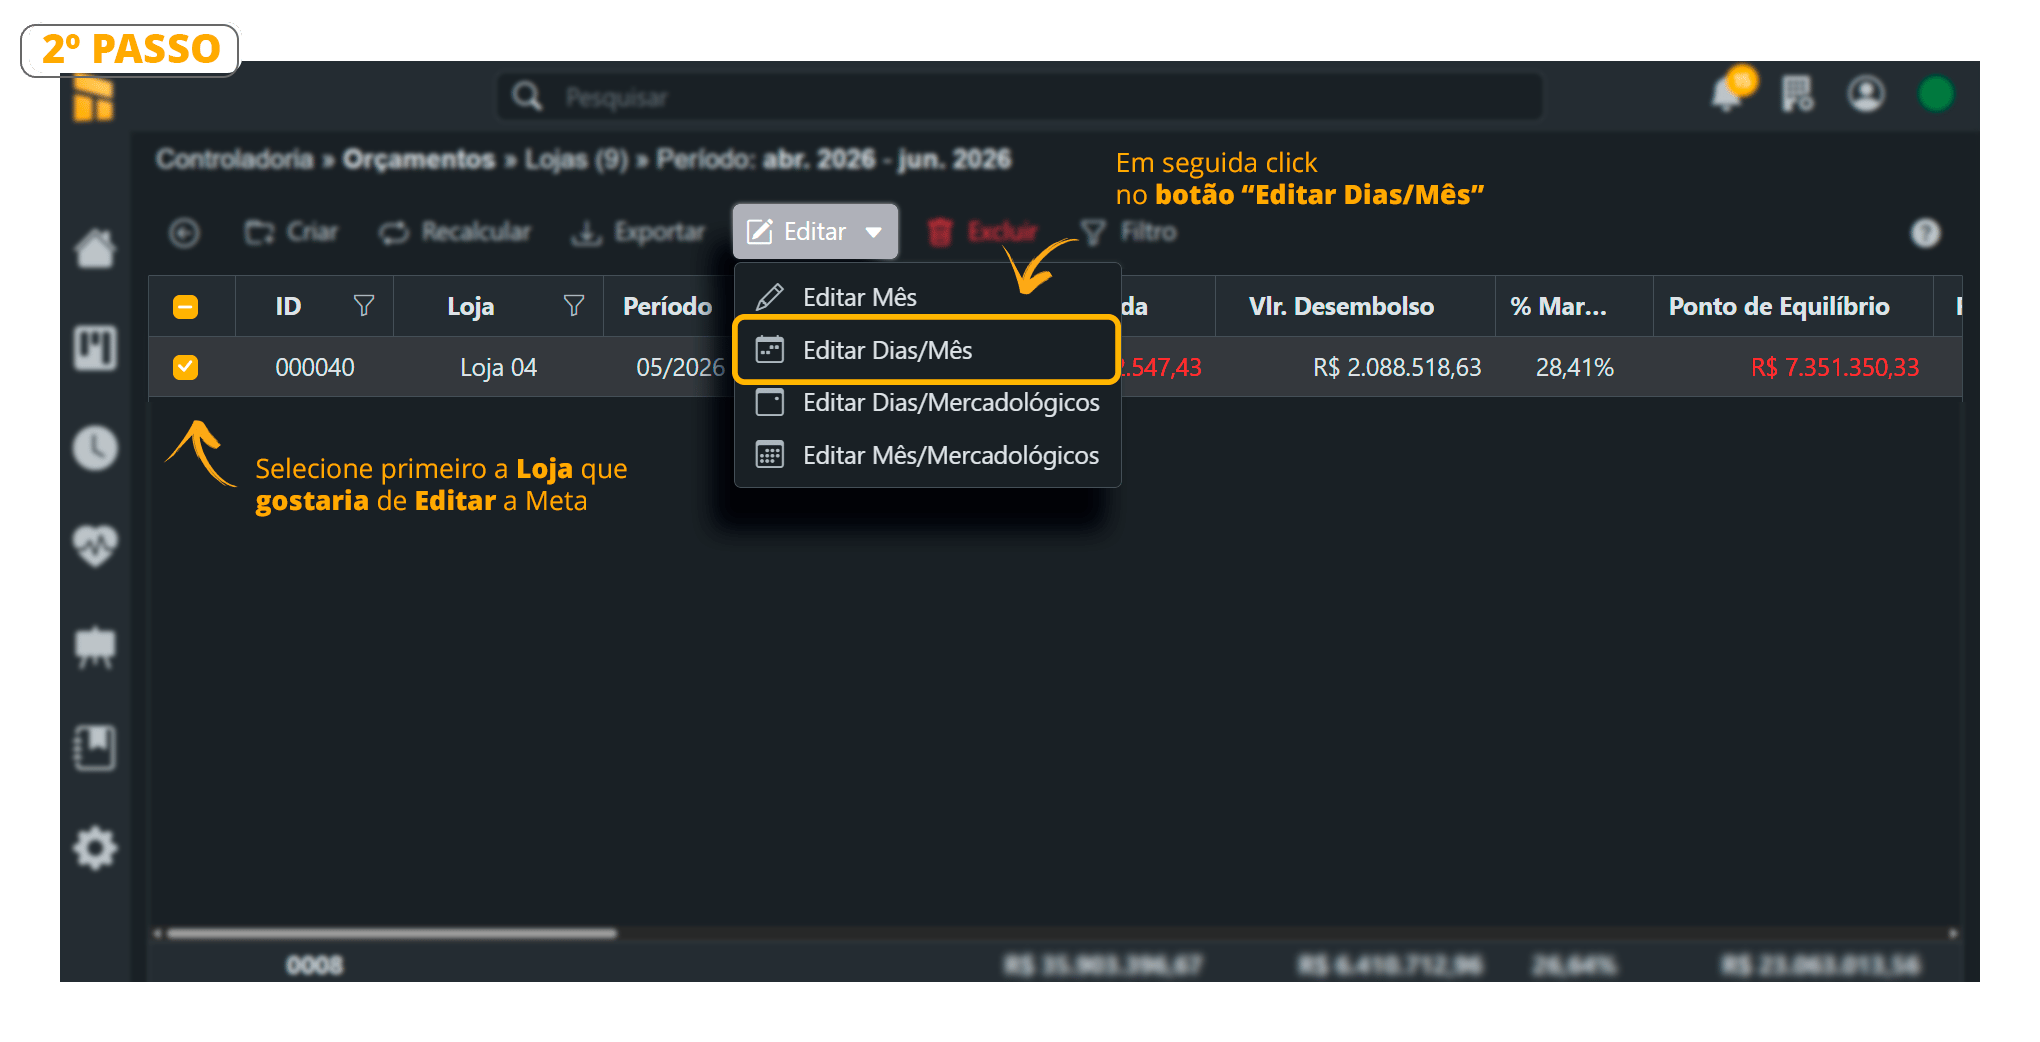
 2. Click “Edit” and choose one of the editing options. In the example below, we are editing by “Days/Month.”
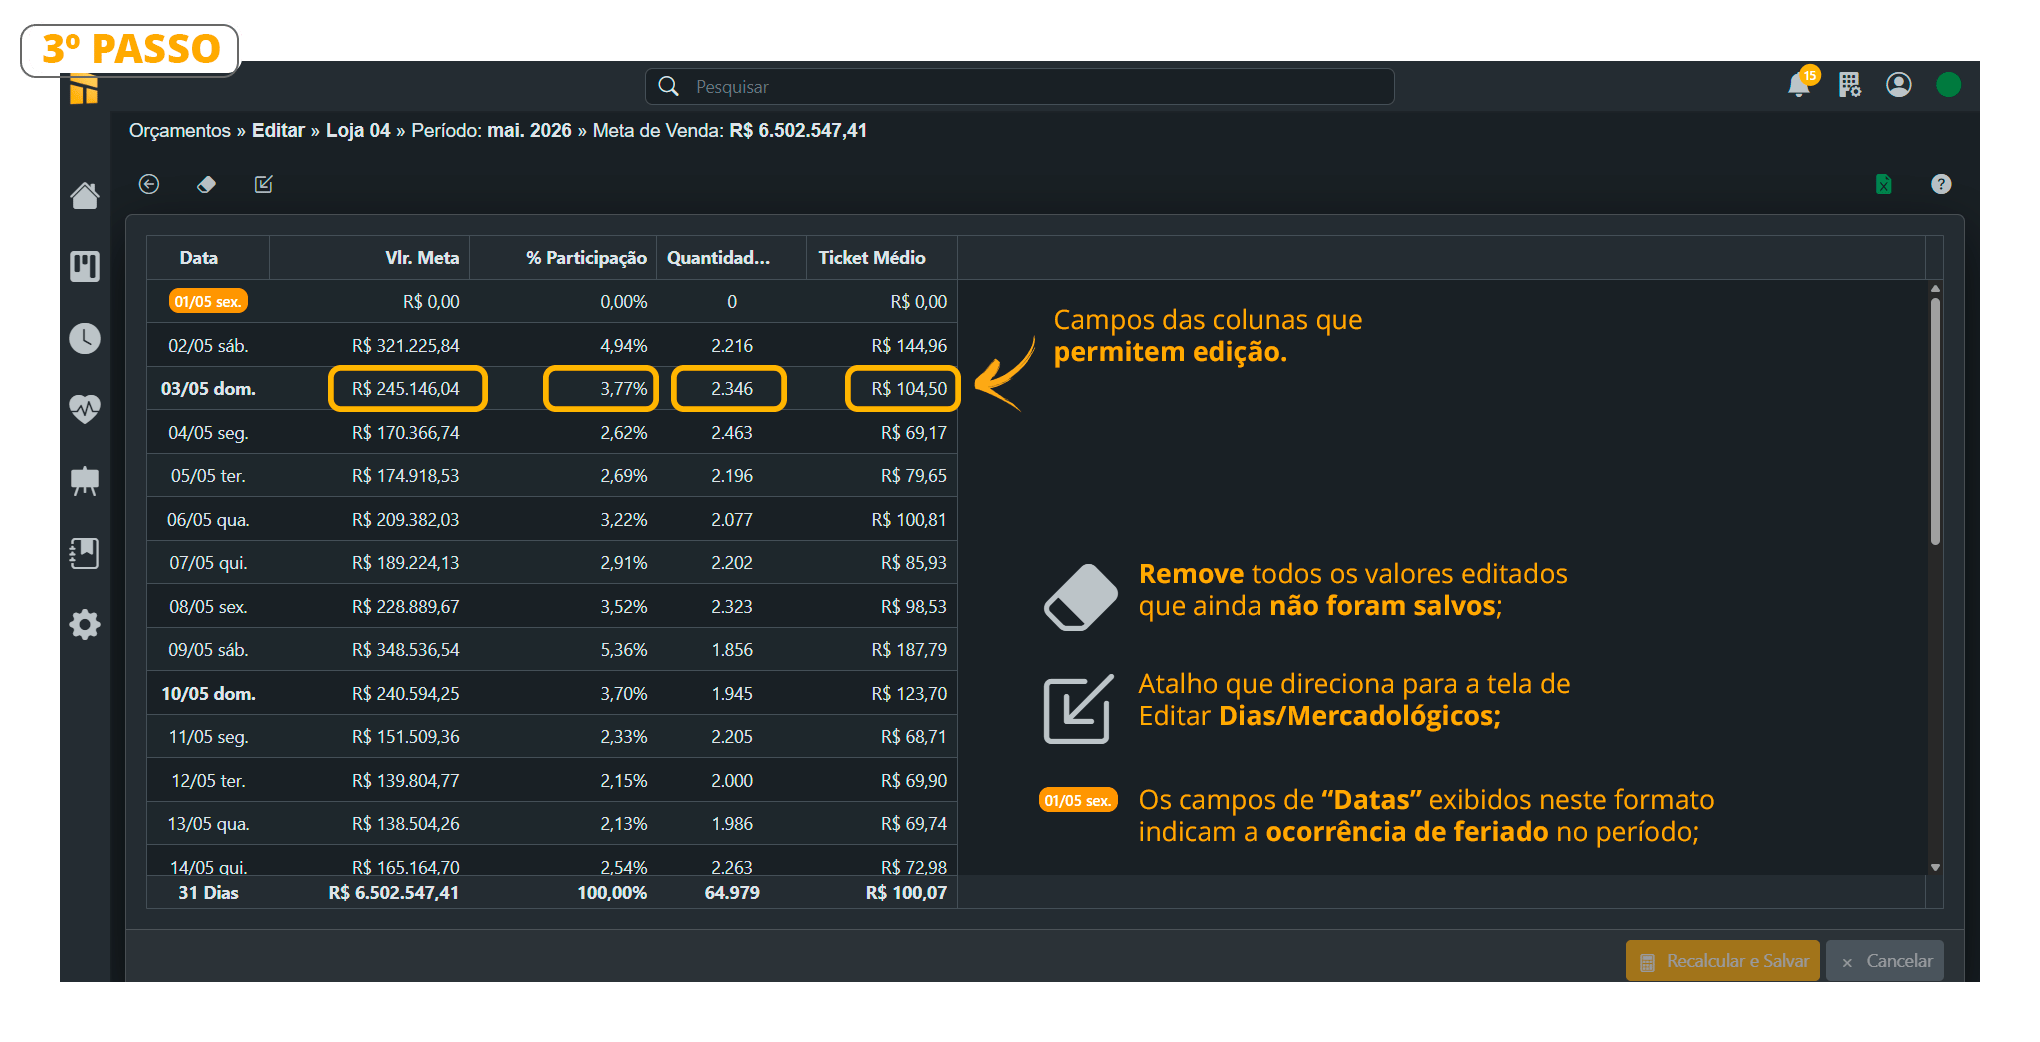
 3. This screen allows you to manually adjust the indicators used to distribute the daily Sales Target, adapting the plan for holidays, seasonality, special events, or specific commercial strategies.
The system automatically recalculates the modified values, maintaining the consistency of the budget for the period.
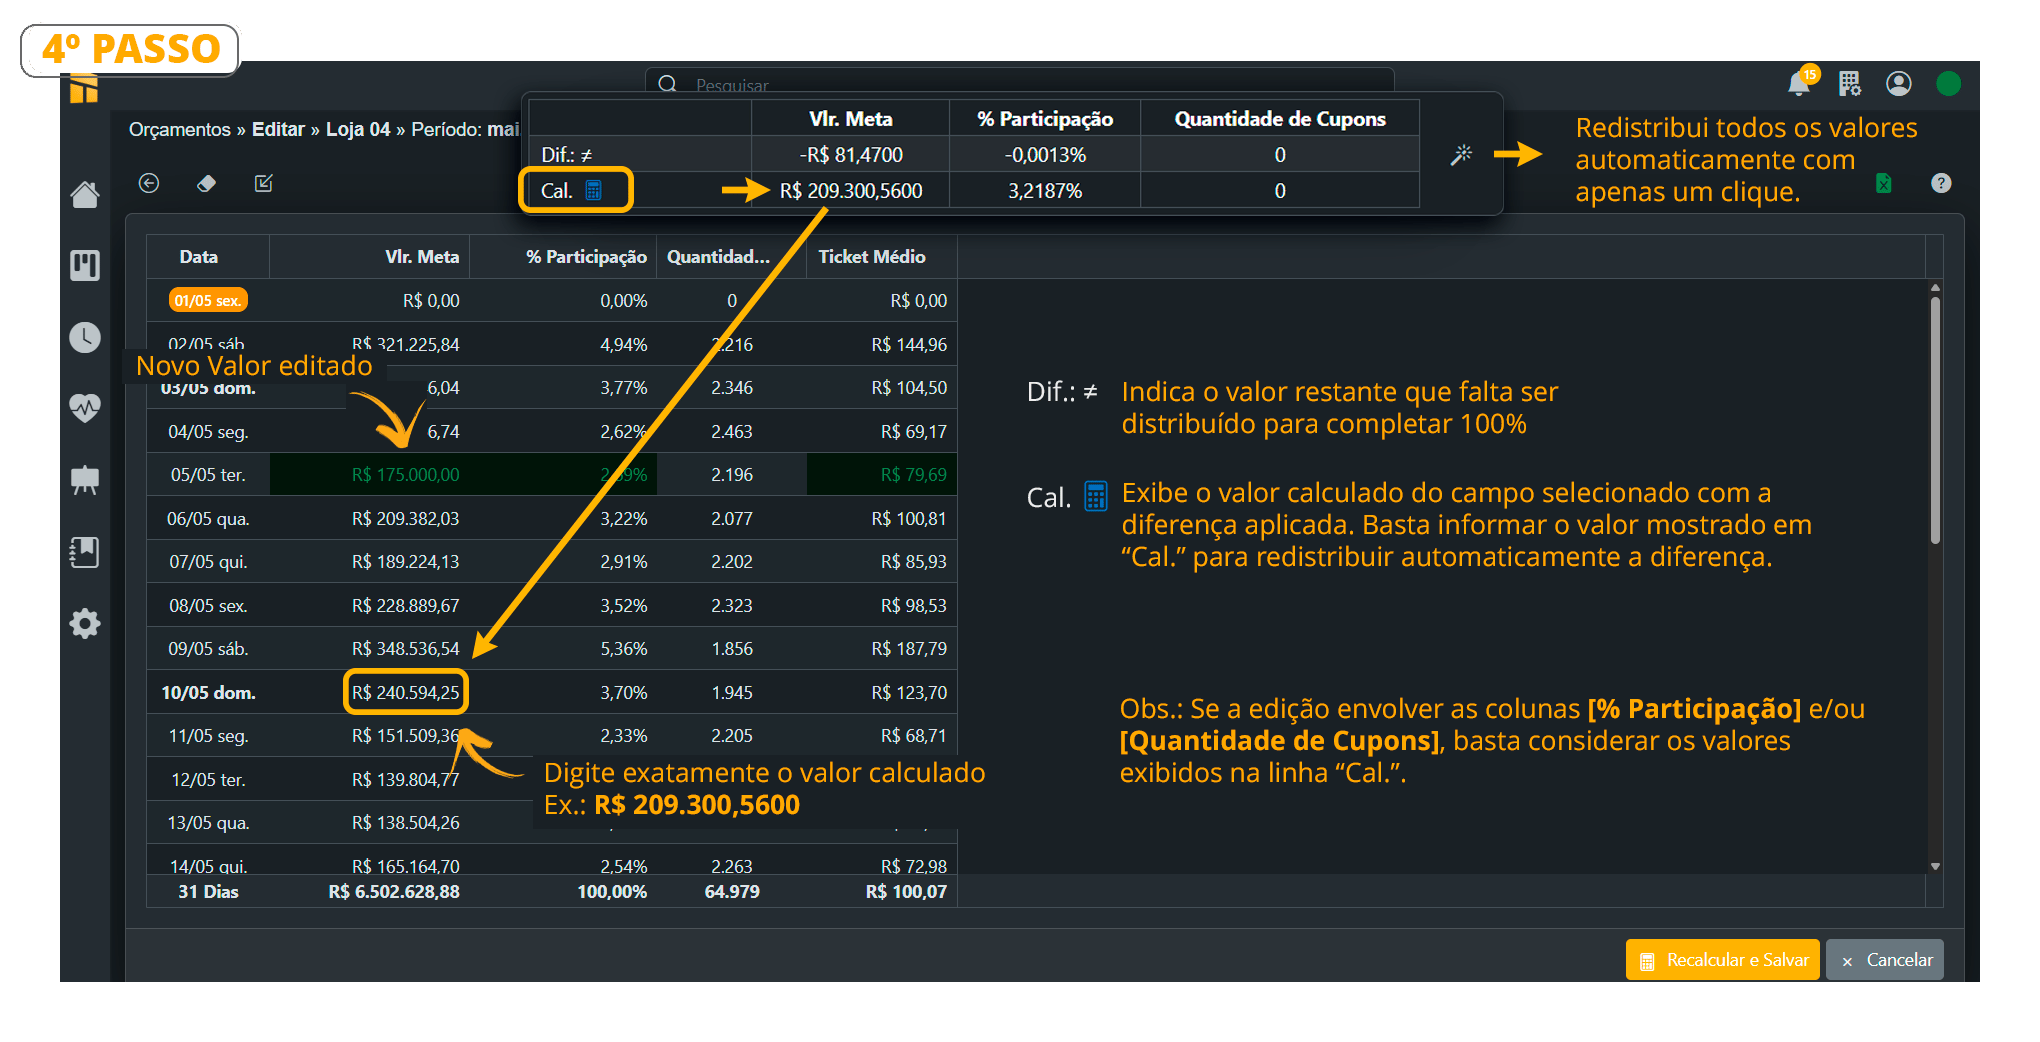
 4. This feature automatically redistributes the values after a manual change, ensuring that the total target remains at 100% and the indicators remain consistent. When you edit a value, the system automatically calculates the resulting difference and provides tools to redistribute this balance among the other records.
 ## **How to Edit Sales Targets BY DAYS/COMMERCIAL CATEGORIES**
[**Click here**](https://youtu.be/QyfTEL6E5lk) to watch the **Complete Editing Video**;
Edit Sales Targets by Days/Commercial Categories
1. Controllership> Budget
2. Click “Edit” and choose one of the editing options. In the example below, we are editing by “Days/Commercial Categories.”
## **How to Edit Sales Targets BY DAYS/COMMERCIAL CATEGORIES**
[**Click here**](https://youtu.be/QyfTEL6E5lk) to watch the **Complete Editing Video**;
Edit Sales Targets by Days/Commercial Categories
1. Controllership> Budget
2. Click “Edit” and choose one of the editing options. In the example below, we are editing by “Days/Commercial Categories.”
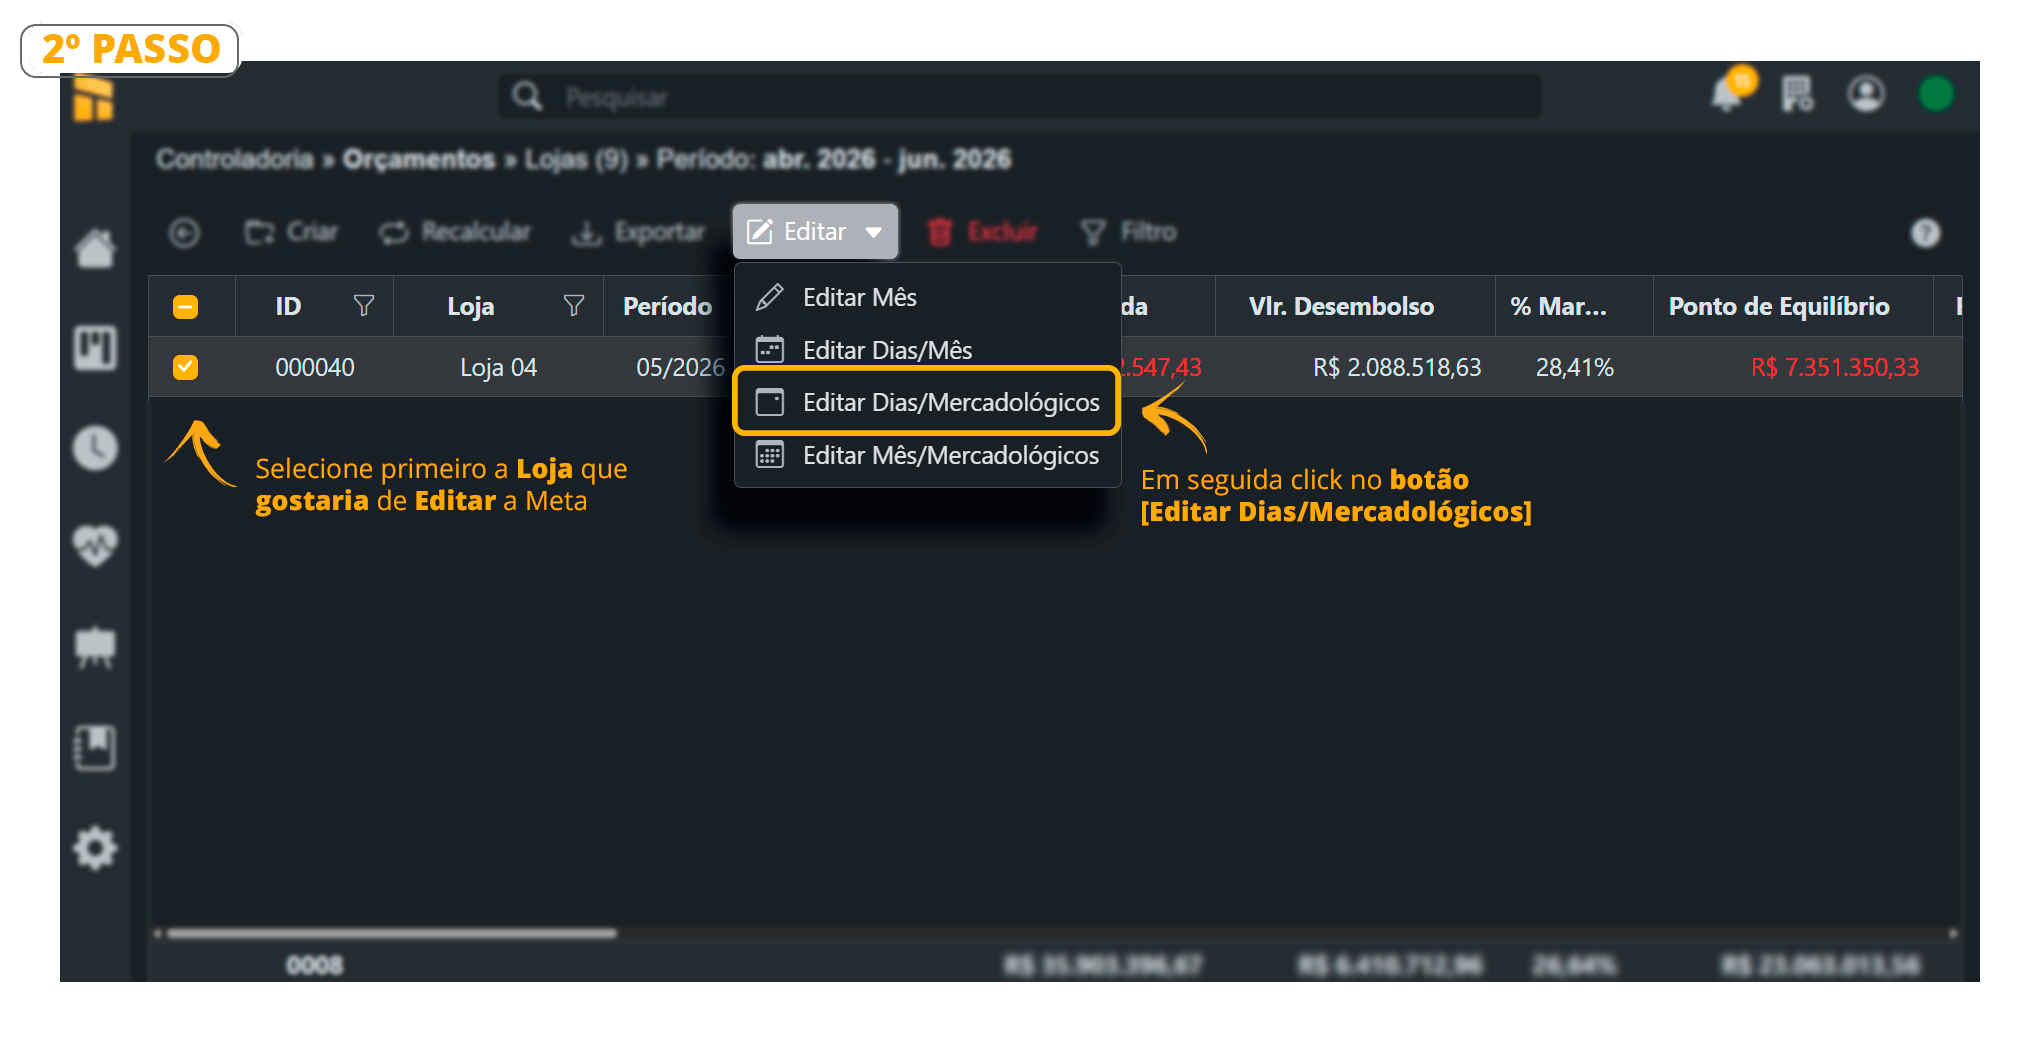 3. See below the columns that can be edited;
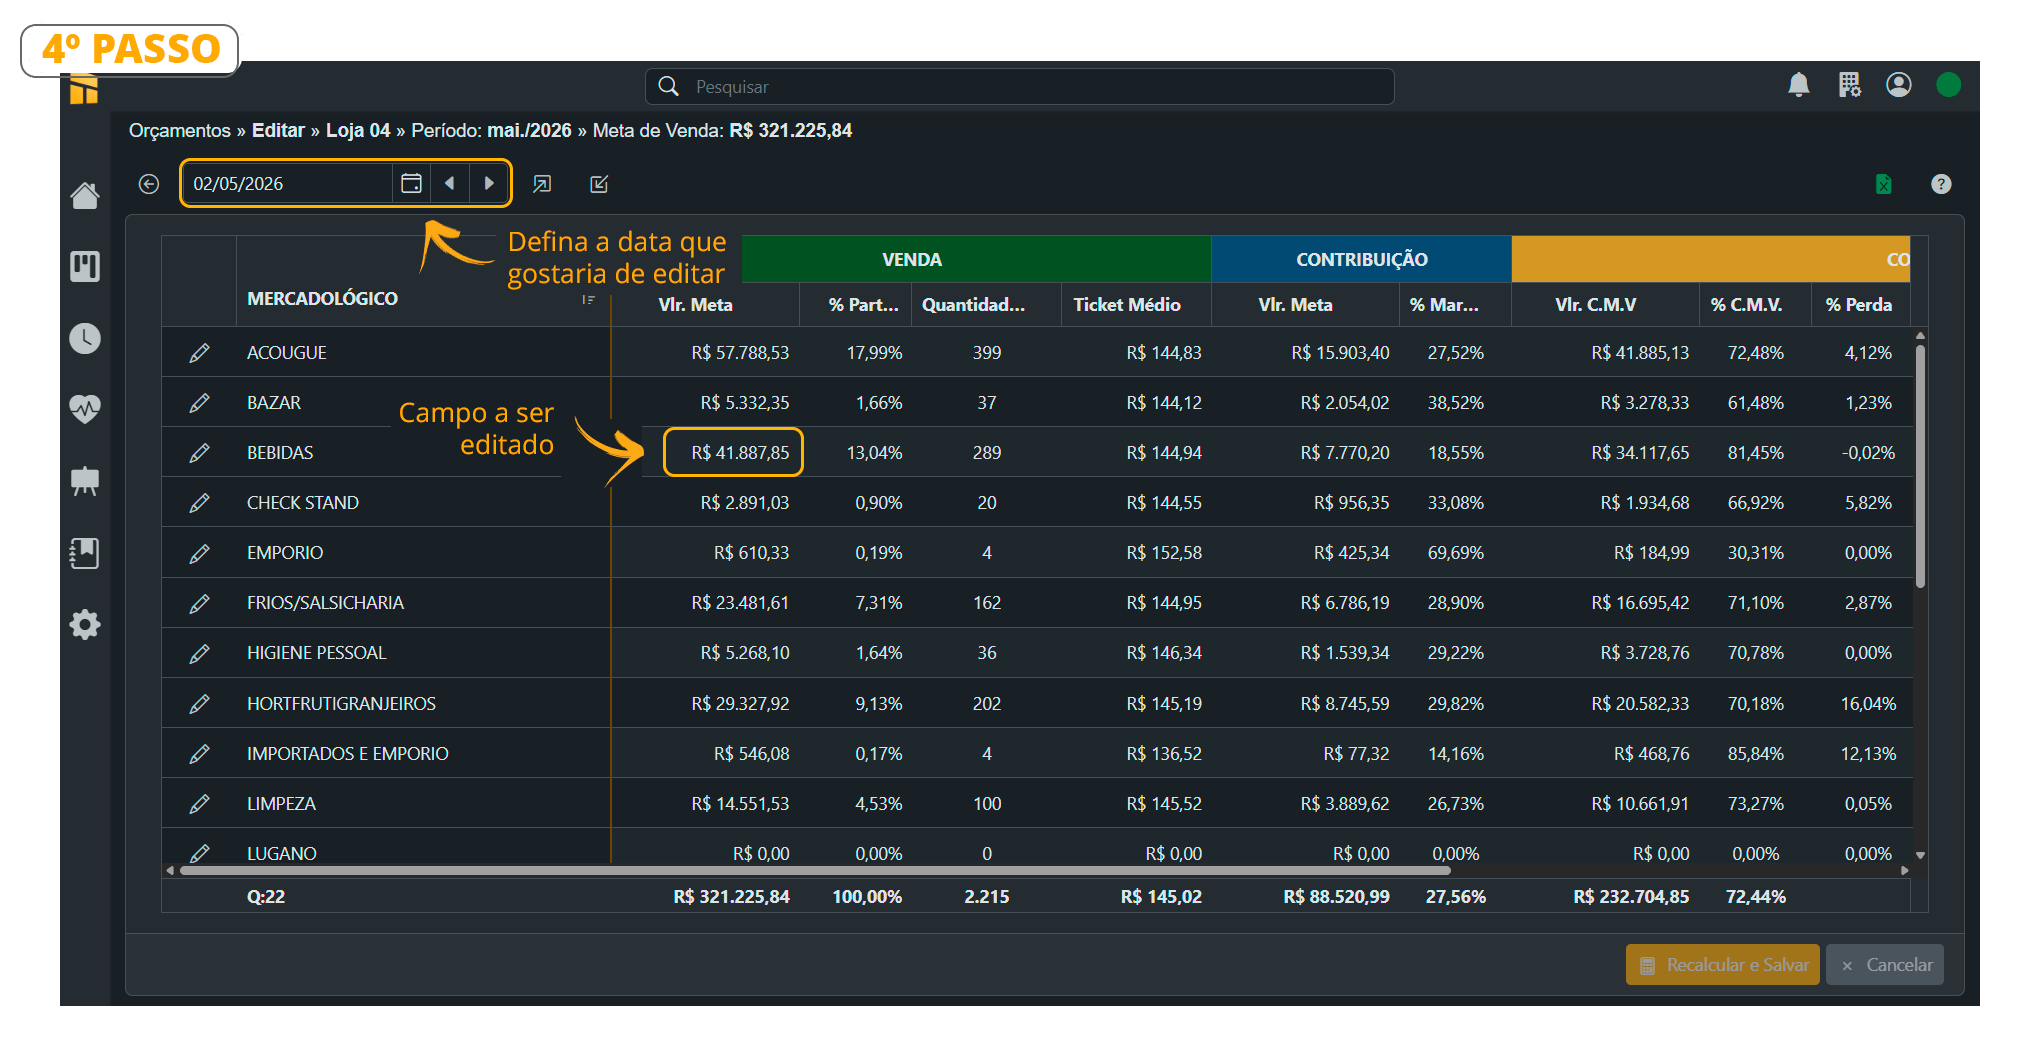
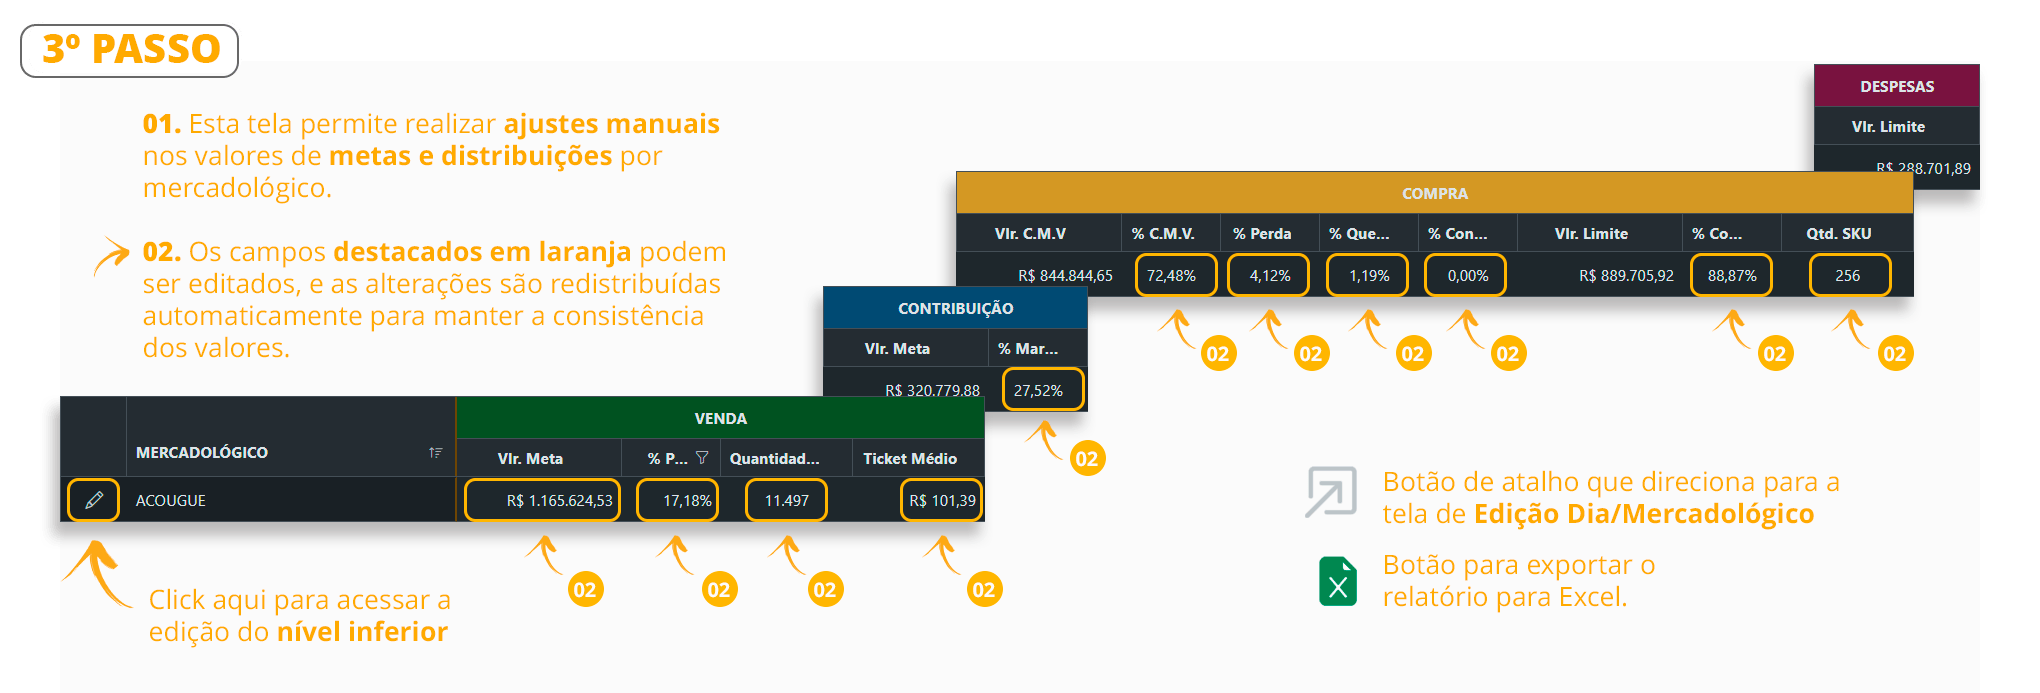 4. See the editing process below;
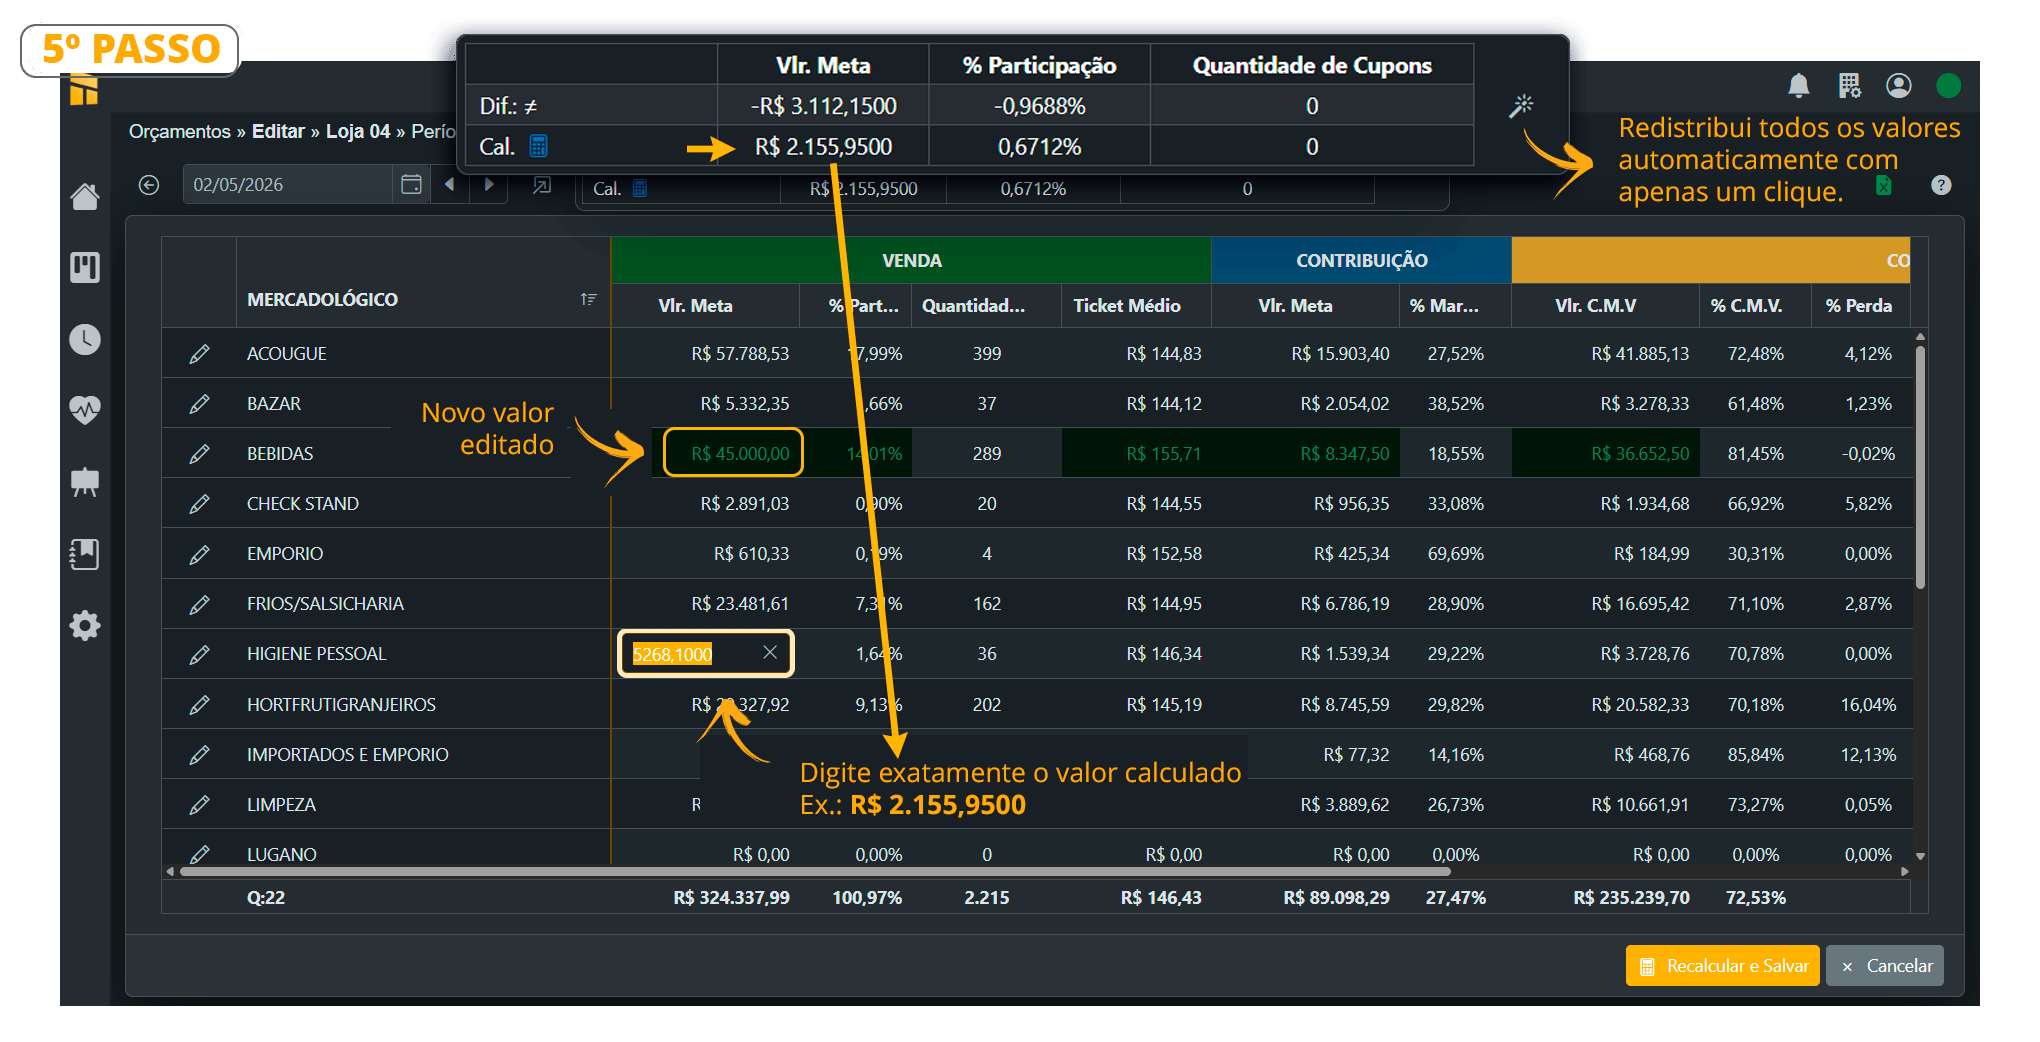
 5. See the target editing and redistribution processes below;
 ## **How to Edit Sales Targets BY MONTH/COMMERCIAL CATEGORY**
[Click here](https://www.youtube.com/watch?v=QyfTEL6E5lk) to watch the Complete Editing Video;
Edit Sales Targets by Month/Commercial Category Follow the steps shown in the images below.
1. Controllership> Budget
2. Choose the Store you want to “Edit” and select the Editing type, as shown in the image below.
## **How to Edit Sales Targets BY MONTH/COMMERCIAL CATEGORY**
[Click here](https://www.youtube.com/watch?v=QyfTEL6E5lk) to watch the Complete Editing Video;
Edit Sales Targets by Month/Commercial Category Follow the steps shown in the images below.
1. Controllership> Budget
2. Choose the Store you want to “Edit” and select the Editing type, as shown in the image below.
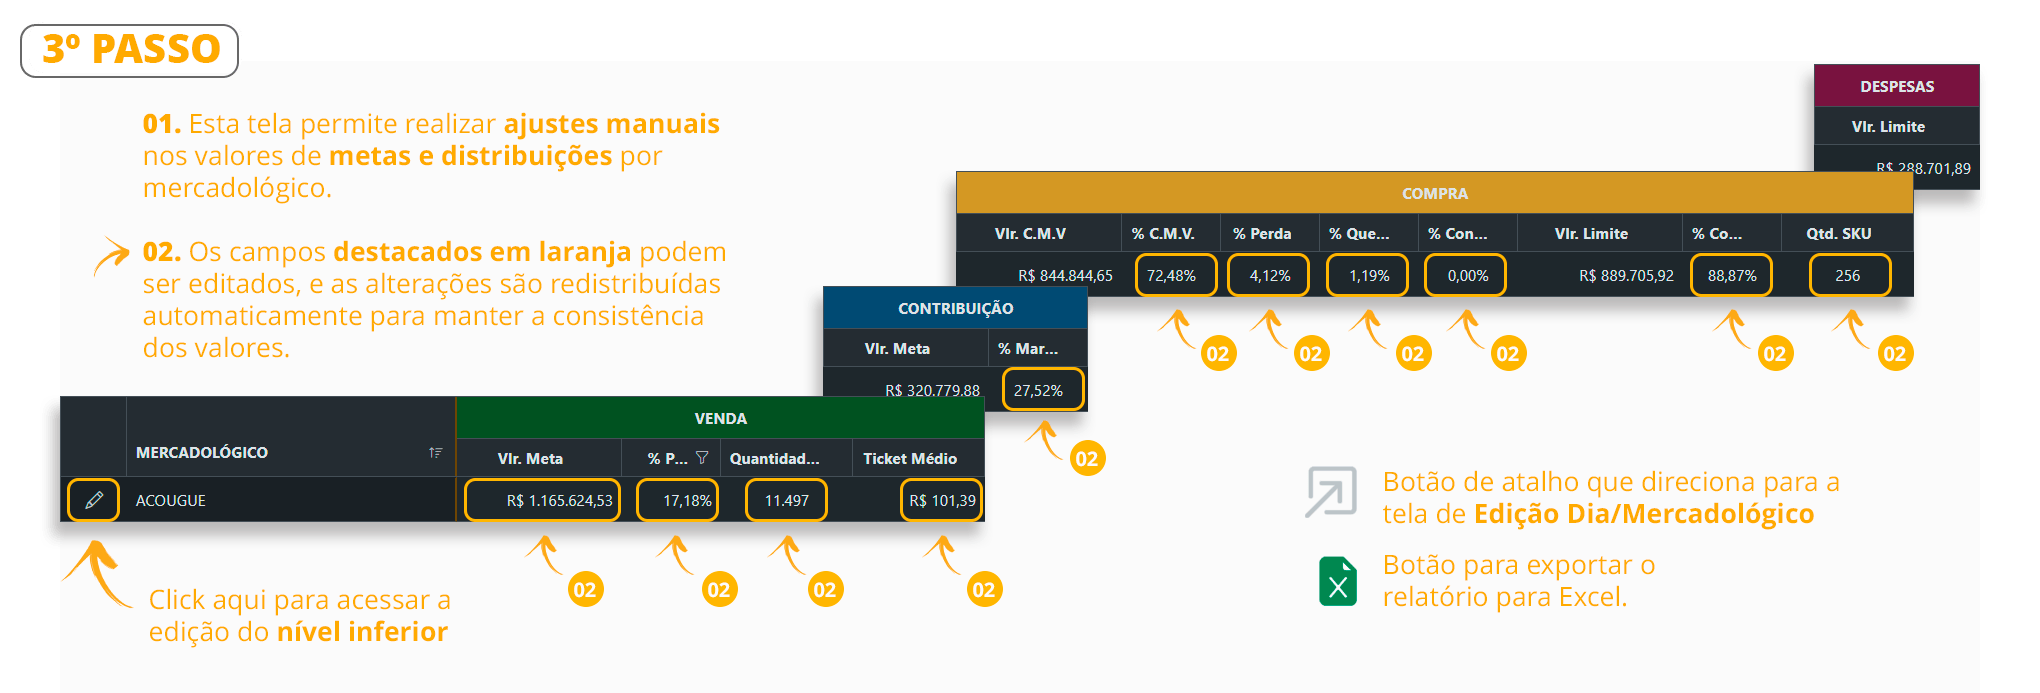
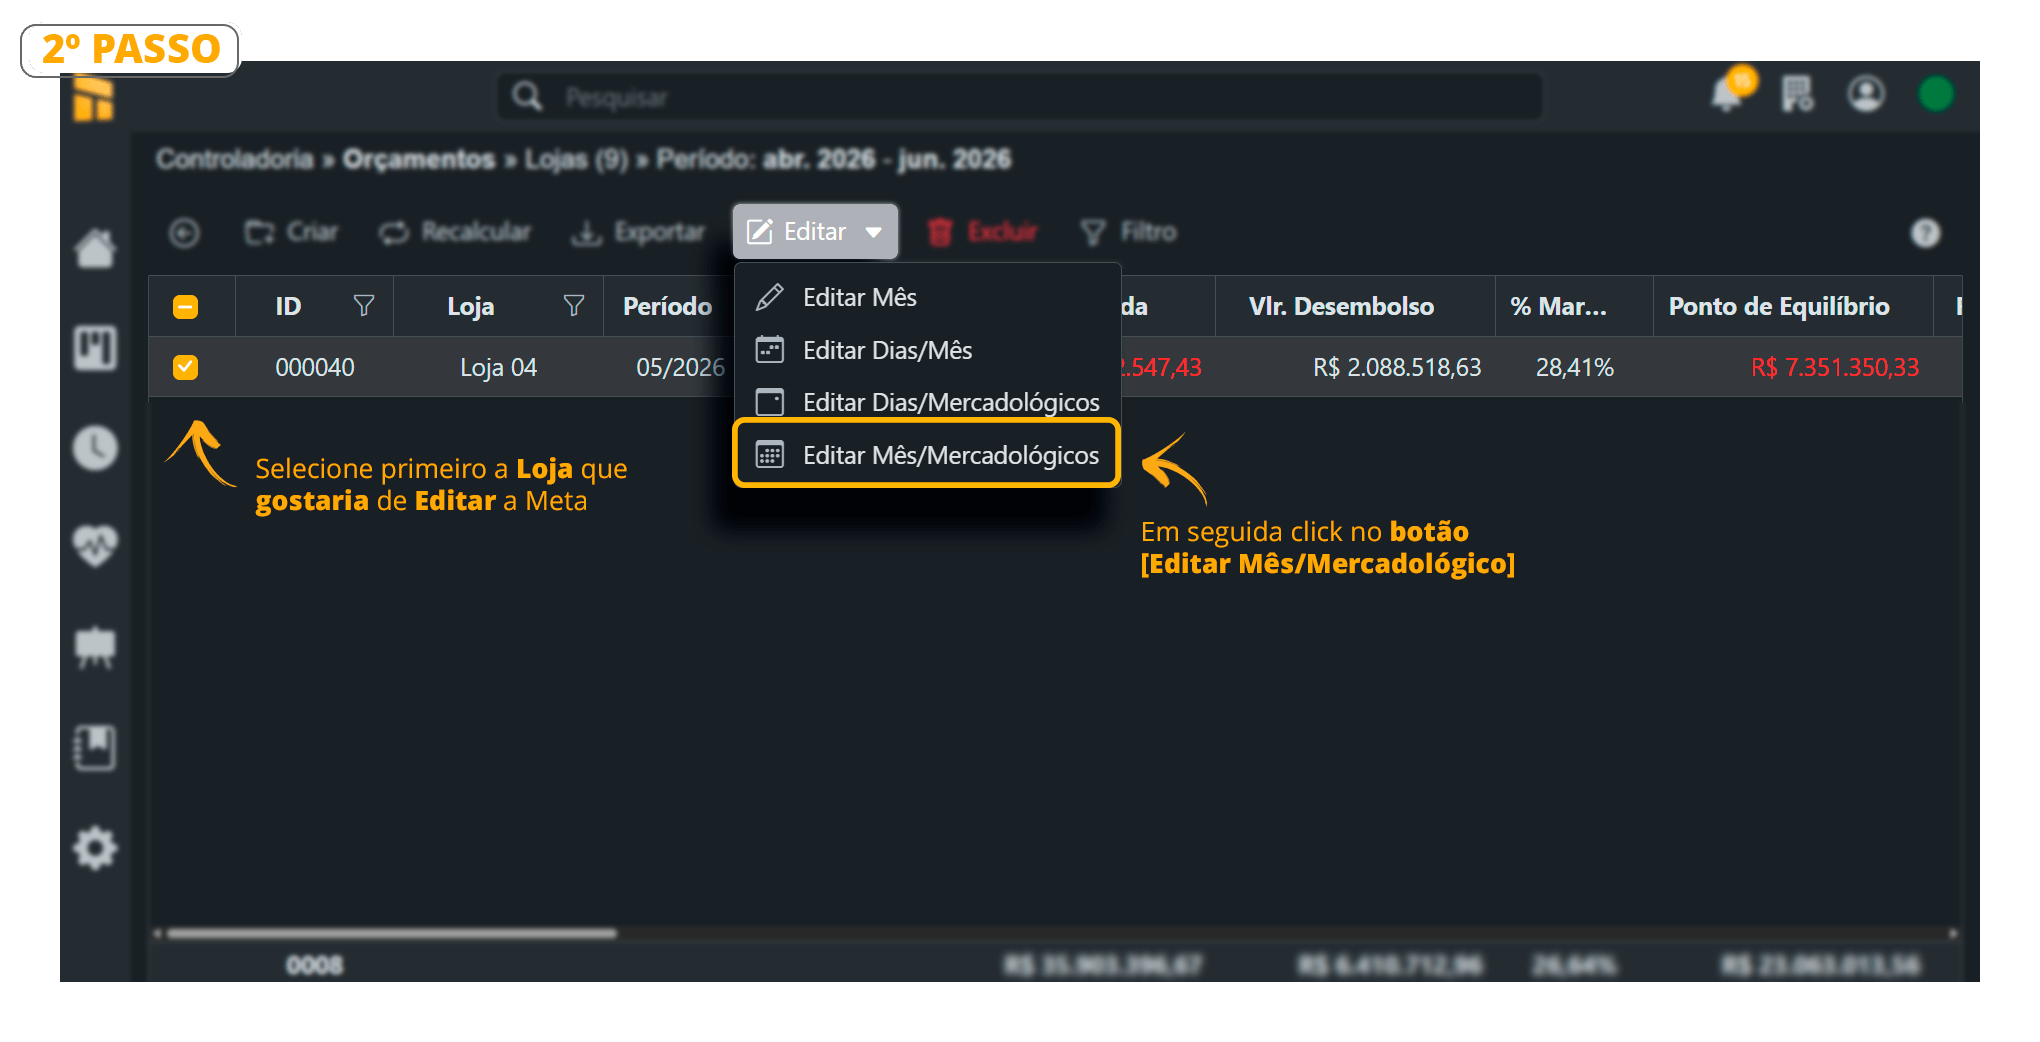 3. See below the columns that can be edited;
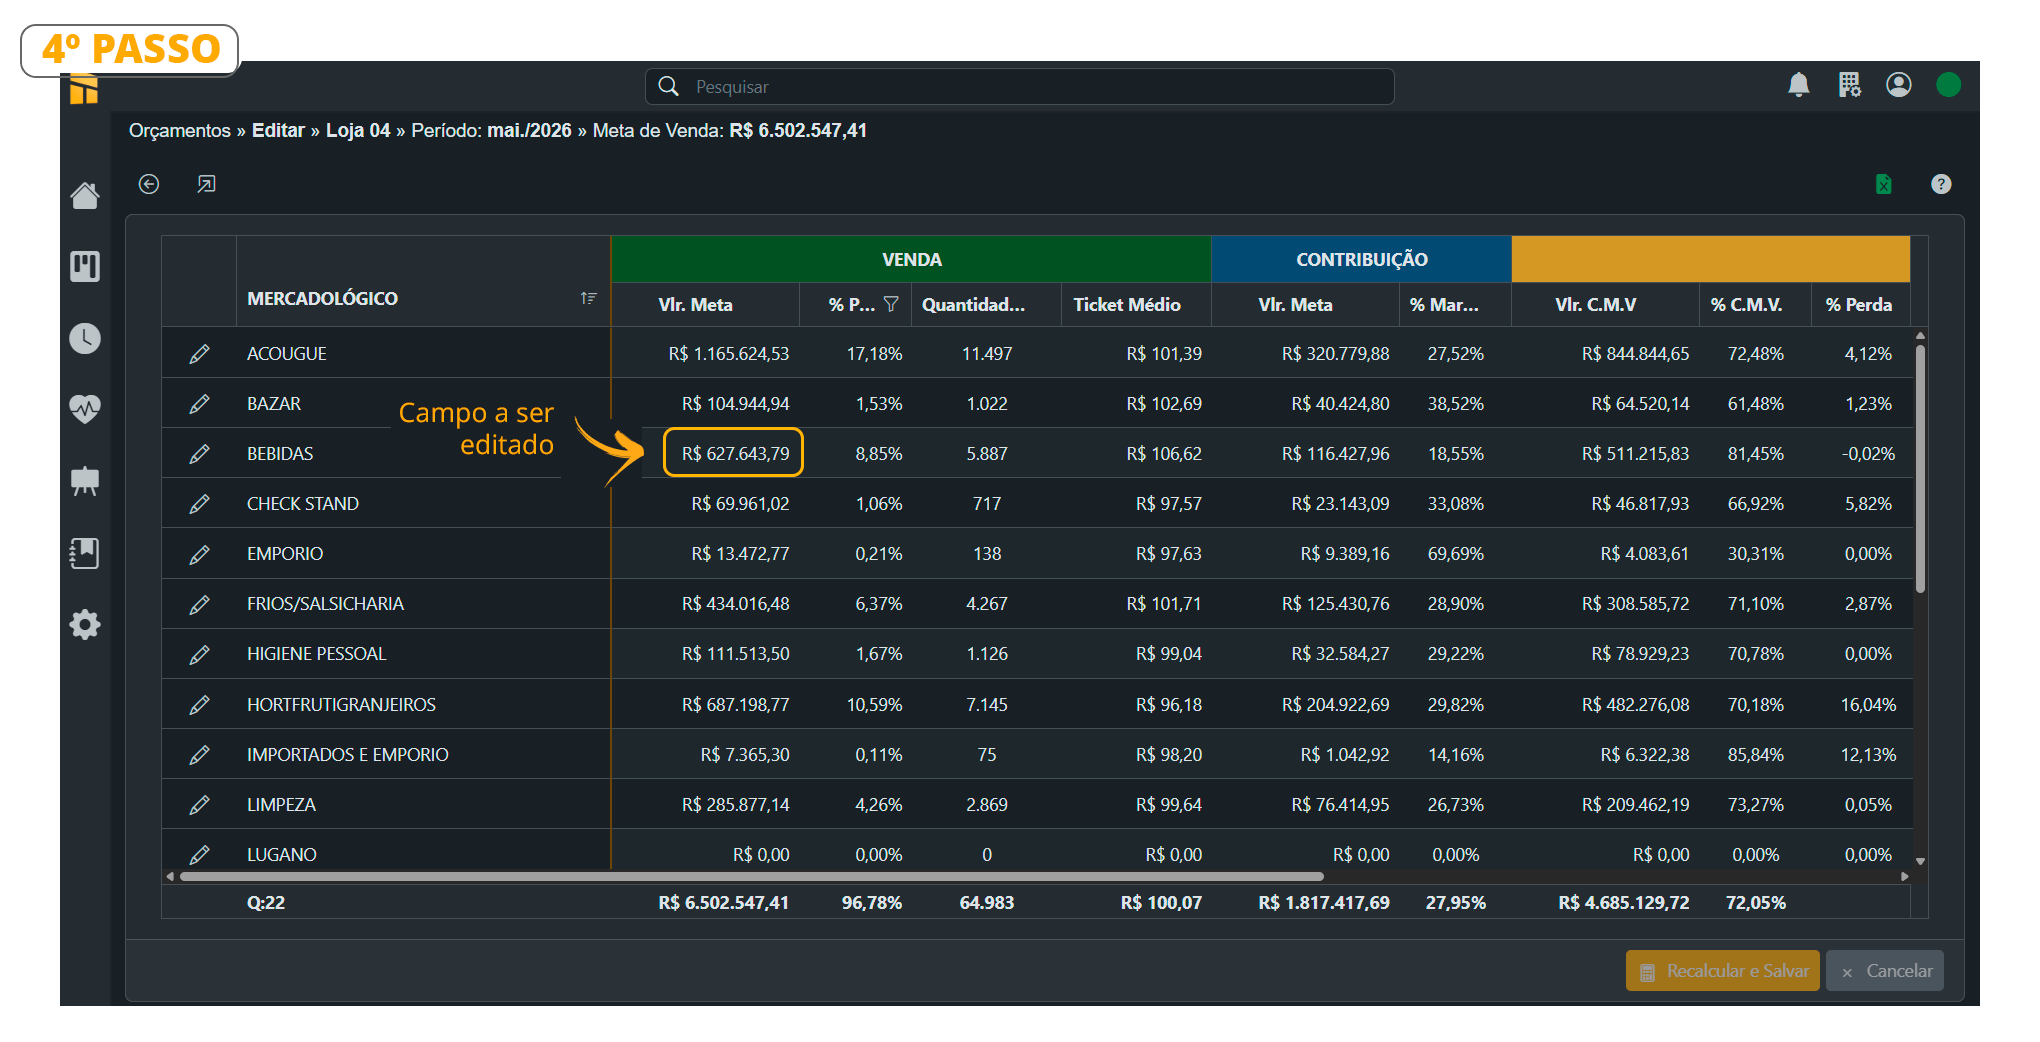
 4. See the editing process below;
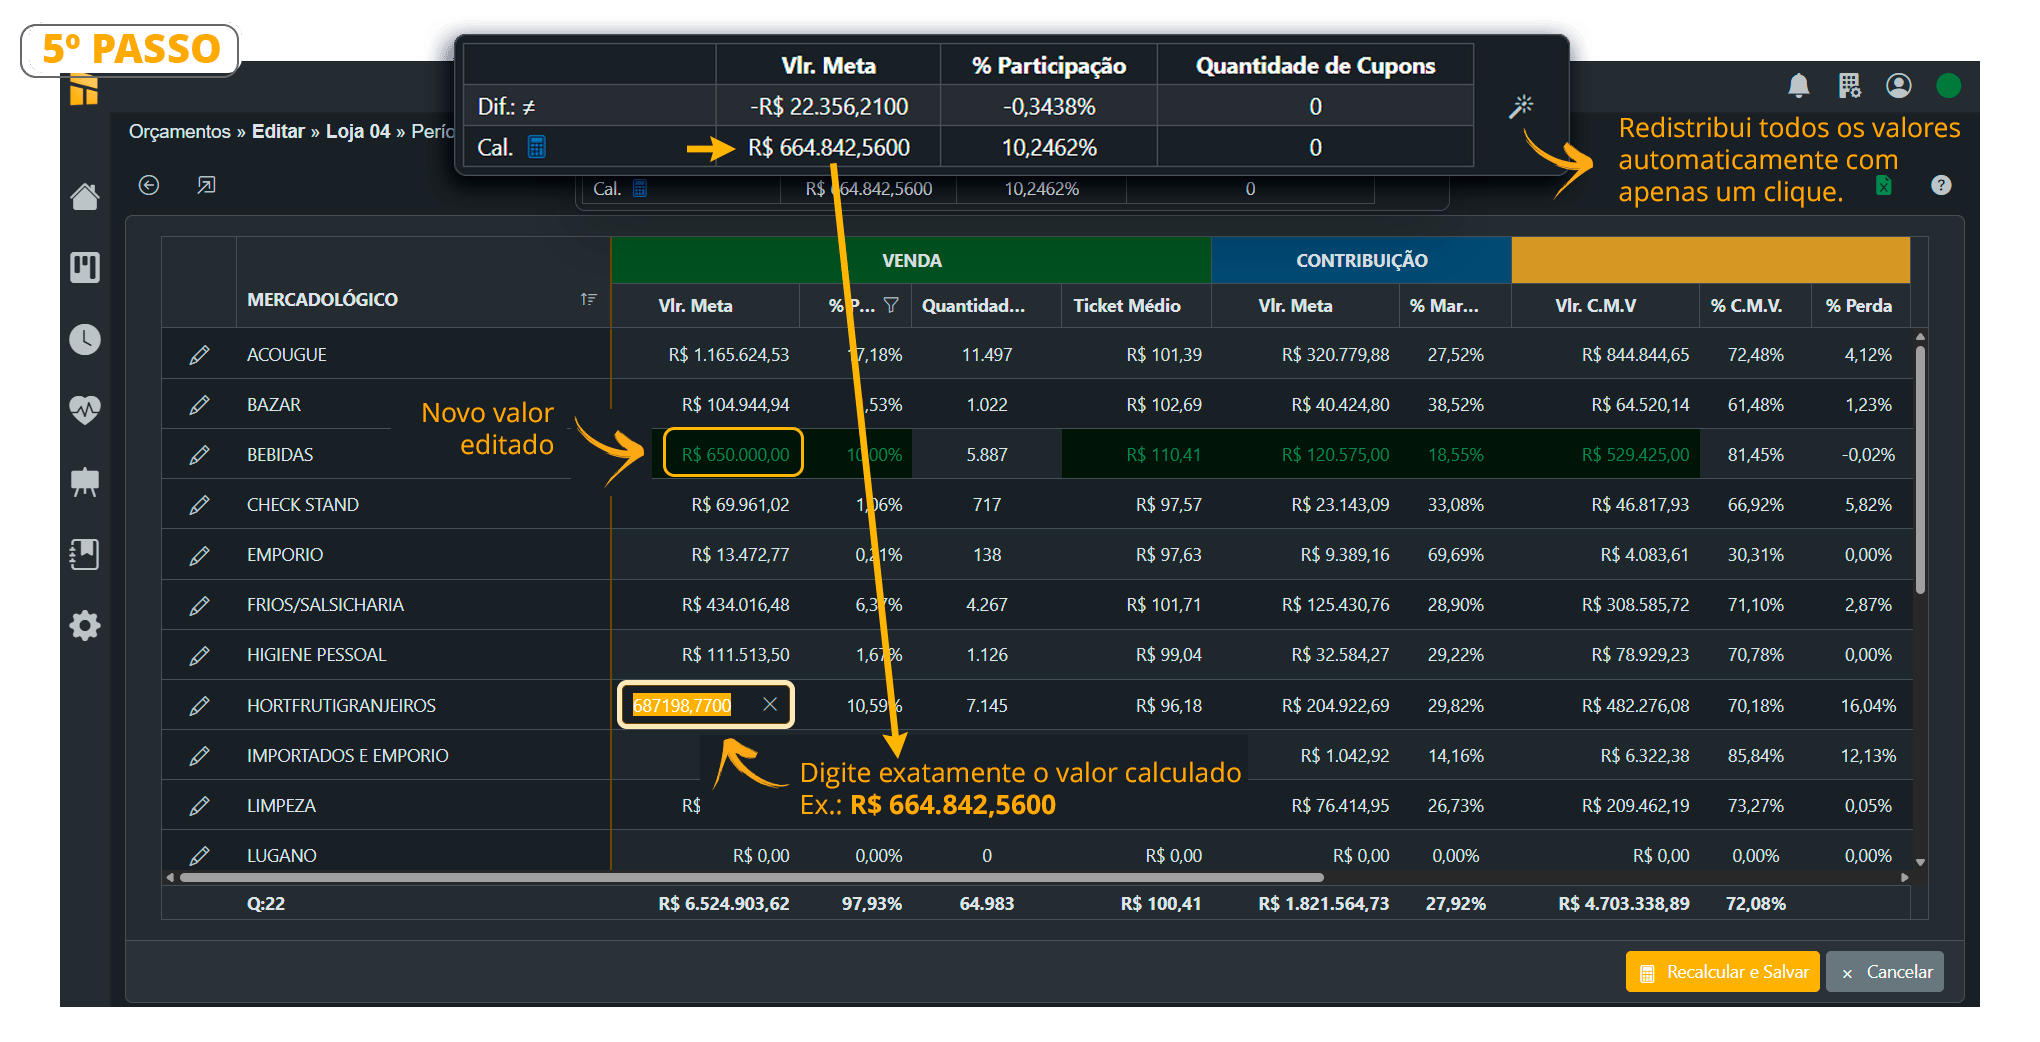
 5. See how to edit the values in the example below
 ## **Average Margin (Budget) vs Contribution Margin %**
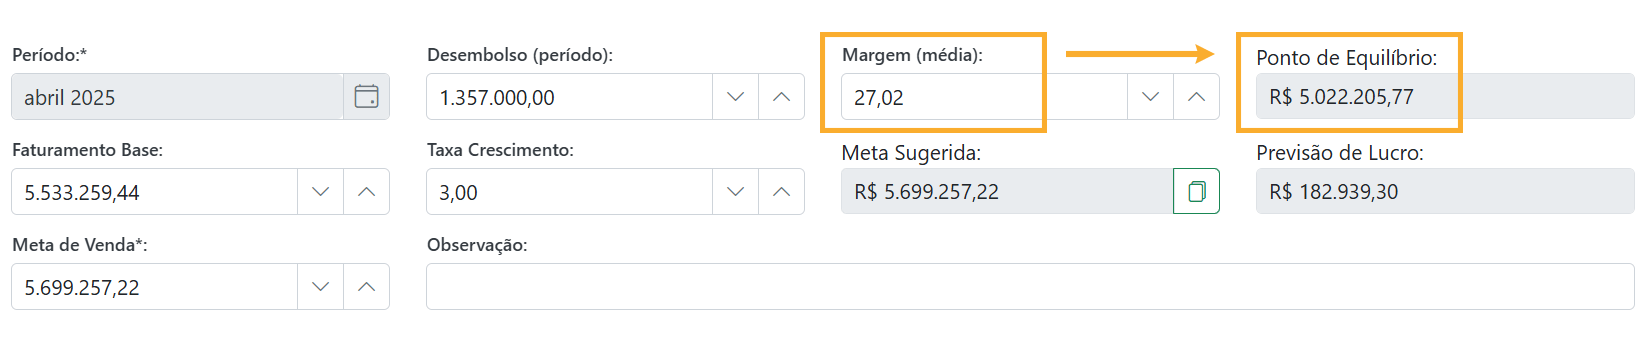
When calculating the Average Margin while **Creating** the budget, Controller uses the average from the last two months, or the customer enters the desired margin. **This margin is used to calculate the Break-Even Point.**
## **Average Margin (Budget) vs Contribution Margin %**
When calculating the Average Margin while **Creating** the budget, Controller uses the average from the last two months, or the customer enters the desired margin. **This margin is used to calculate the Break-Even Point.**
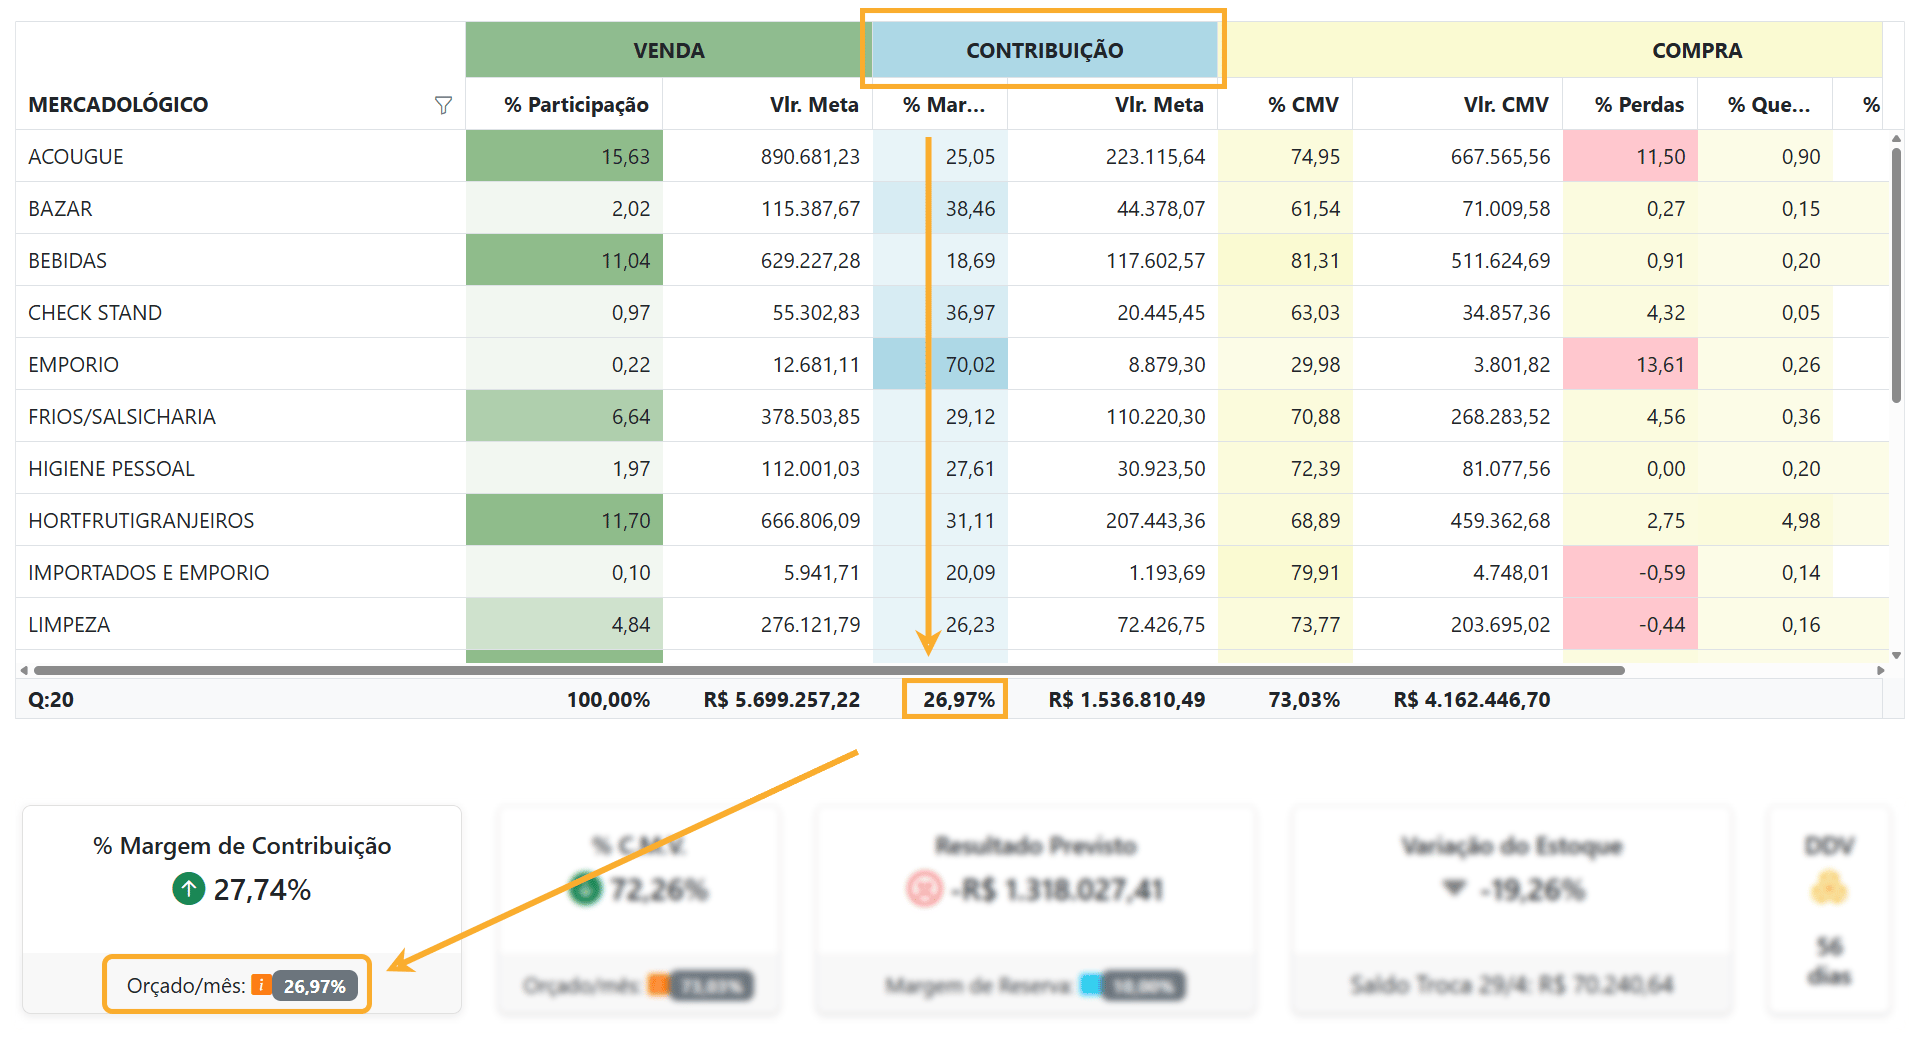
 When moving to the next routine, **Calculate Budget**, Controller uses historical data to distribute the **Sales target by commercial category** and then **by day**, while respecting **the period's seasonality**. This defines the **Contribution Margin**, which is also based on previous months.
The Margin determined after this entire calculation is the **Contribution Margin** shown in the budget details and as an indicator on the Contribution Margin % Card in **Metrics.**
When moving to the next routine, **Calculate Budget**, Controller uses historical data to distribute the **Sales target by commercial category** and then **by day**, while respecting **the period's seasonality**. This defines the **Contribution Margin**, which is also based on previous months.
The Margin determined after this entire calculation is the **Contribution Margin** shown in the budget details and as an indicator on the Contribution Margin % Card in **Metrics.**
 ## **Check Expenses: Controller 360 vs VR Master**
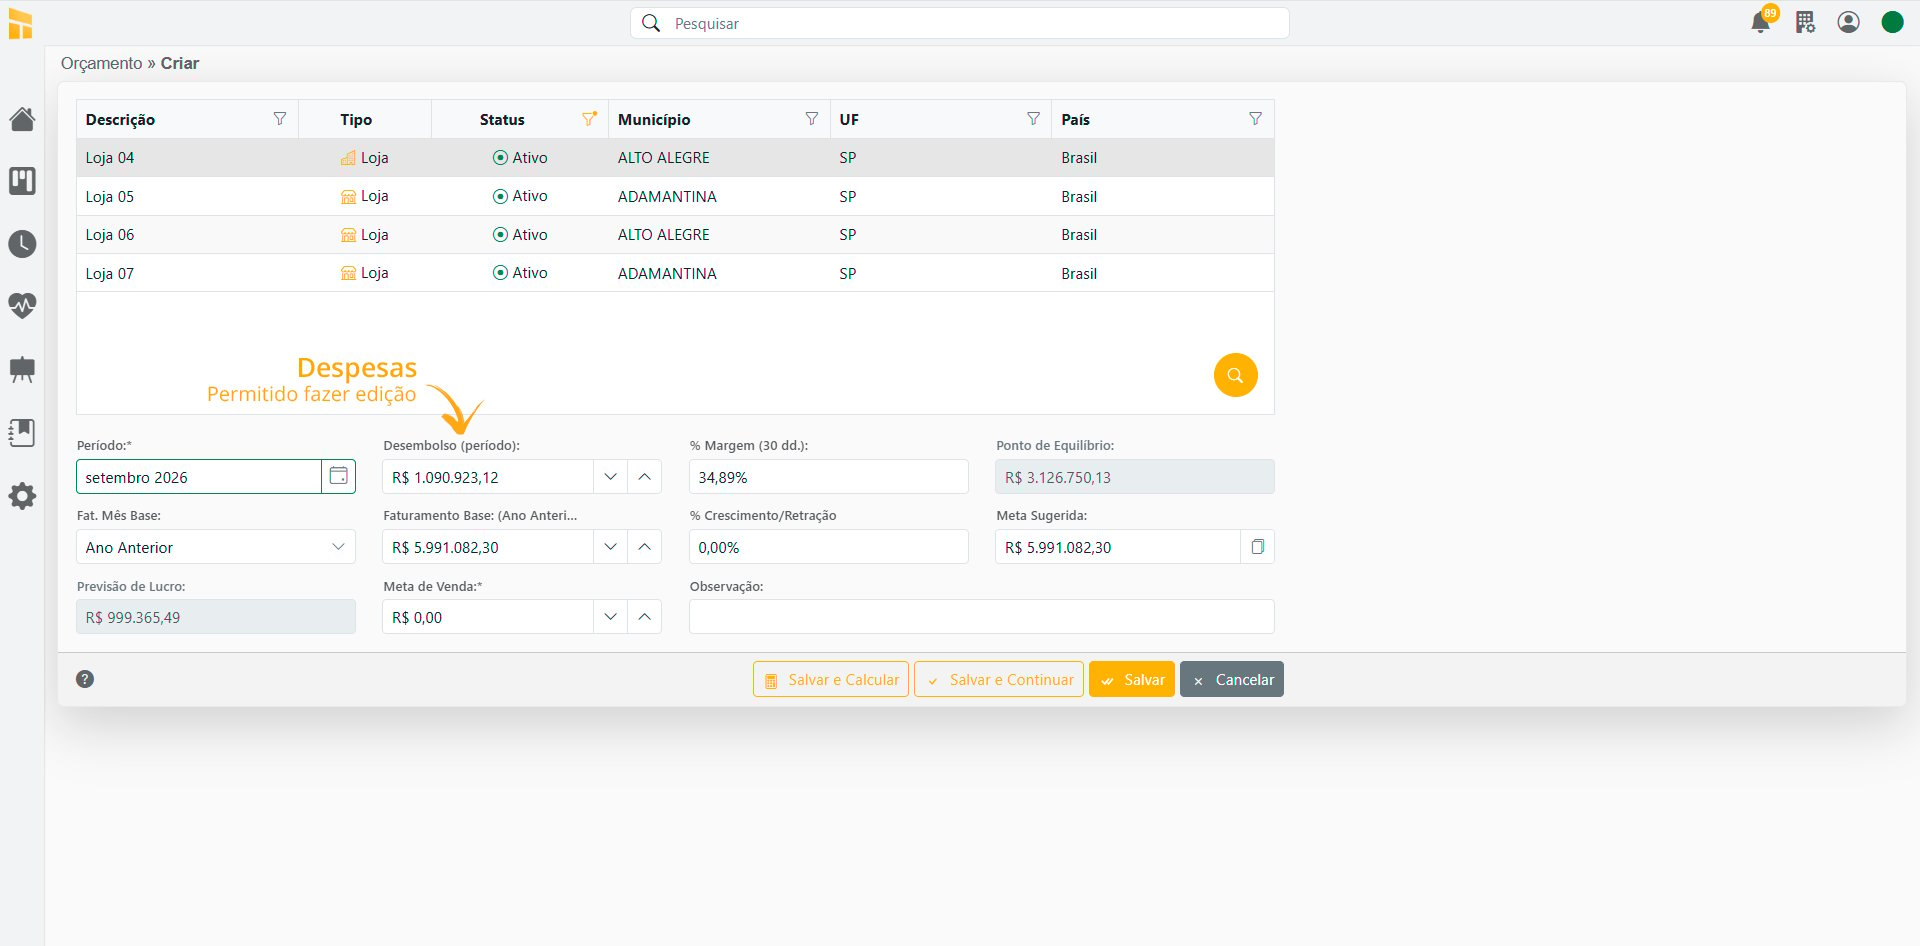
See below the “Disbursement” field, which displays the expenses entered in VR Master.
## **Check Expenses: Controller 360 vs VR Master**
See below the “Disbursement” field, which displays the expenses entered in VR Master.
 To check the data, go to:
**Finance/Accounts Payable/Supplier**
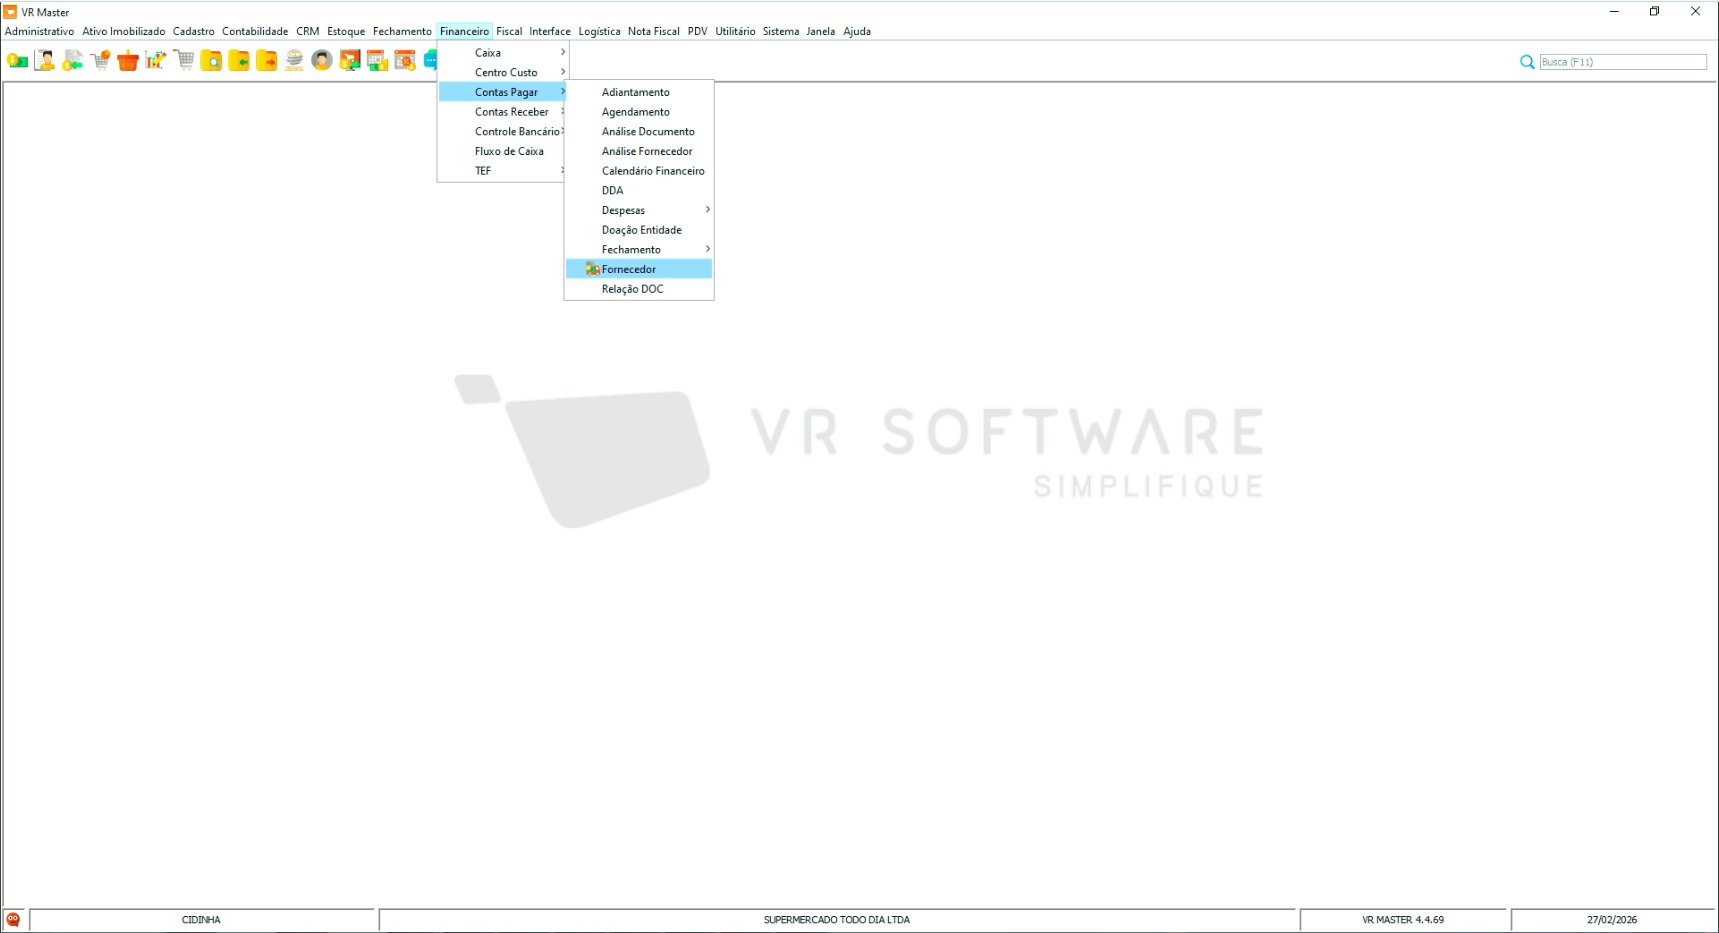 See how the data appears in VR Master for checking in the image below;
.png?fit=max&auto=format&n=1bTJvCBiGyykVHT3&q=85&s=37f0013c2a9f02b86ff1f66c452b79b2)